Search the Community
Showing results for tags 'tutorial'.
Found 3 results
-
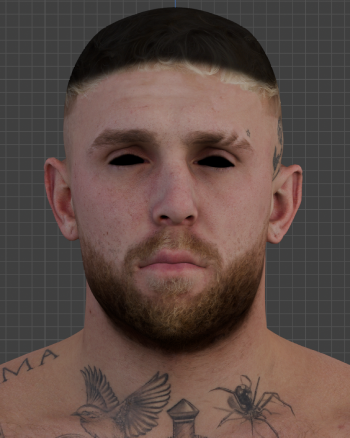
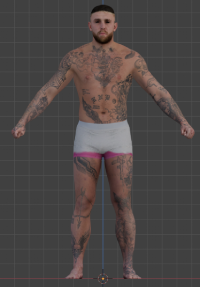
1. Open the .assetbundle file in UABEA 2. Decompress to memory 3. Export All 4. Open up AssetStudio and load the folder where you exported the assets from UABEA 5. Once loaded, go to asset list 6. Body meshes are listed as "Body" and textures are listed as "FirstName_LastName_BaseMap" 7. Click on the asset to preview it 8. Right click and press export and the body meshes will be exported as .OBJ files and the textures will be exported as .PNGs Note: if you run into an error regarding version specification, specify it as 6000.0.24f1 UABEA AssetStudio (updated)

-
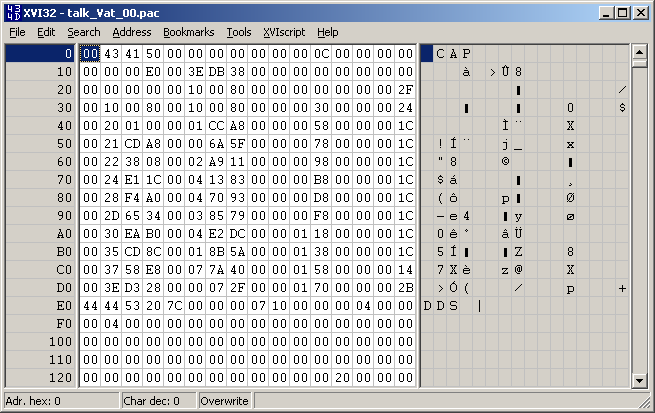
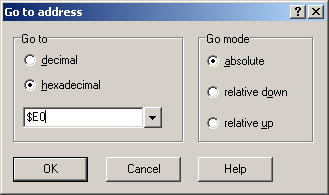
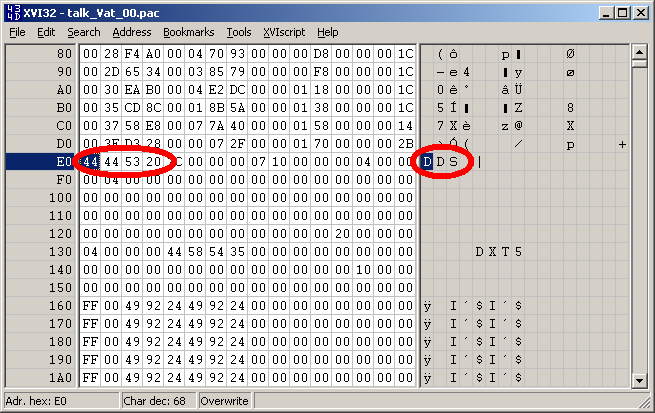
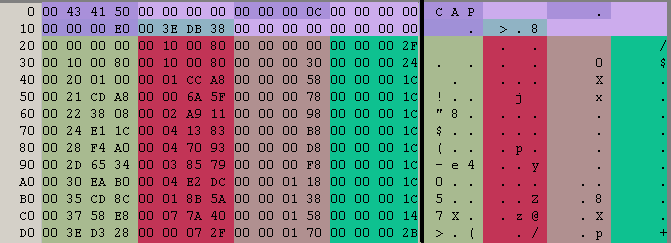
Original poster great aluigi A real example/tutorial about a not-so-simple archive format. I think this is a bit advanced for beginners but I wanted to do something based on a recent file format I analyzed. The sample is attached: talk_Vat_00.zip Tools: QuickBMS http://quickbms.aluigi.org Hex editor if you don't have idea of what to take, try XVI32 Read hex, speak hex, eat hex: forget the decimal notation and think only to 0xNUMBER, it's what will help you during reversing... so 10 is 0xa. Things to notice: Do we have a magic number? It's a string/signature or number that is usually used to identify a file format, for example ZIP archives have "PK". In this case we have a 0x00 "CAP" which looks just like a magic. What is the endianess? The endianess is the direction of the numbers stored in the archives. Big endian of 0x11223344 is 11 22 33 44 Little endian of 0x11223344 is 44 33 22 11 The secret is watching the data as blocks of 4 bytes (32bit) so in this case after " CAP" we have: 00 00 00 00 00 00 00 0c That second field looks just a 0xc, so a big endian. Doesn't have sense to be 0x0c000000 in little endian We don't know yet what is this 0xc, let's check it later. Then we have another 00 00 00 00, skip the fields set to zero. And now 00 00 00 e0, so 0xe0. We are at the beginning of the format so it may be an offset, or the size of a section or the number of files or maybe nothing important. Go in your hex editor and press CTRL-G, select hexadecimal and type e0: The data at that offset looks just like a DDS image, take it in your notes. We can notice that it's a non-compressed file because there are many zeroes and the file is easily identified. The next field is 00 4e db 38, so 0x4edb38. Repeat the same operation as before and at that offset you will see a sequence of complete filenames (path + name): Now go back to the beginning of the file because there are still a lot of fields between that DDS image and the current position: 00 43 41 50 00 00 00 00 00 00 00 0c 00 00 00 00 .CAP............ 00 00 00 e0 00 3e db 38 00 00 00 00 00 00 00 00 .....>.8........ 00 00 00 00 00 10 00 80 00 00 00 00 00 00 00 2f .............../ 00 10 00 80 00 10 00 80 00 00 00 30 00 00 00 24 ...........0...$ 00 20 01 00 00 01 cc a8 00 00 00 58 00 00 00 1c . .........X.... 00 21 cd a8 00 00 6a 5f 00 00 00 78 00 00 00 1c .!....j_...x.... 00 22 38 08 00 02 a9 11 00 00 00 98 00 00 00 1c ."8............. 00 24 e1 1c 00 04 13 83 00 00 00 b8 00 00 00 1c .$.............. 00 28 f4 a0 00 04 70 93 00 00 00 d8 00 00 00 1c .(....p......... 00 2d 65 34 00 03 85 79 00 00 00 f8 00 00 00 1c .-e4...y........ 00 30 ea b0 00 04 e2 dc 00 00 01 18 00 00 00 1c .0.............. 00 35 cd 8c 00 01 8b 5a 00 00 01 38 00 00 00 1c .5.....Z...8.... 00 37 58 e8 00 07 7a 40 00 00 01 58 00 00 00 14 [email protected].... 00 3e d3 28 00 00 07 2f 00 00 01 70 00 00 00 2b .>.(.../...p...+ 44 44 53 20 7c 00 00 00 07 10 00 00 00 04 00 00 DDS |........... If you watch carefully you can notice a certain "pattern", from offset 0x20. Basically a sequence of fields that gets repeated, like 4 32bit numbers, 4 numbers, 4 numbers... So let's try to identify this pattern splitting the fields in our mind: Now it's time to make some math operations. We have the number 0xc at the beginning of the file that is also the number of these patterns composed by 4 fields each one, so probably that 0xc is the number of files. The first field is zero so if it's an offset it's for sure a relative offset: OFFSET + 0xe0 = file offset. The second field seems related to the first one. For example: OFFSET 0x00 and second field 0x100080 OFFSET 0x100080 (previous offset + previous size) and second field 0x100080 OFFSET 0x200100 (previous offset + previous size) and second field 0x1cca8 and so on. So let's say it's a SIZE. When we work with archives we need at least 3 parameters: OFFSET SIZE NAME The missing one is NAME and considering the ascendant number (0, 0x30, 0x58, 0x78) it may be a relative offset for the names table we have seen at the beginning of the analysis at offset 0x3edb38. Check it: 0x3edb38 + 0x30 = "BattleRes/talk/st_bg/screen_bg02.dds" 0x3edb38 + 0x58 = "se/talk/07Vat/Vat00_0001.msf" 0x3edb38 + 0x78 = "se/talk/07Vat/Vat00_0002.msf" Ok we have the NAME relative offset And what may be the last one? It's not important, but if you check it you will notice that it's related to the incremental name offset, it's the name size. The reversing of the file format is finished, we can extract all the files with their original filenames Let's check the relative script: http://aluigi.org/papers/bms/others/uniel.bms And in the next post we will see how to write the script from scratch with these parameters.
-
Author : Bigchillghost Preface From what I've seen and heard so far, there're still some people who truely want to learn some skills and help themselves, maybe even others. That's why I'm making this tutorial. Content Manual Researching Section Background Knowledge before Starting Introduction on Hex2Obj Analyzing and Extracting a Game Model Analyzing and Reverse Engineering a Game Archive Programming Section Basic BMS Scripting Learning C Writing an Obj Convertor in C Summary Summary of the workflow Extended Content AMR - an Alternative for Mesh Format Research Advanced Mesh Reaper - Xtreme Edition (AXE) A Demonstration on Using AXE