
Leaderboard
-
Noob
Supporter47Points328Posts -
Hazza12555
Members26Points83Posts -
shak-otay
Engineers13Points1,466Posts -
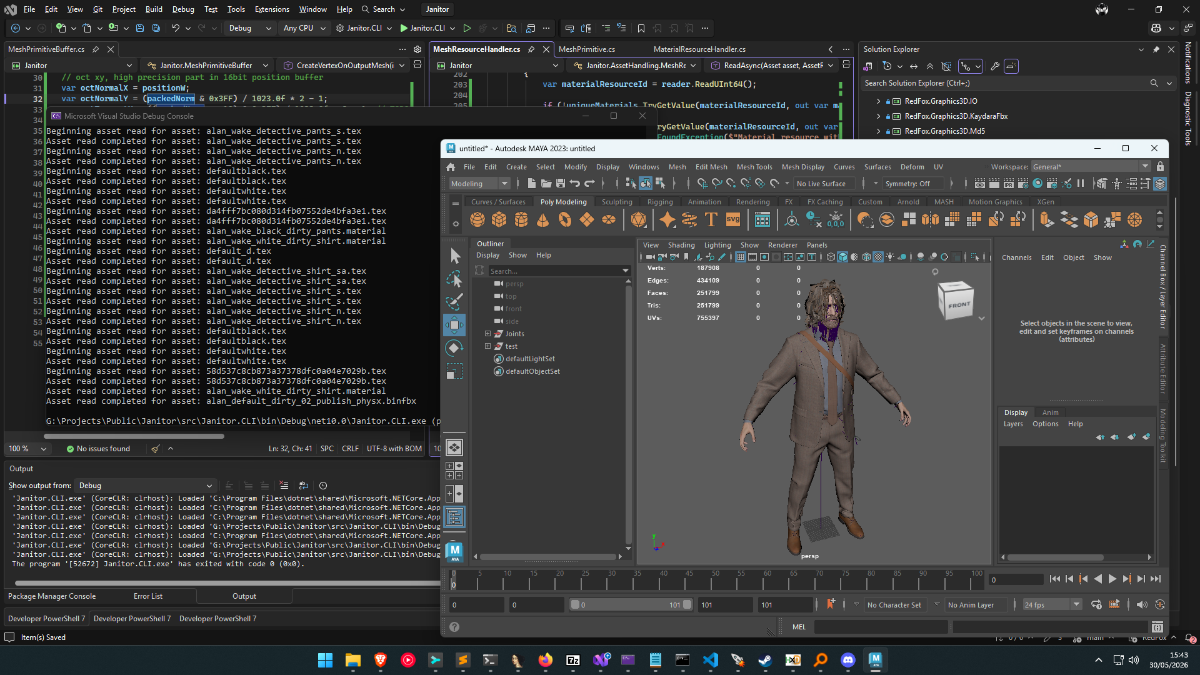
_1024.2590275(1).webp.229d9e7b3cfbfdc6b009f95ed73d712b.webp)
Rabatini
Engineers12Points307Posts


Popular Content
Showing content with the highest reputation since 06/12/2026 in Posts
-
4 pointsWe are currently testing whether we can retrieve character IDs from the database and read all related data4 points
-
3 pointsNew Version of TASM 1+2 Tools Audio is now sorted/named Also sorted into languages.3 points
-
I guess now that I'm actually getting some progress going, the next project I'm working on is an actual game loader, it won't be in blender. Blender is just a debug space for it. so technically what it will be is like those Mario 64 loader where you have to provide your own game root folder, but once loaded, it will allow you to mod the game, and stuff like that. Still a lot of functions I need to go through, but its getting there, hopefully everything goes alright
 2 points
 -
New FeaturesAdded .bmx material parameter parser. Extract shader constants from material files. Detect emissive textures automatically. Detect fur alpha mask textures. Export emissive color and emissive strength to glTF. Export specular color and specular textures. Support bump/normal intensity from material parameters. Material ImprovementsMaterials now preserve: Diffuse color Specular color Specular exponent Emissive color Opacity Fur shell alpha masks now use the correct UV tiling. Improved material deduplication using shader parameters in addition to texture sets. glTF ExportAdded proper transparent material support (alphaMode: BLEND). Automatically enables double-sided rendering for translucent materials. Converts Blinn–Phong specular power into an approximate PBR roughness value. Improved normal map handling with exported bump scale. Better mapping of legacy shader properties to glTF PBR materials. OBJ/MTL ExportExpanded generated .mtl files with: Ks Ns Ke d map_Ke Produces materials that more closely match the original game. ImprovementsImproved material reconstruction from BMX shader data. More accurate recreation of in-game material appearance. Reduced duplicate material generation during export. Automatically repairs known broken game assets during export for improved compatibility. FixesFixed incorrect fur alpha texture scaling. Fixed missing emissive information during export. Improved handling of translucent materials. Improved consistency between exported OBJ and glTF materials. Fixed fur shell transparency. The exporter now automatically extracts the alpha channel from CH_ALL_furShell2_N textures and applies it correctly for both GLB and OBJ exports. Fixed Rambo (Alt 1) and Pants (Alt 3) teeth. The exporter now detects the broken game data and automatically repairs the teeth mesh by assigning the correct material and UV mapping. A --no-repair option is available to preserve the original game data if desired. Known LimitationsAvatar (Alt 2) cloth/torso accessories remain untextured. This is due to unused content left in the game files—the mesh exists, but no texture was ever shipped, making reconstruction impossible. The exporter now assigns a plain white material instead of a misleading placeholder material.2 points
-
Tool is nearly finished. This is one of the weirdest format's i've ever worked with...
 2 points
 -
2 points
-
2 points
-
2 pointsadded extraction support, should work on files with versions beside 1.2 but untested same with compressed files: https://github.com/smiRaphi/UniPyX/commit/10b71fe85dbc064334ff472caadb6525fb1b5b852 points
-
2 pointsPython 3.X import argparse import struct import sys import threading import zlib from dataclasses import dataclass from pathlib import Path, PurePosixPath MAGIC = b"D0" @dataclass(frozen=True) class PackEntry: name: str offset: int stored_size: int original_size: int stored_raw: bool def u16(data: bytes, offset: int) -> int: return struct.unpack_from("<H", data, offset)[0] def u32(data: bytes, offset: int) -> int: return struct.unpack_from("<I", data, offset)[0] def parse_pack(data: bytes) -> tuple[int, list[PackEntry]]: if len(data) < 8: raise ValueError("The file is too small to contain a D0 pack header.") if data[:2] != MAGIC: raise ValueError(f"Unsupported magic {data[:2]!r}; expected {MAGIC!r}.") index_end = u32(data, 2) entry_count = u16(data, 6) if not (8 <= index_end <= len(data)): raise ValueError(f"Invalid index end offset: 0x{index_end:X}.") index_pos = 8 raw_entries: list[tuple[str, int, int, bool]] = [] for entry_index in range(entry_count): name_end = data.find(b"\0", index_pos, index_end) if name_end < 0: raise ValueError(f"Missing file-name terminator in index entry {entry_index}.") if name_end + 9 > index_end: raise ValueError(f"Truncated metadata in index entry {entry_index}.") name = data[index_pos:name_end].decode("utf-8", "replace") packed_size_field = u32(data, name_end + 1) original_size = u32(data, name_end + 5) stored_raw = bool(packed_size_field & 0x80000000) stored_size = packed_size_field & 0x7FFFFFFF if not name or stored_size == 0: raise ValueError(f"Invalid index entry {entry_index} at 0x{index_pos:X}.") raw_entries.append((name, stored_size, original_size, stored_raw)) index_pos = name_end + 9 if index_pos != index_end: raise ValueError( f"Index parsed to 0x{index_pos:X}, but header declares 0x{index_end:X}." ) entries: list[PackEntry] = [] data_pos = index_end for name, stored_size, original_size, stored_raw in raw_entries: data_end = data_pos + stored_size if data_end > len(data): raise ValueError(f"Resource {name!r} extends past the end of the container.") entries.append( PackEntry( name=name, offset=data_pos, stored_size=stored_size, original_size=original_size, stored_raw=stored_raw, ) ) data_pos = data_end if data_pos != len(data): raise ValueError( f"Resource data ends at 0x{data_pos:X}, but file ends at 0x{len(data):X}." ) return index_end, entries def safe_relative_path(name: str) -> Path: normalized = name.replace("\\", "/") parts = [] for part in PurePosixPath(normalized).parts: if part in ("", ".", "/"): continue if part == "..": continue clean = part.replace(":", "_") parts.append(clean) if not parts: raise ValueError(f"Resource name {name!r} does not contain a safe path.") return Path(*parts) def decompress_payload(payload: bytes, entry: PackEntry) -> bytes: if entry.stored_raw or entry.stored_size == entry.original_size: return payload errors: list[str] = [] for window_bits in (zlib.MAX_WBITS, -zlib.MAX_WBITS): try: output = zlib.decompress(payload, window_bits) if entry.original_size and len(output) != entry.original_size: raise ValueError( f"decompressed size {len(output)} does not match {entry.original_size}" ) return output except Exception as exc: errors.append(str(exc)) raise ValueError(f"Could not decompress {entry.name!r}: {'; '.join(errors)}") def extract_pack(input_path: Path, output_dir: Path, preserve_folders: bool = True) -> list[Path]: data = input_path.read_bytes() _, entries = parse_pack(data) output_dir.mkdir(parents=True, exist_ok=True) written: list[Path] = [] for index, entry in enumerate(entries, 1): payload = data[entry.offset : entry.offset + entry.stored_size] output = decompress_payload(payload, entry) relative = safe_relative_path(entry.name) if not preserve_folders: relative = Path(f"{index:04d}_{relative.name}") output_path = output_dir / relative output_path.parent.mkdir(parents=True, exist_ok=True) output_path.write_bytes(output) written.append(output_path) return written def summary_text(input_path: Path, index_end: int, entries: list[PackEntry]) -> str: raw_count = sum(entry.stored_raw for entry in entries) compressed_count = len(entries) - raw_count lines = [ f"Container: {input_path.name}", f"Magic: {MAGIC.decode('ascii')}", f"Index end: 0x{index_end:X}", f"Entries: {len(entries)}", f"Raw entries: {raw_count}", f"Compressed entries: {compressed_count}", "", ] for entry in entries[:80]: mode = "raw" if entry.stored_raw else "compressed" lines.append( f"0x{entry.offset:08X} {entry.stored_size:9d} {mode:10s} {entry.name}" ) if len(entries) > 80: lines.append(f"... {len(entries) - 80} more entries") return "\n".join(lines) def run_gui() -> None: import tkinter as tk from tkinter import filedialog, messagebox, scrolledtext, ttk root = tk.Tk() root.title("D0 Packres Extractor") root.geometry("800x540") root.resizable(True, True) default_file = Path("packres-android_core.png") input_var = tk.StringVar(value=str(default_file.resolve()) if default_file.exists() else "") output_var = tk.StringVar(value=str((Path.cwd() / "_packres_android_core_extract").resolve())) folders_var = tk.BooleanVar(value=True) status_var = tk.StringVar(value="Ready") frame = ttk.Frame(root, padding=12) frame.pack(fill="both", expand=True) frame.columnconfigure(1, weight=1) frame.rowconfigure(5, weight=1) def browse_input() -> None: path = filedialog.askopenfilename( title="Choose packres container", filetypes=[("Packres files", "*.png *.dat *.bin"), ("All files", "*.*")], ) if path: input_var.set(path) source = Path(path) output_var.set(str(source.with_name(source.stem + "_extract"))) def browse_output() -> None: path = filedialog.askdirectory(title="Choose output folder") if path: output_var.set(path) def set_log(text: str) -> None: log.configure(state="normal") log.delete("1.0", "end") log.insert("1.0", text) log.configure(state="disabled") def scan_clicked() -> None: try: input_path = Path(input_var.get().strip()) if not input_path.is_file(): raise ValueError("Input file does not exist.") index_end, entries = parse_pack(input_path.read_bytes()) set_log(summary_text(input_path, index_end, entries)) status_var.set(f"Scan complete: {len(entries)} entries.") except Exception as exc: status_var.set("Scan failed") messagebox.showerror("Scan failed", str(exc)) def extract_clicked() -> None: def worker() -> None: try: input_path = Path(input_var.get().strip()) output_dir = Path(output_var.get().strip()) if not input_path.is_file(): raise ValueError("Input file does not exist.") written = extract_pack(input_path, output_dir, folders_var.get()) index_end, entries = parse_pack(input_path.read_bytes()) text = summary_text(input_path, index_end, entries) text += f"\n\nWrote {len(written)} file(s) to:\n{output_dir}" root.after(0, lambda: set_log(text)) root.after(0, lambda: status_var.set(f"Extracted {len(written)} file(s).")) root.after( 0, lambda: messagebox.showinfo( "Extract complete", f"Extracted {len(written)} file(s)." ), ) except Exception as exc: root.after(0, lambda: status_var.set("Extract failed")) root.after(0, lambda: messagebox.showerror("Extract failed", str(exc))) status_var.set("Extracting...") threading.Thread(target=worker, daemon=True).start() ttk.Label(frame, text="Input Container").grid(row=0, column=0, sticky="w", padx=6, pady=6) ttk.Entry(frame, textvariable=input_var).grid(row=0, column=1, sticky="ew", padx=6, pady=6) ttk.Button(frame, text="Browse", command=browse_input).grid(row=0, column=2, padx=6, pady=6) ttk.Label(frame, text="Output Folder").grid(row=1, column=0, sticky="w", padx=6, pady=6) ttk.Entry(frame, textvariable=output_var).grid(row=1, column=1, sticky="ew", padx=6, pady=6) ttk.Button(frame, text="Browse", command=browse_output).grid(row=1, column=2, padx=6, pady=6) ttk.Checkbutton(frame, text="Preserve folders", variable=folders_var).grid( row=2, column=0, columnspan=2, sticky="w", padx=6, pady=8 ) buttons = ttk.Frame(frame) buttons.grid(row=3, column=0, columnspan=3, sticky="e", padx=6, pady=8) ttk.Button(buttons, text="Scan", command=scan_clicked).grid(row=0, column=0, padx=6) ttk.Button(buttons, text="Extract", command=extract_clicked).grid(row=0, column=1, padx=6) ttk.Label(frame, textvariable=status_var).grid( row=4, column=0, columnspan=3, sticky="w", padx=6, pady=4 ) log = scrolledtext.ScrolledText(frame, wrap="none", state="disabled") log.grid(row=5, column=0, columnspan=3, sticky="nsew", padx=6, pady=6) root.mainloop() def parse_args(argv: list[str]) -> argparse.Namespace: parser = argparse.ArgumentParser(description="Extract D0 packres containers.") parser.add_argument("input", nargs="?", help="Input packres file.") parser.add_argument("-o", "--output", help="Output folder. Default: <input>_extract") parser.add_argument("--flat", action="store_true", help="Do not preserve resource folders.") parser.add_argument("--scan-only", action="store_true", help="Only display the index.") parser.add_argument("--gui", action="store_true", help="Open the graphical interface.") return parser.parse_args(argv) def main(argv: list[str] | None = None) -> int: args = parse_args(sys.argv[1:] if argv is None else argv) if args.gui or not args.input: run_gui() return 0 input_path = Path(args.input) output_dir = Path(args.output) if args.output else input_path.with_name(input_path.stem + "_extract") data = input_path.read_bytes() index_end, entries = parse_pack(data) print(summary_text(input_path, index_end, entries)) if args.scan_only: return 0 written = extract_pack(input_path, output_dir, preserve_folders=not args.flat) print(f"\nWrote {len(written)} file(s) to {output_dir}") return 0 if __name__ == "__main__": raise SystemExit(main())
 2 points
 -
Added rigging to all models in the form of a .glb model. Fixed some bugs2 points
-
2 pointsthese .lsc files are a custom container, magic NKDB (Nikke Database). All big-endian. Layout: 0x00 "NKDB" 0x04 version (uint32) = 1 0x08 16-byte key/IV (unique per file) 0x18 flag uint32 = 0x1000 (4096) - same in every file 0x1C record count (uint32) 0x20 offset table: count × uint32 (absolute offsets) + 4 pad bytes ... data section: records back-to-back Record size = offset[i+1] - offset, last one runs to EOF. The offset table checks out perfectly (monotonic, no gaps, matches file size), so reading the container is trivial. The record payloads are encrypted. Data section entropy is a flat 8.0 bits/byte and the byte distribution is dead uniform (all 256 values ~0.39% each), which screams AES, not compression (no magic bytes, no skew). Record sizes aren't multiples of 16, so it's a stream mode (CTR/CFB/OFB/GCM), not ECB/CBC. The 16 bytes in the header are almost certainly a per-file IV/nonce or key-id, the actual AES key isn't in the file, it lives in the game client (il2cpp binary). Tried XOR and AES with the header bytes as the key, nothing decrypts, so don't bother going down that road. You'll need to pull the key from GameAssembly/libil2cpp to read the actual locale text (probably JSON/table rows once decrypted).2 points
-
Instead of just dumping files without explanation, you need to explain what you're trying to do, what you've already tried, etc. And read the rules, or these low effort posts will be deleted.2 points
-
2 points2 points2 pointsWas heavily tied up in other stuff - including building up my utility library for other projects (that would include this), I'm hoping to have an OSS release at some point this week, the tool has undergone major refactoring under the hood and I've figured out where the game handles those invalid version meshes, along with texture bindings, etc. With the upgrades to my utility library the tool will support more formats such as SMD, FBX, etc.
 2 pointsHere you go - plugin for Blender 5.0 Imports meshes, skeletons, animations and textures Some animation files may fail to import (could not figure it out) io_scene_until_dawn_demo.zip2 pointsHere's a hexpat: struct Str { u32 l; char v[l]; }; struct de { u32 crc; s32 id; s32 pid; s32 nid; u32 dc; s32 u1; u32 fc; }; bitfield fle { bool zstd : 1; // otherwise zlib bool compressed : 1; padding : 3; unk1 : 1; padding : 10; s16 zstd_dict_id; }; struct fe { u64 off; u64 zs; u64 us; u32 crc; u32 fid; fle fl; u32 did; char start[4] @ (parent.do + off); char end[4] @ (parent.do + off + zs - 4); }; struct ce { u32 s; u32 cs[s / 4]; }; bitfield fl { padding : 4; bool chunks : 1; bool zstd_dicts : 1; padding : 26; }; struct a { char magic[4]; fl fl; u32 v; u32 dc; $ += dc * 0x1C; u32 fc; u64 fso = $; u64 do = fso + fc*0x28 + 0x18; u64 chnkdo @ (do - 0x18); u64 decdo @ (do - 0x10); u64 stro @ (do - 8); u64 so = stro; if (so == 0) so = decdo; $ = so; u32 fsc; Str fstrs[fsc]; u32 dsc; Str dstrs[dsc]; $ = chnkdo; u32 chnkz; u64 ep = $ + chnkz; ce ce[while($ < ep)]; de de[dc] @ 0x10; fe fe[fc] @ fso; }; a a @ 0;1 point1 pointHere's code for decompression. You can decompress it with qbms. //------------------------------------------------ //--- 010 Editor v14.0 Binary Template // // File: // Authors: // Version: // Purpose: // Category: // File Mask: // ID Bytes: // History: //------------------------------------------------ BigEndian();OutputPaneClear(); local uint32 i; char SegsSign[4]; uint16 Unknown_0; uint16 ChunkCount; uint32 DecompressedSize; uint32 FileSize; struct { uint16 ChunkCompSize; uint16 ChunkDecompSize; // if 0 = 65536 uint32 ChunkOffset; }ChunkToc[ChunkCount]; for (i=0; i < ChunkCount; i++) { FSeek(ChunkToc[i].ChunkOffset - 1); struct { byte ChunkCompData[ChunkToc[i].ChunkCompSize]; }ChunkData; }So here's decompressor. ############################## get BaseFileName basename get FileSize asize get FileExtension extension comtype deflate endian big idstring "segs" getdstring Dummy 0x2 get ChunkCount ushort get TotalDecompressedSize uint32 get FileSize uint32 for i = 0 < ChunkCount get ChunkCompSize ushort get ChunkDecompressedSize ushort get ChunkOffset uint32 math ChunkOffset - 1 append 0 string Name p "%s.%s_d" BaseFileName FileExtension if ChunkDecompressedSize == 0 clog Name ChunkOffset ChunkCompSize 65536 else clog Name ChunkOffset ChunkCompSize ChunkDecompressedSize endif next i1 pointHello, I'm trying to get into the .asset Unity files from the Chinese-only game, One Piece: Fighting. While I can open the files from the mobile version of the game, I wanted to try and get them from the PC version to see if the assets were higher quality. I've included a .zip with random .asset samples OPFP .asset Sample.zip1 pointAdded support https://github.com/smiRaphi/UniPyX/commit/4e30da708bcdb3929e92bc6a86ac9a5173a1bef7 And small correction/addition: the Blowfish key is encrypted with RSA and it uses big endian Blowfish in mode ECB1 pointPS-ADPCM fully documented, AMWX/XWMA investigation ongoingContextThis write-up documents the reverse engineering of the .sdt and .sdx audio formats used by Metal Gear Solid 2: Sons of Liberty – Master Collection (PC). The original goal was to build tools capable of replacing in-game dialogue, music and sound effects while preserving complete compatibility with the original file formats. Achieving this required understanding the binary layouts, audio codecs, and engine constraints imposed by both formats. The resulting implementation is available as MGS2 SDT Tool, an open-source (MIT) project written in Python/PyQt6. Repository: romerojopro-web/SDT-Tool-for-MGS2MCBetterAudioMod 1. Two completely different formats behind the .sdt extensionThe first—and probably most important—discovery is that two incompatible formats share the .sdt extension. Vanilla Steam / Master CollectionKonami AMWX container. Audio appears to be stored as WMAv2/XWMA. Better Audio ModUses audio originating from the HD Collection assets. Encoded as PlayStation 4-bit ADPCM (PS-ADPCM) at 44.1 kHz. A significant amount of the early investigation was spent assuming Better Audio Mod files matched the vanilla Steam format. Although both use the .sdt extension, their internal layouts are completely different. If you're investigating this format yourself, the first thing to verify is which variant you're dealing with before making assumptions about the codec or container. 2. PS-ADPCM format (Better Audio Mod)This variant has now been fully documented and implemented. General structureAudio is stored as a sequence of MG blocks. +--------------------+ | 16-byte header | +--------------------+ | up to 0x4000 bytes | | of PS-ADPCM data | +--------------------+ Channel countThe number of channels is stored at offset 0x98 of the file header. Stereo interleavingThe most difficult aspect of the format was stereo decoding. Unlike standard PCM stereo—or even many PS-ADPCM implementations—the left and right channels are not interleaved sample-by-sample or ADPCM block-by-block. Instead, interleaving occurs in 0x800-byte chunks: L 0x800 R 0x800 L 0x800 R 0x800 ... Pitfall #1Treating the stream as mono causes the right channel to be decoded approximately 81 ms later than the left channel, producing a noticeable echo. Pitfall #2De-interleaving every 16-byte ADPCM block initially appears to work, but playback becomes approximately 2× faster ("chipmunk voice"). This happens because PS-ADPCM prediction depends on previous decoder state. Splitting the stream too frequently destroys predictor continuity for each channel. Working solutionThe correct decoding procedure is: Read the channel count from offset 0x98. If stereo, separate both channels using 0x800-byte chunks. Decode each channel independently while maintaining its own ADPCM predictor state. Recombine both decoded streams into a standard 16-bit PCM stereo WAV. For dialogue replacement, the reverse operation is performed: encode the replacement dialogue as PS-ADPCM, duplicate the encoded stream, re-interleave both channels using 0x800-byte chunks, preserve the original file size exactly, as required by the game engine. 3. Vanilla Steam format (AMWX/XWMA)The vanilla Steam files remain the only unresolved part of the .sdt format. Current findings: Konami AMWX container. Audio stored as WMAv2/XWMA. The AMWX structure itself has largely been mapped. Extracted bitstreams are rejected by ffmpeg, likely because of container-specific framing or non-standard padding. Current research directions include: normalizing XWMA headers before decoding, using Microsoft's xWMAEncode.exe instead of ffmpeg, identifying how AMWX stores XWMA block information. A Reddit contributor (u/SpaceCore0352) also shared Python code for XWMA header normalization, which appears to be a promising lead. Anyone familiar with XWMA, WMAv2, or AMWX-like containers is welcome to contribute. 4. SDX format (Stage sound banks)Alongside .sdt, MGS2 also uses .sdx files for stage-specific sound banks. Unlike .sdt, these are not simple audio containers but complete sound banks containing audio samples, lookup tables and playback sequences. File layoutRegion Description 0x0000 – 0x1000 Header 0x1000 – ~0x100000 PS-ADPCM sample data (22050 Hz), approximately 200+ sequential samples ~0x101800 – 0x102xxx Sample table (16-byte records referencing sample addresses) ~0x110000 – end Playback sequence (event → sample mapping) Unlike .sdt, every stage contains its own complete .sdx bank. Sample tableThe sample table consists of multiple 16-byte record types (for example beginning with 50 01 01, 10 01 01 or 30 01 01). These records reference sample locations using addresses expressed in 8-byte units. Several record types appear to store multiple addresses, likely representing combinations of: sample start, loop point, sample end. Although not every field has been fully identified, the table structure is sufficiently understood for safe sample replacement. Audio replacement without breaking pointersOne major constraint is that the table stores absolute sample addresses. Changing the encoded size of one sample shifts every subsequent address and invalidates the entire bank. The implemented solution is therefore: Encode the replacement audio using exactly the same number of ADPCM frames as the original. Pad with silence or truncate as necessary. Preserve every original PS-ADPCM frame flag (loop/end markers) instead of regenerating them. As a result: only the target sample's audio data changes, every pointer remains valid, the sample table is left completely untouched, the playback sequence remains byte-identical. This approach has been validated both through automated parsing and in-game testing. Cross-bank sample identificationMany sound effects appear in multiple stage banks. To identify identical sounds regardless of bank location, an audio fingerprinting method based on hashing the decoded sample data (after neutralizing ADPCM frame flags) was implemented. This makes it possible to recognize identical sounds independently of: bank file, scan order, sample index. The resulting identifier provides a consistent way to tag and organize sound effects across the entire game. 5. Current findingsAt this stage, the following aspects are understood: Two incompatible .sdt variants exist. Better Audio Mod uses PS-ADPCM. Stereo interleaving occurs every 0x800 bytes. Channel count is stored at offset 0x98. PS-ADPCM decoding and encoding are fully implemented. .sdx sound banks have been structurally mapped. Sample replacement works while preserving original pointer tables. Vanilla Steam .sdt files use an AMWX container wrapping XWMA/WMAv2 audio. 6. Still unresolvedOpen questions remain regarding the vanilla format: Exact meaning of several AMWX metadata fields. Why ffmpeg rejects extracted XWMA streams. Whether additional preprocessing is required before decoding. Complete support for vanilla Steam .sdt files. 7. Source codeThe complete implementation is open source and includes: binary parsers, PS-ADPCM decoder, stereo de-interleaver, PS-ADPCM encoder, .sdt dialogue replacement, .sdx sample replacement, command-line interface, PyQt6 graphical interface. GitHub: romerojopro-web/SDT-Tool-for-MGS2MCBetterAudioMod Nexus Mods: MGS2MC SDT Tool The code is fully commented in English, and the command-line interface can be used independently of the GUI for scripting or batch processing. Feedback, corrections, or contributions—particularly regarding the AMWX/XWMA variant—are very welcome. Remaining unknowns: Exact XWMA block padding format. Possible purpose of some SDT metadata fields. Any documentation or previous research on the Master Collection audio pipeline.1 pointResource types are listed in misc/resourcetypedefinitions.xml: Model/MeshGroupPacketBuffer.smf, Texture/TextureImageData.pst, Material.bmx (loose files named by GUID), Animation.saf, Level.lvl, world geometry.geo, Sector.sec, collision.col, MotionSet.msb, SoundBank.nsb. Resources are identified by 128-bit GUIDs (4×u32). If anyone is wanting to know what the formats are ^1 point1 pointhi bro, watch this mod. Bellingham Celebration mod https://youtu.be/GL02gKaVqNs?si=WWghqouLnqKGnC_V1 point1 pointAlso added support https://github.com/smiRaphi/UniPyX/commit/a0279f18358cfded8b46e2ddcf45c7e6df08ee7d1 point1 pointJust uploaded a tool to extract all textures/models/audio https://reshax.com/topic/19262-beenoxgoliath-engine-games-tools/1 pointzlib/deflate. You can get decompressed size at end of file - 4 bytes. And here is template for c3d. Not sure if it will work on all. I was unable properly decode vertices and rest of it like normals / uvs. Maybe someone else can... Here's decompressor ############################## comtype deflate get BaseFileName basename get FileExtension extension get FileSize asize xmath DecompressedSizeOffset "FileSize - 4" xmath CompressedSize "FileSize - 14" goto DecompressedSizeOffset get DecompressedSize uint32 string Name p "%s_d.%s" BaseFileName FileExtension clog Name 10 CompressedSize DecompressedSize//------------------------------------------------ //--- 010 Editor v14.0 Binary Template // // File: // Authors: // Version: // Purpose: // Category: // File Mask: // ID Bytes: // History: //------------------------------------------------ LittleEndian();OutputPaneClear(); local string FileName=GetFileName(),FilePath=FileNameGetPath(FileName,true),BaseName=FileNameGetBase(FileName,false),ShapeNum; local uint32 i,j,k,l; char Sign[4]; uint32 CM3DSize; struct { struct { char CM3DSign[4]; uint32 Unknown; uint32 CM3DInfoSize; uint16 TOCCount; uint16 ShapeCount; uint32 TextureCount; uint32 TOCBaseOffset; uint32 ShapeBaseOffset; uint32 TextureBaseOffset; }CM3DInfo; FSeek(startof(CM3D) + CM3DInfo.TOCBaseOffset); struct { uint32 Unknown_0; uint32 Unknown_1; uint32 Unknown_2; uint32 Unknown_3; uint32 Unknown_4; uint32 Unknown_5; uint32 Unknown_6; uint32 Unknown_7; uint32 Unknown_8; uint32 Unknown_9; uint32 Unknown_10; uint32 Unknown_11; uint32 Unknown_12; uint32 Unknown_13; uint32 Unknown_14; uint32 Unknown_15; uint32 Unknown_16; uint32 Unknown_17; uint32 Unknown_18; uint32 Unknown_19; if (Unknown_19 == 1) uint32 Unknown_20; }CM3DTOC[CM3DInfo.TOCCount]<optimize=false>; // at some cases completely wrong FSeek(startof(CM3D) + CM3DInfo.ShapeBaseOffset); struct { string ShapeName; FSeek(startof(ShapeName)); FSkip(12); uint32 ShapeDataSize; uint16 VertexCount; uint16 IndexCount; FSkip(28); struct { int16 VPosX,Unk_0; int16 VPosY,Unk_1; int16 VPosZ,Unk_2; FSkip(20); // reserved }ElementBuffer[VertexCount]<optimize=false>; struct { int16 Unk_0; uint16 F1,F2,F3; int16 TextureId; // maybe FSkip(14); // reserved }IndexBuffer[IndexCount]<optimize=false>; }CM3DShape[CM3DInfo.ShapeCount]<optimize=false>; FSeek(startof(CM3D) + CM3DInfo.TextureBaseOffset); struct { string TextureName; FSeek(startof(TextureName)); FSkip(12); uint32 BM6DSize; struct { char BM6DSign[4]; FSkip(6); uint32 TextureDataOffset; uint32 Unknown_0; uint32 TextureWidth; uint32 TextureHeight; uint16 Unknown_1; uint16 PixelFormat; uint32 Unknown_2; uint32 TextureDataSize; uint32 Unknown_3; uint32 Unknown_4; uint32 Unknown_5; uint32 Unknown_6; local uint32 TextureDataSizeCalc=(TextureWidth * TextureHeight); byte PaletteData[1024]; FSeek(startof(BM6D) + TextureDataOffset); if (TextureDataSize != 0) byte TextureData[TextureDataSize]; else byte TextureData[TextureDataSizeCalc]; FSeek(startof(BM6D)); FSkip(BM6DSize); }BM6D; }CM3DTexture[CM3DInfo.TextureCount]<optimize=false>; }CM3D;1 point1 pointI briefly looked at this and it looks like the biggest part of that file is compressed with zlib/deflate. Containing textures + meshes.1 pointWow, apparently it was about a year of effort xD, but the games .w32 format can be fully roundtripped in Blender, you can open and edit the main.w32 files which contain character models, apply a texture and have it shoved straight into the game, it can also do the same with the games weapons, I made a little video on it too! https://youtu.be/Sw0T6pnaGlY io_scene_psiops_w32.py1 point1 pointYeah, textures seem to be converting and looking 100% fine now. Thanks a lot for that, bruv.1 point1 pointok new version posted. You need to re-dump (only chunks) to get HD chunks now.1 point1 pointAfter having searched through many too many senseless (?) blocks I finally got this (deepforest):
 1 pointThis might be helpful for finding character models in the files: 00653-01785 = Chitose 01842-03093 = Emi 03150-04315 = Hotaru 04372-05505 = Kazumi 05562-06750 = Mari 06807-07392 = Masaki 07419-08618 = Rika 08677-09924 = Serika 09925-10414 = Takuo 10441-11745 = Yukiko 11808-11811 = Female Character Character models (not including the chibi ones) are 700KB to 1MB+ in size. For some reason though, Serika's models have duplicates, and there are two instances of the winter school uniform of most of the characters.1 pointHi, Sorry I didn't know, is this could help? granturismo4_tracks.rar1 pointPlaystation All Stars Battle Royale Tools V4 I have now updated the tools to feature a GUI (to make it more user friendly). This version also is updated to work with RETAIL BUILDS, not just the beta builds with no encryption. To do this, I reversed engineered Chap's PPU INFLATE decoder ( which only used to work with RPCS3 ) To run just double click PSAS Extractor.bat. A GUI will load, select the .psarc file you want to extract from. You can then select costumes/equipment/effects/other from the drop down menu. You can choose either to download all, or select which ones you want to download. A small preview will show of the model before downloading (might take a few seconds to load all previews) HUGE thanks to LovilyDino5647 for providing me with Chap's updated script, or this would not have been possible. ANY BUGS FEEL FREE TO DM ME. PSASBR Tools V4.zip1 point1 pointAre you trying to modify the font? I'm not sure about importing, but exporting is easy with existing tools. The character order is oddly arranged. e.g.
 1 pointHi there, I’ve recently been working on a project to translate Tokimeki Memorial 3 into Chinese, and I happened to come across your post. Following some reverse engineering and disassembly analysis, I discovered that the .atp files use a form of LZSS compression. They can be decompressed using a Python script. Here is the assembly code I located (at 1E93D0): lbu a3,0x0(a0) addiu a0,a0,0x1 daddu t1,a1,zero addiu t0,zero,0x8 bne t0,zero,0x001E93F8 andi v0,a3,0x0001 lbu a3,0x0(a0) addiu a0,a0,0x1 addiu t0,zero,0x8 andi v0,a3,0x0001 bne v0,zero,0x001E9418 addiu t0,t0,-0x1 lbu v0,0x0(a0) addiu a0,a0,0x1 srl a3,a3,0x01 sb v0,0x0(a1) beq zero,zero,0x001E93E0 addiu a1,a1,0x1 bne t0,zero,0x001E942C srl a3,a3,0x01 lbu a3,0x0(a0) addiu a0,a0,0x1 addiu t0,zero,0x8 andi v0,a3,0x0001 beql v0,zero,0x001E9498 lbu v0,0x0(a0) addiu t0,t0,-0x1 bne t0,zero,0x001E9450 srl a3,a3,0x01 lbu a3,0x0(a0) addiu a0,a0,0x1 addiu t0,zero,0x8 andi v0,a3,0x0001 srl a3,a3,0x01 addiu t0,t0,-0x1 bne t0,zero,0x001E9470 sll a2,v0,0x01 lbu a3,0x0(a0) addiu a0,a0,0x1 addiu t0,zero,0x8 andi v0,a3,0x0001 srl a3,a3,0x01 lbu v1,0x0(a0) addiu a0,a0,0x1 addu v0,a2,v0 addiu t0,t0,-0x1 bne v1,zero,0x001E94E0 addiu a2,v0,0x2 beq zero,zero,0x001E94E0 addiu v1,zero,0x100 addiu a0,a0,0x1 lbu v1,0x0(a0) addiu a0,a0,0x1 sll v0,v0,0x08 srl a3,a3,0x01 or v1,v0,v1 beq v1,zero,0x001E9510 addiu t0,t0,-0x1 andi a2,v1,0x000F beq a2,zero,0x001E94D0 addiu a2,a2,0x2 beq zero,zero,0x001E94E0 srl v1,v1,0x04 nop lbu v0,0x0(a0) addiu a0,a0,0x1 srl v1,v1,0x04 addiu a2,v0,0x1 beq a2,zero,0x001E93E0 subu v1,a1,v1 lbu v0,0x0(v1) addiu v1,v1,0x1 addiu a2,a2,-0x1 sb v0,0x0(a1) nop bne a2,zero,0x001E94E8 addiu a1,a1,0x1 beq zero,zero,0x001E93E0 nop nop jr ra subu v0,a1,t1 decompress.py1 pointHere the executable: https://drive.google.com/file/d/1uNtUpMyFZLqc2AnjjunMzX58fEg3mdRQ/view?usp=drivesdk1 pointYou can easily convert it to the qbms code. ############################## get BaseFileName basename idstring "CRAP" get Version ushort get CRPRStrLen ubyte getdstring CRPResourceName CRPRStrLen getdstring Dummy 0x5 get StrLen ubyte getdstring TrackName StrLen get ResourceCount uint32 get DataBaseOffset uint32 for i = 0 < ResourceCount get Unknown_0 uint32 get StrLen ubyte getdstring ResourceName StrLen get MD5StrLen ubyte getdstring MD5 MD5StrLen get Unknown_1 uint32 get ResourceOffset uint32 get Unknown_2 uint32 get ResourceSize uint32 math ResourceOffset + DataBaseOffset string Name p "%s/%s.dat" TrackName ResourceName log Name ResourceOffset ResourceSize next i The first file is some kind of TOC, second are data and rest are PNG's with some metadata on start.1 pointIt wasn't that hard follow 010 template... Works on all provided samples. Thanks ikskoks for confirmation. from inc_noesis import * import noesis import rapi import os def registerNoesisTypes(): handle = noesis.register("Shogo: Mobile Armor Division - Texture", ".DTX") noesis.setHandlerTypeCheck(handle, noepyCheckType) noesis.setHandlerLoadRGBA(handle, noepyLoadRGBA) noesis.logPopup() return 1 def noepyCheckType(data): bs = NoeBitStream(data) if len(data) < 20: return 0 return 1 def noepyLoadRGBA(data, texList): bs = NoeBitStream(data) baseName = rapi.getExtensionlessName(rapi.getLocalFileName(rapi.getInputName())) bs.read(8) TextureWidth = bs.readUShort() TextureHeight = bs.readUShort() bs.read(32) PaletteBuffer = bs.read(1024) RawDataBufferSize = TextureWidth * TextureHeight RawDataBuffer = bs.read(RawDataBufferSize) data = rapi.imageDecodeRawPal(RawDataBuffer, PaletteBuffer, TextureWidth, TextureHeight, 8, "a8 r8 g8 b8") texFmt = noesis.NOESISTEX_RGBA32 texList.append(NoeTexture(rapi.getInputName(), TextureWidth, TextureHeight, data, texFmt)) return 11 point1 pointHi Thanks for the reply. https://www.dropbox.com/scl/fi/1w80o3nyqxi6c65ntzumb/car_24922C7461E7A08C.json.jmodel?rlkey=8grue2kq4y8mvgzgqze2zqrjy&st=seqbisjh&dl=0 He is the file https://mega.nz/file/AEFyjbzb#J-M2lVQMtK9MR5AGTFCSgz4MoTWRDddfDn8LhLTkous Here is the raw pack file too Thanks 🙂1 point1 pointHi everyone, I am currently working on a fan translation and localization project for Dante's Inferno on the PS3. (Polish TRANSLATE) I have successfully extracted and edited the game text, but I am facing a major roadblock with the rebuilding stage. Specifically, I need to pack and compress my modified .lh2 files back into the original .ols container archive format. It is absolutely crucial that the original file structure and directory layout are strictly preserved so the PS3 runtime can read the assets without throwing errors. I've tried standard extraction tools, but recompiling them back properly has been tricky and often causes crashes. Could anyone recommend a specific script, a tool, or the correct command-line arguments to repack these files into .ols while maintaining the native compression structure? Any help, templates, or guidance would be highly appreciated. Thanks in advance!1 pointWould you mind releasing this tool and its source code please?1 pointWell, you can convert to PNG with ImageHeat and then you can convert to JPG/TGA with other tools. By the way, toher tools should also work: DTXView (from REZ Tool Pack) DTXConvert (from REZ Tool Pack) DTXUtility DEdit DTX-Meta-Transfer
 1 pointHey, sorry for the long wait, just finally decided to sit down and do this so here you go: https://github.com/smiRaphi/UniPyX (https://github.com/smiRaphi/UniPyX/commit/69fa01b841d7ebd7635726e6325b3c810a9c55bd) In case you get an error like this: "AssertionError: 5 not implemented (<stuff>)", tell me which file exactly that happened with and I'll try to fix that1 pointDrag and drop .index files into the script, it will automatically parse streamed.resources and extract sounds. streamed.py streamed.zip
.thumb.png.c09c1d8af0948c551ca36af743253048.png) 1 point1 pointUse this bms script by chrrox endian big comtype zlib_noerror get idstring long get chunksize long get baseoff long get unkown long get files long get totalzsize long get totalsize long get name filename set offset baseoff get NAME basename string NAME += ".pak" savepos tmp for i = 0 < files if i == 0 get size long else goto tmp get old long savepos tmp get size long math size - old endif if totalzsize >= 0x8000 set zsize 0x8000 else set zsize totalzsize endif clog MEMORY_FILE offset zsize size append log name 0 size MEMORY_FILE append math offset += 0x8000 math totalzsize - 0x8000 next i1 point
1 point1 pointUse this bms script by chrrox endian big comtype zlib_noerror get idstring long get chunksize long get baseoff long get unkown long get files long get totalzsize long get totalsize long get name filename set offset baseoff get NAME basename string NAME += ".pak" savepos tmp for i = 0 < files if i == 0 get size long else goto tmp get old long savepos tmp get size long math size - old endif if totalzsize >= 0x8000 set zsize 0x8000 else set zsize totalzsize endif clog MEMORY_FILE offset zsize size append log name 0 size MEMORY_FILE append math offset += 0x8000 math totalzsize - 0x8000 next i1 point


.png.ccf09f34bfa6b931b357fdc6d96ded37.png)