Leaderboard


Popular Content
Showing content with the highest reputation since 11/22/2025 in all areas
-
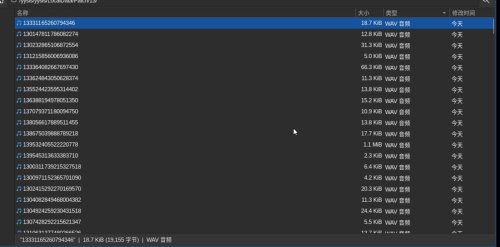
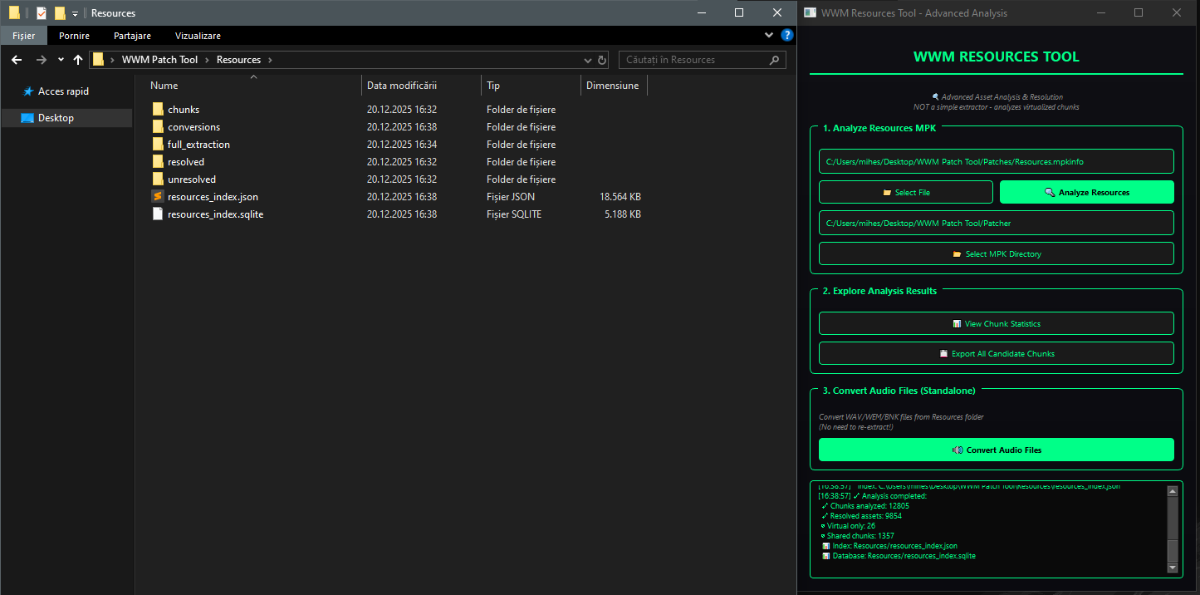
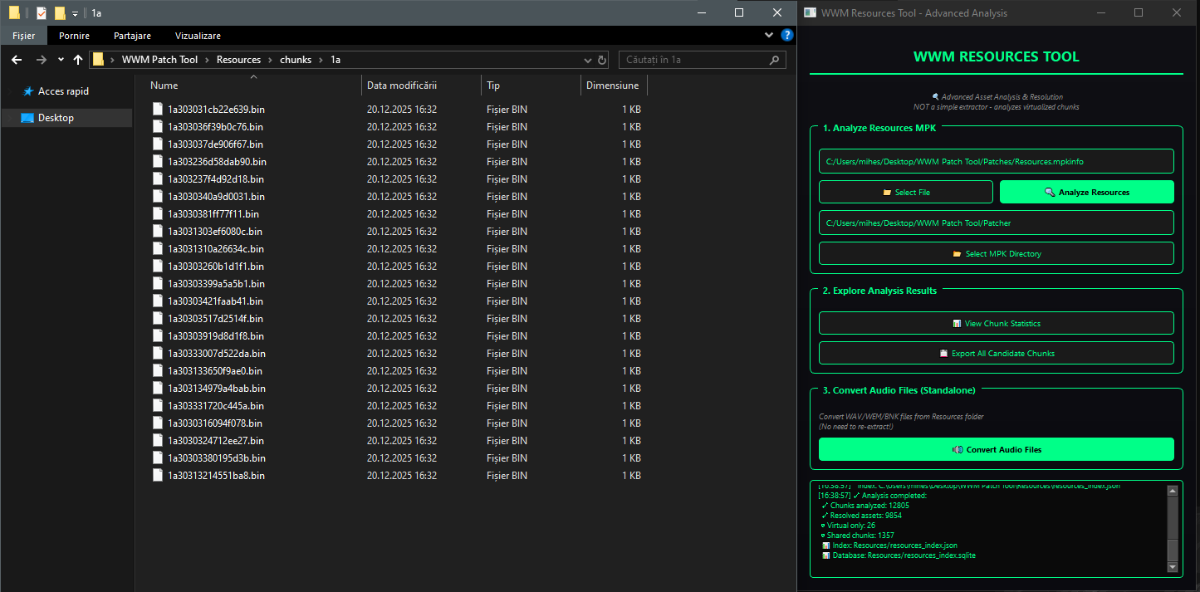
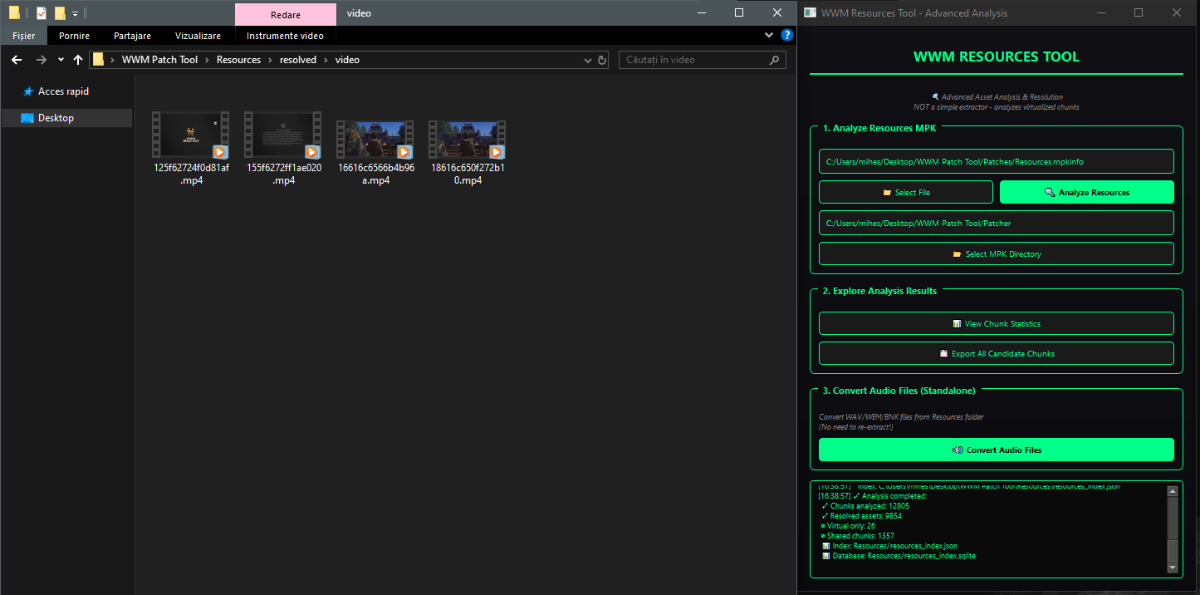
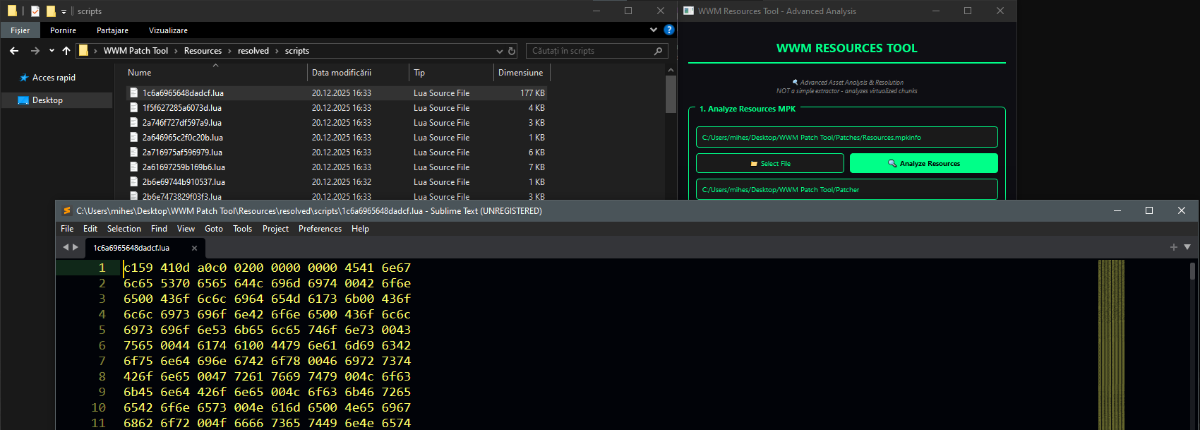
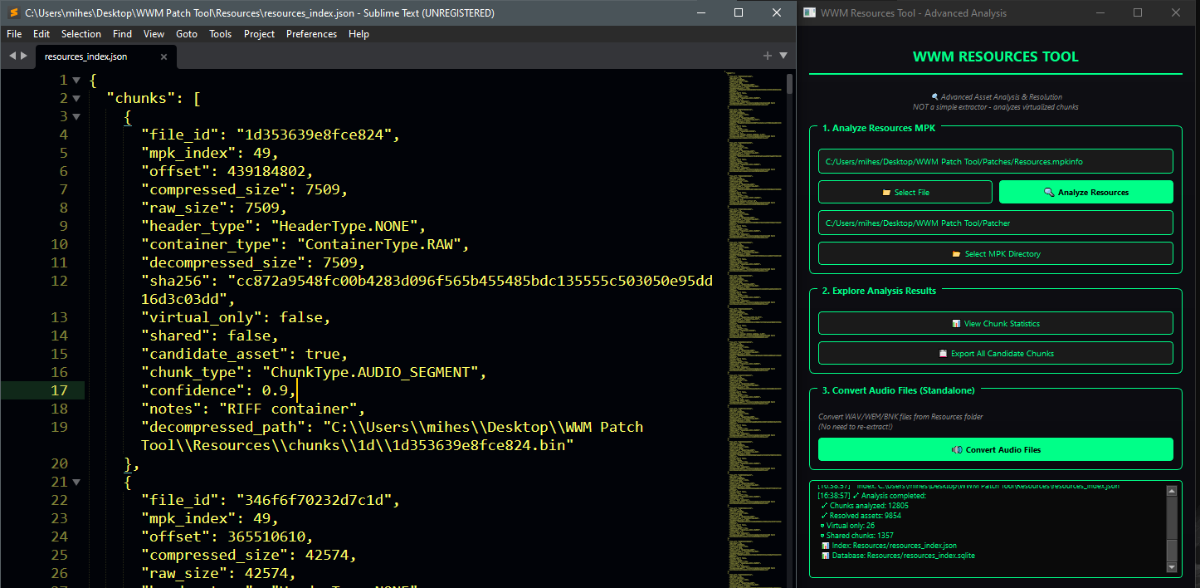
Author: Myro Scope: Educational & research-oriented reverse engineering Status: Ongoing research Introduction: This thread documents an ongoing technical research project focused on analyzing the MPK container system used by Where Winds Meet (WWM). The goal is to understand the structure, behavior, and data flow of the game’s asset containers from a reverse-engineering and archival perspective, strictly for educational and analytical purposes. No proprietary assets, binaries, or tools will be distributed as part of this work. 1. Patch*#.mpk vs Resource*#.mpk — Structural Similarity, Semantic Differences At a container level, Patch#.mpk* and Resource#.mpk* share the same base format: Indexed via mpkinfo / mpkdb Entries contain: FileID Size Offset MpkIndex Use the same compression stack: LZ4 / ZSTD / LZMA EZST (AES-encrypted) However, despite this structural similarity, their extraction semantics differ significantly. 2. Patch*#.mpk — Partial Transparency, Direct Asset Access Patch MPKs behave primarily as delta / override containers: Assets retain near-original offsets Internal file structures remain largely recognizable Minimal indirection compared to Resource MPKs As a result: ~99% of audio assets can be recovered successfully A subset of Lua scripts becomes readable after decompression Non-audio assets (including some images) are present and partially accessible Testing on Patch3100.mpk confirmed that Patch archives are not limited to sound assets. Conclusion: Patch MPKs prioritize update efficiency and fast access, with limited transformation of payload data. 3. Resource*#.mpk — Indirection and Shared Data Resource MPKs represent the primary asset pool and introduce several additional complexities: The Size field often represents a logical or expanded size, not the physically stored payload Naïve extraction pipelines tend to: materialize padding and alignment blocks duplicate shared data blobs inflate archive size artificially (e.g. ~2 GB → tens of GB) This behavior explains why Resource MPKs appear far more “opaque” when extracted without validation. Important observations: Fixed headers such as 02 02 02 01 … frequently represent logical structures (e.g. texture containers with multiple mip blocks) Headers of the form size (4 bytes) + size × 20 bytes often describe lookup tables, not standalone assets Many assets are shared, aliased, or referenced indirectly Conclusion: While Patch and Resource MPKs share the same container format, they do not share the same extraction semantics. Resource MPKs require strict validation, deduplication, and asset-type verification to avoid false positives. 4. Audio Extraction & Tooling Initial testing with Ravioli Game Tools proved sub-optimal for this pipeline: Inconsistent parsing of Patch audio assets Unreliable WAV output in multiple cases Switching to vgmstream yielded significantly better results: Correct parsing of recovered audio data Clean, fully functional WAV output Proper handling of codec structures Current result: Audio extraction and conversion are fully verified and stable. 5. Resource.mpk Extraction – Current Progress Testing on Resources49.mpk (~740.9 MB) produced the following results: Successfully extracted: Audio assets → converted to valid .wav files Over 8,500 audio files identified in a single Resource MPK Video files (.mp4) → fully playable Lua scripts (.lua) → extracted but still encrypted / obfuscated Unresolved: Files detected as images (.png, .jpg, .bmp) Headers contain the string “messiah” Strongly suggests custom packing, encryption, or misclassification Currently not valid image data despite file extensions 6. Current Status ✔️All Patch*#.mpk, Resource*#.mpk, and lt*.mpk archives can be unpacked ✔ Audio assets fully recovered and validated ✔ MP4 video assets fully playable ✔ Lua scripts extracted but not yet readable 7. Next Steps Ongoing research will focus on: Reversing additional transformation layers in Resource*#.mpk Identifying: secondary encryption stages compression chaining block or stream reordering Investigating the custom image container format Further analysis of Lua encryption / obfuscation Automating Patch vs Resource handling as two distinct pipelines Notes on Tooling & Distribution All tools used in this project are: developed entirely from scratch created specifically for WWM research used strictly for educational purposes At this stage: no tools, binaries, or scripts will be released no proprietary assets will be redistributed Closing This thread is intended solely as a technical research and documentation log, not as a release, redistribution, or exploitation guide. In accordance with applicable intellectual property laws and forum policies, no tools, binaries, scripts, or extracted assets will be posted or shared, either publicly or privately. All game data, assets, file formats, and related materials discussed here remain the exclusive proprietary property of NetEase and the developers of Where Winds Meet. Any references to assets or file structures are made strictly for educational, analytical, and research purposes, with no intent to enable misuse, circumvention, or redistribution of protected content. Should any concerns arise regarding compliance or scope, I am fully open to cooperating with forum moderation and adjusting the visibility or content of this thread accordingly. Thank you for your understanding and for supporting responsible technical research. — Myro Below are a few illustrative screenshots and log excerpts from the current stage of the research, provided solely to contextualize the findings outlined above.
 3 points
 -
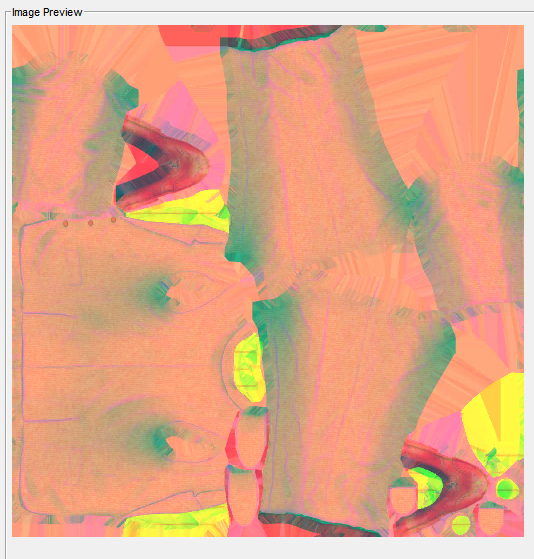
This looks correct. The palette is RGB5551, but is swizzled with the same method as the image (not the standard PS2 palette shift). Patrick should be able to confirm if that can be added to ImageHeat as a palette swizzle option.
3 points
-
I don't know if there are more models in that unpacked folder, you need to check that so examine each file there. Just remember that characters use shorts in vertices buffer, I think I saw other file with floats but maybe that file is not a character or maybe it is but with floats, I really don't know, lol. Here is the script if you want to test it: fmt_black_ps2_prototype_DB.py3 points
-
Version 1.0
9 downloads
Syberia Remastered Localization Tool (2025) * Syberia Remastered Localization Tool.py Required: Python. When installing, make sure to check “Add python.exe to PATH.” Usage: * Copy the LocalizationModule file into the same folder as the .py file. * Run the .py file (double-click it). * In the window that opens, select the language you want to edit. * Export the text into a .tsv file. * Add your translation in the Translation column. * Run the .py file again and import your translation back in. * The new file will be created with the NEW_ suffix. Tested with latest steam Build (20969727) FEARka3 points -
You'd be better using ImageHeat, as it has more options for swizzling, etc. For these, the image is PS2 swizzled, but I can't work out the palette. It doesn't seem to use any of the standard PS2 palette formats, maybe a different swizzling method. This is from "t_compact_rockangelz_closed_00000003":
2 points
-
Drag and drop .md6mesh files into the script it will convert them into obj files. md6mesh.py md6mesh.zip
2 points
-
The "repeated offsets" pointing to new blocks indicate that the main BIGFILE.CAT is acting as a master container that holds smaller, self-contained archives inside it. The Master Index: Points to large chunks of data (e.g., "Level 1 Data", "Level 2 Data"). The "New Block": When you go to that offset, you find a new header (signature 01 00 01 00). The Inner Index: This new header has its own list of files. Because this block is treated as a standalone file by the game engine once loaded, its offsets start at 0 (relative to the start of that block), not relative to the start of the whole disc. [ MASTER CAT (BIGFILE) ] |-- Header |-- Index Entry 1: Offset 1000 -> Points to "Level 1 Block" |-- Index Entry 2: Offset 5000 -> Points to "Level 2 Block" | |... [Data at Offset 1000] ... | +-> [ NESTED CAT (Level 1) ] |-- Header (starts at Master Offset 1000) |-- Index Entry A: Offset 10 (Absolute: 1010) |-- Index Entry B: Offset 50 (Absolute: 1050) |-- Data... Why did developers do this? (The Logic) This approach was necessary due to the hardware limitations of the PlayStation 1 (PS1): RAM Constraints: The PS1 has only 2MB of RAM. It cannot keep a massive table of thousands of file offsets in memory at all times. Modular Loading: The game loads the "Master Index" to find the location of the current level's data. It then streams that specific "Block" (Nested CAT) into memory. Relative Addressing: Once the "Block" is loaded into a specific memory address, the game engine reads the inner offsets. Since these offsets are relative to the start of the block (0), the engine can easily calculate memory pointers without needing to know where the block was originally located on the CD.2 points
-
![More information about "Battlefield 6 [beta] tools"](https://reshax.com/uploads/monthly_2025_08/map.thumb.jpg.f503626435349af5fed86b5ca046925b.jpg)
Version 1.1
554 downloads
Tools for Battlefield 6 beta. Currently supports dumping the game, export models/maps. Usage is similar to previous tools for frostbite engine. toc_bf6.exe - dump tool Change .ini file parameters: - game path - dump path - selection to dump "ebx", "res", "chunks" or "all" Then drop any .toc file onto .exe to dump assets. Or run from command line with 1 parameter - toc file name. Fb_bf6_mesh.exe - model tool Takes .MeshSet as parameter. ske_soldier_3p.ebx - main universal skeleton for soldiers. Must be in the same folder. If you need another skeleton, use its name as 2nd parameter. Or rename it to ske_soldier_3p.ebx. Tool will try to find chunks automatically. If not, it gives error message with chunk name. Map export 1. Create database Run fb_maps_bf6_db.exe tool once, it will scan whole dump for meshsets and blueprints, so later maps can be converted fast, without the need to go into whole tree of assets. This will take a few minutes. After that, 2 files will be created: bp.db & meshnames.txt, which need to stay in the same folder with EXE for main tool to work. 2. Export maps Use fb_maps_bf6.exe (main map tool) to convert maps. Drop any EBX on it, use in command line with 1 parameter, or create a batch. 3. Terrain export Main terrain data is in .TerrainStreamingTree files for each level. For some levels, these files are small, which means the actual data is in chunks. Sometimes data is in the file itself, in this case it may be big, about 50mb in size. Drop .TerrainStreamingTree on fb_terrain_bf6.exe or use command line.2 points -
There is the tool PS2JunjouUnpacker-decompressor.zip2 points
-
I've just released new version of ImageHeat 🙂 https://github.com/bartlomiejduda/ImageHeat/releases/tag/v0.39.1 Changelog: - Added new Nintendo Switch unswizzle modes (2_16 and 4_16) - Added support for PSP_DXT1/PSP_DXT3/PSP_DXT5/BGR5A3 pixel formats - Fixed issue with unswizzling 4-bit GameCube/WII textures - Added support for hex offsets (thanks to @MrIkso ) - Moved image rendering logic to new thread (thanks to @MrIkso ) - Added Ukrainian language (thanks to @MrIkso ) - Added support for LZ4 block decompression - Added Portuguese Brazillian language (thanks to @lobonintendista ) - Fixed ALPHA_16X decoding - Adjusted GRAY4/GRAY8 naming - Added support section in readme file2 points
-
The textures are compressed with ZSTD - just that type 0 means the whole file is not compressed. But there doesn't seem to be any encryption once decompressed - looks something like ETC format:
2 points
-
It's been a while since this topic is up and i have found a way to deal with this: -Step 1: From the .farc files, use either the tool mentioned at the first post of this thread, or download QuickBMS and use the virtua_fighter_5 bms script i included in the zip file below to extract them into bin files. -Step 2: Download noesis and install the noesis-project-diva plugin (https://github.com/h-kidd/noesis-project-diva/tree/main , or in the included zip file) in order to view and extract the textures/models and use them in Blender or a 3d modeling software of your choice. KancolleArcade.zip2 points
-
https://github.com/bartlomiejduda/ImageHeat/releases/tag/nightly1 point
-
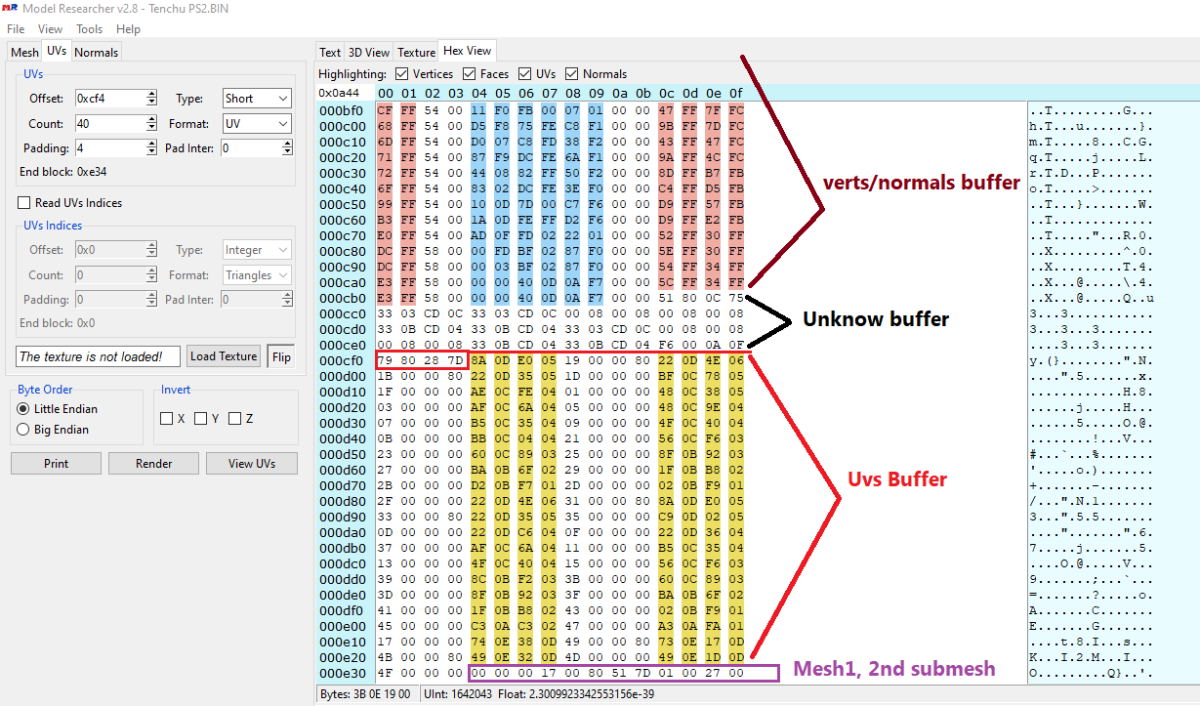
Wait, I think I did something wrong, lol. I can see other unknow block or buffer before UVs. I thought that was the start of UVs but no! So Uvs have the same count as verts after all. The format is: verts/normals buffer: 3 shorts verts, 1 short flag, 3 shorts normals, 1 short flag. unk buffer: ?? UVs buffer: 2 shorts UVs, 4 bytes unk(maybe vertex colors?) Well, it looks like that but I am not sure. About the meshes with floats is: verts/normals buffer: 3 floats verts, 1 short flag, 1 short pad, 3 floats normals, 1 short flag, 1 short pad UVs buffer: 2 shorts UVs, 4 bytes unk(maybe vertex colors?) So meshes with floats don't have that unk buffer. And like always, each buffer has a 4 bytes tag, Here is the last part of the 1st submesh, you cn see that unk buffer before UVs:
1 point
-
Sometimes there's a 2nd uv channel. Do you mean that? (In another case one could also double special vertices to get the same amount like uvs but I forgot how to do that... iterate through faces, somehow. edit: found it, answer from Daniol Dan, ""thus each vertex has its own single UV coord"" Not sure whether this will apply to your problem, though.1 point
-
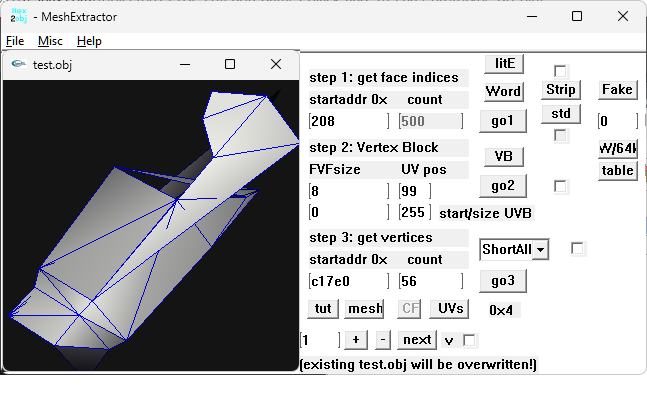
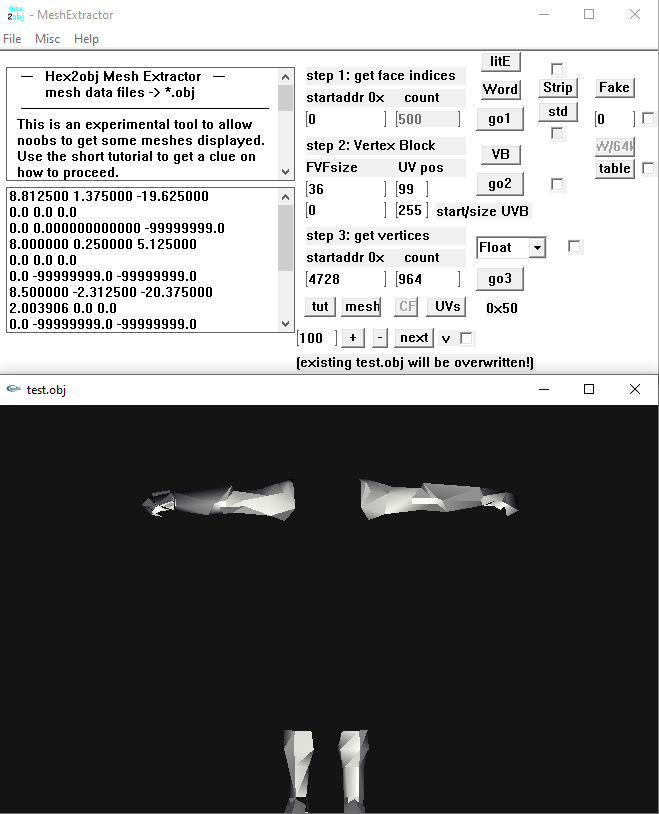
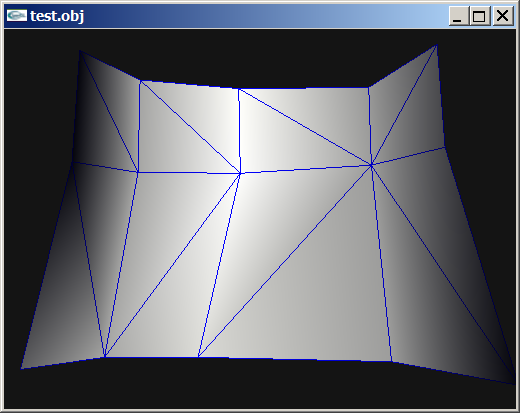
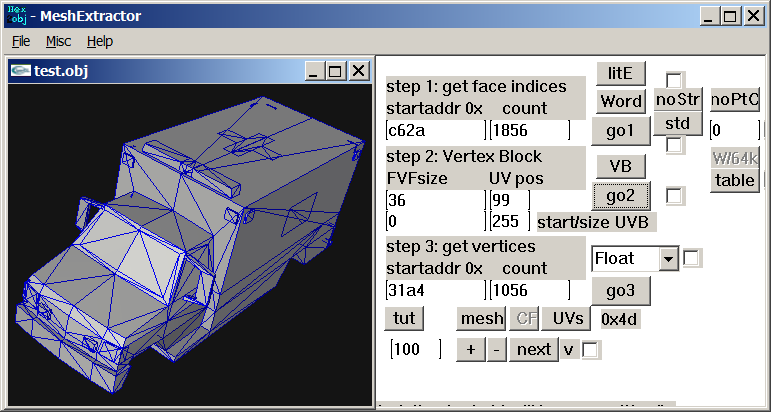
Today I am gonna show you, how to reverse eningeer any Binary 3D Models, turns out this is not that hard and actually one of the cooolest things in reverse enigneering! (Uncompressed and un-encrypted models obviously). +====TUTORIAL SECTION=====+ INTRODUCTION But how do all those models store their 3D Data? Well, the answer is simple, there is no magic here, All 3D Models are just made up of *Vertecies*, *Faces*, *Vertex UV Coordinates* and *Vertex Normal Coordinates* They are definatelly *must* somewhere there in your file (this place is called buffer) and there is absolutelly no extra magic in here. This is how the Vertecies look like: v 1.0 4.0 3.0 <= X, Y, Z matrix coordinates (usually from 0.01 to 1000) v 2.0 3.0 4.0 <= Point values so are usually floats v 6.0 2.0 3.0 <= Usually stable, values don't varry to much in max and min values This is how faces looks like: f 1 2 3 <= Takes all those previous vertecies and makes a triangle out of them This is how UV Vertex coords look lke: vt 0.2 0.3 <= 2D coordinate of the first vertex (usually from 0.1 to 1.0) vt 0.5 0.2 <= Point values so are usually floats vt 0.3 0.1 <= Usually stable, values don't warry to much in max and min values This is how Vertex normals look like: [not so important actually] vn 0.745 0.845 0.360 <= X, Y, Z matriz coordinates (usually from 0.01 to 1) vn 0.320 0.625 0.270 <= Point values so are usually floats, so "v2 x, y, z" vn 0.430 0.320 0.390 <= Usually stable, values don't warry much in max and min values The result is a simple triangle that has it's own UV Map too. This is how the simplest 3D Model format OBJ stores their 3D Model data, hovewer we can say that all of the binary models store their 3D Data in OBJ file format there is just one more thing to it. Binary formats have only two ways of storing their 3D Data (Aside faces) in a Separate way and Structured way, here is how it looks like: Separate way: vertex_buffer = [ v1 1.0 4.0 3.0 <= X, Y, Z matrix coordinates (usually from 0.01 to 1000) v2 2.0 3.0 4.0 <= Point values so are usually floats, so "v2 x, y, x" v3 6.0 2.0 3.0 <= Usually stable, values don't varry to much in max and min values ... ] face_buffer = [ f1 1 2 3 <= Takes all those previous vertecies and makes triangle out of them, so "f1 v1, v2, v3" ... ] uv_coords_buffer = [ vt1 0.2 0.3 <= 2D coordinate of the first vertex (usually from 0.1 to 1.0) vt2 0.5 0.2 <= Point values so are usually floats, so "vt2 u, v" vt3 0.3 0.1 <= Usually stable, values don't warry to nuch in max and min values ... ] vertex_normals_buffer = { vn1 0.745 0.845 0.360 <= X, Y, X matrix coordinates (usually from 0.01 to 1) vn2 0.320 0.625 0.270 <= Point values so are usually floats, so "v2, x, y, z" vn3 0.450 0.310 0.390 <= Usually stable, values don't warry much in max and min values ... } Structured way: buffer = [ {v1 1.0 4.0 3.0, vt1 0.2 0.3, vn1 0.745 0.845 0.360} {v2 2.0 3.0 4.0, vt2 0.5 0.2, vn2 0.320 0.625 0.270} {v3 6.0 2.0 3.0, vt3 0.3 0.1, vn3 0.450 0.310 0.390} ... ] BINARY DATA The data in each file can be viewed as binary no matter if it was readable or unreadable or even empty before, viewing it in binary will spoil immediatelly everything. And while binary files are all the same, the way we read it changes drastically everything! To view your binary file yiou must dump HEX from it or load it into HEX Viewer: Example file: Addres: HEX Bytes: ASCII: 0012BFC0 48 53 68 61 70 65 5F 31 37 00 00 00 00 00 01 00 HShape_17....... <= First line contains ASCII strings 0012BFD0 00 00 0A 00 00 00 22 00 00 10 00 00 00 00 0C 00 ......"......... <= Second line does not contain ASCII strings 0012BFE0 00 00 61 32 76 2E 6F 62 6A 43 6F 6F 72 64 01 00 ..a2v.objCoord.. <= Third line contains ASCII strings 0012BFF0 00 00 FF FF FF FF 02 00 00 00 47 04 00 00 82 56 ..........G....V <= Fourth line contains interesting "00 00 FF FF FF FF" buffer mark 0012C000 F9 40 39 94 59 43 76 26 13 41 BB 61 FB 40 5A A4 [email protected]&.A.a.@Z. <= Fifth line starts containg the actual float Vertex coordinates! But looks random in ASCII strings! 0012C010 5B 43 95 B7 00 41 8F 70 CB 40 C1 4A 5B 43 31 08 [[email protected][C1. <= Sixth line contains actual float Vertex coordinates! But looks random in ASCII strings! 0012C020 12 41 8A 8E C9 40 E7 5B 59 43 E8 82 1D 41 90 A0 .A...@.[YC...A.. <= Seventh line contains actual flaot Vertex coordinates! But looks still random in ASCII strings! 0012C030 62 40 21 90 58 43 05 DD 1C 41 BC B3 78 40 D7 63 b@[email protected] <= Eight line contains actual float Vertex coordinates! But looks again random in ASCII strings! But what are those floats, shorts and ASCII? The Bits are the smallest units of computer data they are either 0 or 1 and comma. The Bytes hgovewer is a combined 8 Bits that can actually start representing some data. Those are Bits ranging from 0 to 255, where 0 is also precieved as an important value (So 256 combinations), (I represented them in HEX, 0-F values, so a 256 combinations) Here is one Byte for example: 10110111 (32 16 8 4 2 1 = 256 bits as sum), combining Bytes together we can make multiple data types. This are all of the data types: Byte/Char => 1 Byte, unsigned/signed (8 Bits) |Example: 48 <= H | ASCII Word/Short => 2 bytes, unsigned/signed (16 Bits) |Example: 48 53 <= HS | ASCII Dword/Int => 4 bytes, unsigned/signed (32 Bits) |Example: 48 53 68 61 <= HShap | ASCII ULONG32/Long => 4 Byte, unsigned/signed (32 Bits) |Example: 48 53 68 61 <= HShap | ASCII ULONG64/Long Long => 8 Byte, unsigned/signed (64 Bits) |Example: 48 53 68 61 70 65 5F 31 <= HShape_17 | ASCII float => 4 bytes, for represnting floating point values (32 Bits) |Example: 48 53 68 61 <= HShap | ASCII double => 8 bytes, for representing more precise floating point values (64 Bits) |Example: 48 53 68 61 70 65 5F 31 <= HShape_17 | ASCII String/Char => A Sequence/Array of Characters terminated by the nulll character |Example: 48 53 68 61 70 65 5F 31 <= HShape_17 | ASCII Big-Endin vs Little-Endian: Reading in Big-Endian for example a float byte will read it normally, left-to-right 48 53 68 61 "HShap", where's Little-endin reads byte in reverse order, right-to-left 61 68 53 48 "paSH". Big-Endians were mainly used in PS3, Xbox360 and Wii platforms where Little-Endians are mainly in Windows, PS4, Xbox One, Nintendo Switch. TRYING TO REVERSE THE BINARY 3D FORMAT But how do we actually apply this info into reverse engineering the binary 3D file format structure and even converting it into an OBJ Model. Assuming that you have the actual decompressed/uncompressed and decrypted/unencrypted binary 3D model file, you can actually visualize the 3D Data geometry while analyzing the HEX from it in realtime! ModelResearcherUltimate is the program that will enable this opportunities. First of, Level 1: Start with vertecies count 500, type: float, carefully try different offsets while printing the values and render it too, until you see a countinous very stable output without insanelly big or small values. (from 0.001 to 1000). If nothing works try with different Endianess, then try a different type (unlikely). If the mesh appears but random vertecies appear too that means that the Data structure is sctructured and you need to try different Padding or even Pad inters sometimes. Second of, Level 2: Start with vertex UV coordinates count [exactly how many vertecies], type: float, carefully try different offsets while printing the values and rendering it too, until you see a countinous stable output without insanelyy big or small values (from 0.0001 to 1.) If nothing works try different type, since you already know the Endianes and Structure. Third of, Level 3: Start with faces, they are actually very carefully linked with vertecies, so the errors will constantly appear, carefully try different offsets while printing the values, don't render it, it will often just throw the errors. You will need see the full values without floating points that are very stable in output without big and small values, if nothing works try different type or even the format. Fourth of, Level 4: [To be honest I didn't know what to write here, normals are pretty useless though, you can just flip them and calculate, very easily in programs like Blender in just a few clicks, so it's not worth your brainstorming!] Practical steps: Here is how BAD Data will look like: [random, disoriented pattern, extreamly low and extreamly big values occur] v -0.0000 -0.0000 -184538016.0000 v -0.0000 15.7924 -158665664.0000 v -0.0000 90990377942005974930976407552.0000 -17551224.0000 v -0.0000 -3386287.2500 -115467744.0000 v -0.0000 15397417210601645679040601784320.0000 -22963316.0000 v -0.0000 15397417210601645679040601784320.0000 -22963316.0000 vt 0.0000 1785889664.0000 vt 0.0000 140283808776479363868647227392.0000 vt 0.0000 10997215558668704718782464.0000 vt 0.0000 -516472.2188 vt 0.0000 -0.0000 vt 0.0000 0.0000 f 57856 10240 3073 f 3073 64769 57856 f 31744 64768 3072 f 57857 64768 58112 f 57856 58112 58368 f 58112 59136 58368 Here is how GOOD data looks like: [strong countinous repating pattern, values are pretty much very similiar] v -0.0733 0.0012 1.6030 v -0.0735 -0.0118 1.6023 v -0.0776 -0.0146 1.5900 v -0.0718 -0.0247 1.6005 v -0.0784 0.0009 1.5913 v -0.0784 0.0009 1.5913 vt 0.0008 0.6221 vt 0.0316 0.6229 vt 0.0344 0.6543 vt 0.0628 0.6246 vt 0.0008 0.6539 vt 0.9978 0.6533 f 226 296 268 f 268 253 226 f 124 253 268 f 226 253 227 f 226 227 228 f 227 231 228 Changing Offfset (oftenly) or Endianess or Type will instanly give the different results including BAd data drastically turning into a GOOD data so keep that in mind and play with those offsets. There is just one small but very important step left, most of the time those binary files leave also values like Vertex count (UV Coords and Vertex Normals count is the same as Vertex always), Face count, buffer mark and even Vertex stride! (Vertex Stride = Vertex Padding + 12, UV Coords stride = UV Coords stride + 8). They are essentially at the begginning of the mesh buffer and are pretty easy to find and are always placed in the same way hovewer, this time I personally recommend finding them using the dedicated HEX viewer, my recommendadions are IM Hex, truly the open-sourse king in terms of ease of use.1 point
-
Hello! Out of boredom, I decided to replace texture from a Godot game, in this case Slot or Not, by using Python but failing and failing over again exhausted me. My script has data and their MD5 hash code replacement, and data header change. I doubt that something doesn’t work or they are others data somewhere. I also think even if both WebP data from Godot and PIL are working, their data processing are different thus incompatible. Not even replacing them with PNG data works. I suspect there is a checksum for PCK somewhere. I compared its PCK file with Super Mario 127’s. Although the WebP data for CTEX and STEX are the same, the data pointers in SM127 are at the start of the file, after the header; SoN are at the bottom. The PCK for V1 is documented in Xentax wiki but not for V3. It may be small but this comparison shouldn’t be dismissed. What I need: If there is a checksum for PCK, where it is? The Bytes leading to the data header thus making the Python script adaptable If the WebP data is the issue, a better understanding of Godot’s WebP data Feel free to reply if you find anything! Slot or Not (PCK File V3) son PCK File.zip Godot Picture Replacer Script (Work in progress) Godot Pictures Replacer Script.py Note for the creator of Slot Or Not, you don’t have to turn it into an moddable game. The game need its own resource to be good game. I do this because why not and for research purpose. Knowledge GODOT PCK FILE FORMAT (Little Endian) (From Slot or Not) HEADER (112 Bytes) 4 Bytes = Signature ("GDPC") 4 Bytes = 03 00 00 00 (Engine Version) 4 Bytes = 04 00 00 00 (Major) 4 Bytes = 05 00 00 00 (Minor) 4 Bytes = 00 00 00 00 (Revision) 4 Bytes = 02 00 00 00 4 Bytes = 70 00 00 00 (First File Pointer) 4 Bytes = 00 00 00 00 4 Bytes = File Numbers 4 x 19 Bytes = 00s (Reserved) DATA HEADER (Found at the last part of the file) 4 Bytes = Length of Path, Including the 00s X Bytes = Path Name + 00s (If not divisible by 4) 8 Bytes = Data Pointer - 112 8 Bytes = File Size 16 Bytes = Data MD5 Checksum 4 Bytes = 00 00 00 00 GODOT CTEX FILE FORMAT (Little Endian) For WebP Format { 4 Bytes = String GTS2 4 Bytes = Use Alpha or Not (01 = Yes; 00 = No) 4 Bytes = Height 4 Bytes = Width 4 Bytes = 00 00 00 0D 4 Bytes = FF FF FF FF 4 x 3 Bytes = 00s (Reserved?) 4 Bytes = 02 00 00 00 2 Bytes = Height 2 Bytes = Width 4 Bytes = 00s 4 Bytes = 05 00 00 00 4 Bytes = Data Size after this Byte 4 Bytes = String RIFF 4 Bytes = WebP Data Size after this Byte 8 Bytes = WEBPVP8L / Tag for Loseless Encoded Image Data 4 Bytes = Data Size (or Data Size - 1 if WebP Chunk ends with 00) (Rest of the File) X Bytes = WEBP VP8L Chunk (On Python, the settings are Loseless = True, EXIF = False) 0-15 Bytes = 00 for Fill Up if the CTex Data Size isn't a divisible of 16 } [NOTE: You can get the WebP data by removing the GTS2 Header.] For PNG Format { X Bytes = PNG File Data 0-15 Bytes = 00 for Fill Up if the CTex Data Size isn't a divisible of 16 } X Bytes = String for [Remap], Settings, Path, Texture, Vram X Bytes = 00s (if the length the String isn’t a divisible of 16)
1 point
-
UModel is mis-parsing the package, usually because the game’s UE2 fork / package format doesn’t match what UModel expects with the current settings. Umodel to my knowledge works with this game. Your settings are not correct. I will elaborate using your error. FArray::Empty: -116 x 12 UModel tried to allocate an array with -116 elements of 12 bytes each. A negative element count is impossible, so the size overflows to a negative number (-1392) and appMalloc blows up. UModel is reading the wrong structure at that position (e.g., thinks this field is “NumVerts” but it’s actually some other 32-bit value), because the package layout / engine profile doesn’t match what UModel expects for “game=ue2” in this case. The rest of the stack confirms it dies while trying to load a skeletal mesh from that .ukx, not on textures or trivial data. In easy to understand terms. "wrong assumptions about how this game’s .ukx stores its skeletal meshes". Umodel should have a selection on the side for where you can pick game targets. If the game isn't there then you might be out of luck. However, I think this game shares a target with another game. Just trial and error to see if any of them work. Also, if this is not a "PC" version of the game you need to change the "Auto" on the bottom right of the gui to the specific platform. I know the topic says PC. People do make mistakes. Unreal Engine 2 games are rare and few in between. Not many people cared to work with any of them. Even the Wheels of Time game didn't get much investment. Also, turn off all forms of textures/material when first trying with unreal engine 2 games to speed up the process especially with whack a mole trial and error. The only people that would even bother adding support to this game which is extremely unlikely are on Gildor's forum. Again, very few people would ever care for an Unreal Engine 2 or 1 game. I am sorry if this wasn't helpful.1 point
-
As per i am a good for nothing in 3d model issues., i can´t tell if te unpack works, but studying DB, i can see 2 types of TOC. Attached the py script, if someone wants to take a look. just drop the files DB or bins in .py or double click in .py black_ps2_unpack.py1 point
-
For PS2, level_00, chardata.db it's a matter of assembling sub meshes (and maybe a better face creation algo):
1 point
-
Hi i was wondering if there is a way to open the .arc files for The Sims on the original Xbox I'm curious to see if the archived files are in .IFF format i tried using The Sims 2 .arc QuickBMS script but to no avail EDIT: Found a script that work ironically it was a Hulk .arc script. Thank You ikskoks1 point
-
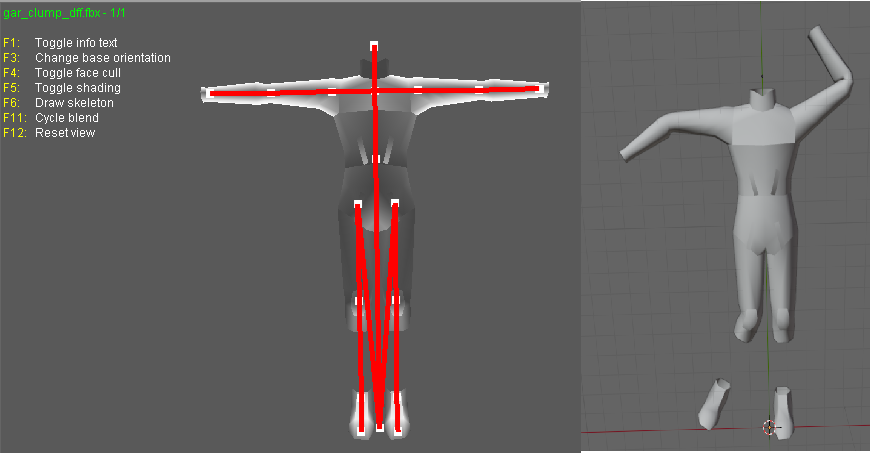
Ok, thanks. You rule that format (besides the anims). I'll check the files tomorrow. (If I can't help maybe someone else can, with all the files provided.) Good night. edt: well, being more the "simple analyzer" I focussed on the skeleton (21 bones?) in the dff file and the gar.rws.dec_be_-15_anim_27.rwanm: I think the 5th column here could be the frame time in msec with translation and rotation values to follow: address 0x1b6: 30486 29945 63488 29628 58856 65209 0 0 51393 54393 57171 30685 30720 63488 29628 58856 65209 0 0 32768 32768 59982 30502 59743 63488 29628 58856 65209 34953 15752 0 0 0 30720 63488 63488 29628 0 0 34953 15624 61841 59913 29289 27424 63488 30459 59522 24 0 34953 15624 22619 21982 18934 30704 58259 63488 29628 48 0 34953 15624 30430 60362 20288 17433 25922 63488 29628 72 0 34953 15624 30136 28721 52832 21347 59344 63488 29628 96 0 34953 15624 48489 62528 16374 29259 25922 63488 29628 120 0 34953 15624 60085 59294 26987 30152 58965 63488 29628 144 0 34953 15624 0 0 62248 29560 24551 63488 29628 168 0 34953 15624 15843 53973 27979 30346 23143 63488 29628 192 0 34953 15624 53430 29725 53792 29292 25922 63488 29628 216 0 34953 15624 26788 24635 22352 30525 58965 63488 29628 240 0 34953 15624 0 0 61788 29946 24551 63488 29628 264 0 34953 15752 22777 25316 22954 30638 23143 63488 29628 288 0 34953 15624 61008 30170 26220 address 0x316: 13303 63488 63488 28399 312 0 34953 15624 0 0 27758 30398 29945 63488 29628 336 0 34953 15624 7522 11482 59715 30545 30720 63488 29628 360 0 34953 15752 32768 32768 59982 30502 59743 63488 29628 384 0 34953 15624 61466 29974 59213 57464 63488 63488 30720 408 0 34953 15624 0 0 28454 30232 29945 63488 29628 432 0 34953 15624 51986 54325 58411 30640 30720 63488 29628 456 0 34953 15752 32768 32768 59982 30502 59743 63488 29628 480 0 34953 15752 59840 61645 28387 29176 63488 30184 63488 528 0 34953 15752 21331 23096 25805 30620 58259 63488 29628 552 0 34953 15752 30629 58637 21582 16964 25922 63488 29628 576 0 34953 15752 30156 28689 53876 51939 59344 63488 29628 600 0 34953 15752 47599 62461 15165 29336 25922 63488 29628 624 0 34953 15752 59092 59464 28203 30010 58965 63488 29628 648 0 34953 15752 0 0 62825 28859 24551 63488 29628 672 0 34953 15752 52057 53845 27997 30341 23143 63488 29628 696 0 34953 15752 55057 29609 55317 address 0x476: 29406 25922 63488 29628 720 0 34953 15752 56171 26016 20052 30608 58965 63488 29628 744 0 34953 15752 0 0 61930 29839 24551 63488 29628 768 0 34953 15752 29497 62179 58598 22637 63488 63488 28399 816 0 34953 15752 0 0 28323 30266 29945 63488 29628 840 0 34953 15752 7817 11470 59999 30499 30720 63488 29628 864 0 34953 15752 29655 61689 27187 25651 63488 63488 30720 912 0 34953 15752 0 0 29009 29954 29945 63488 29628 936 0 34953 15752 52130 54326 59350 30587 30720 63488 29628 960 0 29287 16404 44589 16658 52439 //49164 29287 16404 44589 16658 9 16448 21 0 1 2 I checked 40 blocks with a size of 22 bytes but none of the point clouds resembled an animation curve (although you can get some points in a line sometimes).
1 point
-
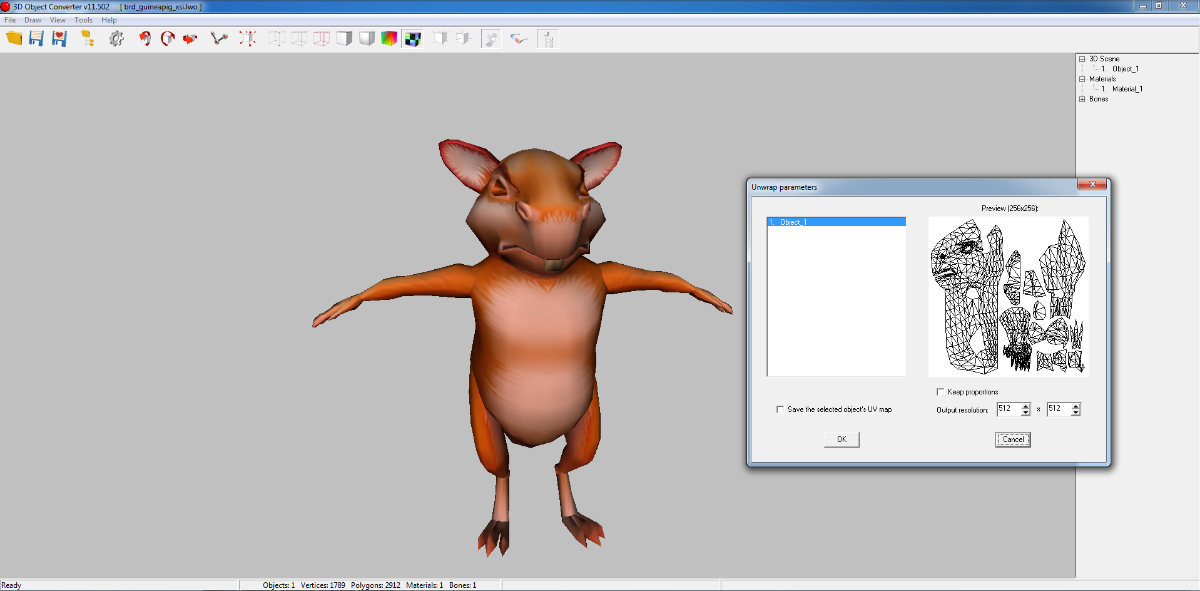
I couldn't find the UVs.
1 point
-
I fear there's not too many who dealed with PS2 animations in this forum, me included. Do you have skeleton data? I checked the dff mesh, looks doable, but usually I don't like to work from scratch:
1 point
-
there is a lot of overlap, in fact the Kameo alpha uses the exact same CAFF version as the Conker Demo. the lvl files are just an archive/container of sorts while the assets themselves are packaged inside individual "CAFF" containers. for example: the file struct is fairly basic for the LVL container itself(for imhex): struct LVL_ENTRY { u32 unk_00; u32* address : u32; }; struct LVL_FILE_TABLE { u32 count; LVL_ENTRY array[count]; }; LVL_FILE_TABLE table @ 0x00; they're similar in a sense that Conker stores the assets inside a "ZPackage" CAFF container instead of using an external container(.LVL) to store the individual CAFF assets. unlike the earlier games like GBTG kameo also stores a lot of data inside pushbuffer commands including things like the triangles/shaders/shaderparams. but as far as models go theyre very similar (as thats what i've spent the most time on) not sure about the other assets tho.1 point
-
i used retool to get the files out, here are the raw files and textures sample.rar1 point
-
1 point
-
animewwise just closes instantly if you try it on there. Regular wwise works https://github.com/mortalis13/Wwise-Unpacker BeyondToolsMod-net9.zip1 point
-
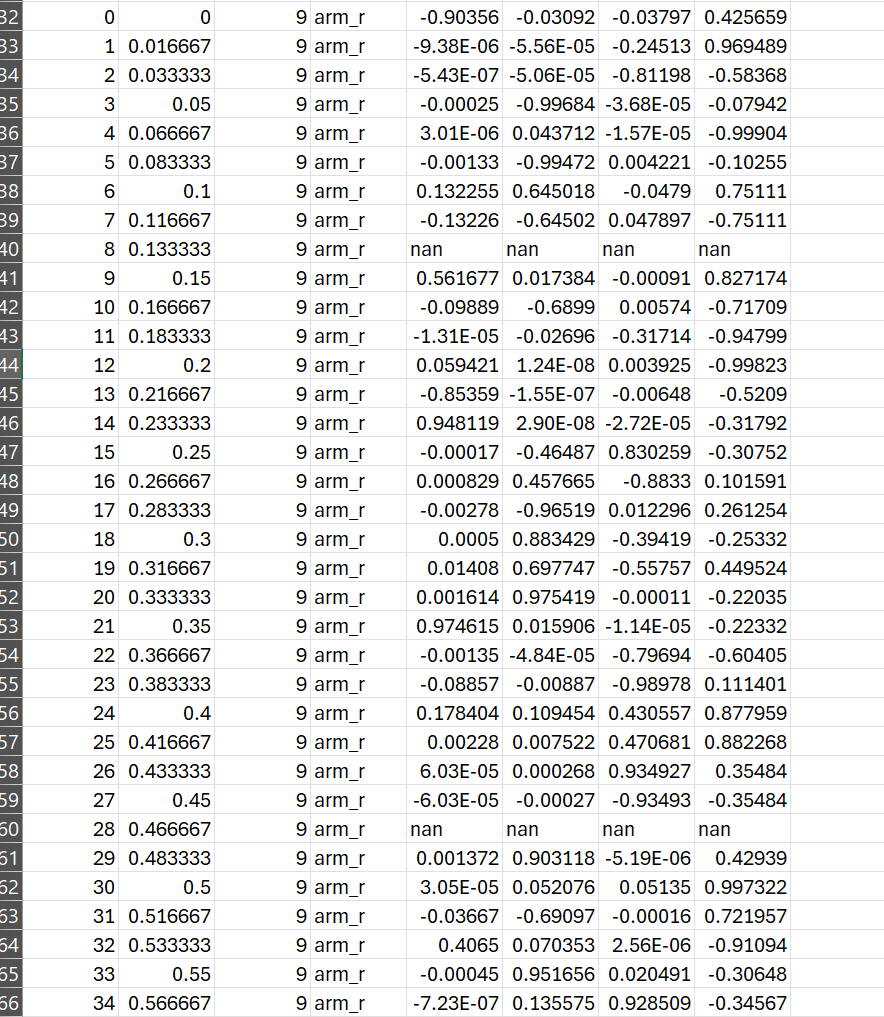
=== Available bones in motion file === 2: waist - Other[type=0x01, keyType=1(StaticValue), frames=1], Other[type=0x02, keyType=0(Static0), frames=0], Other[type=0x00, keyType=0(Static0), frames=0], Other[type=0x06, keyType=1(StaticValue), frames=1], Other[type=0x07, keyType=1(StaticValue), frames=1], Other[type=0x08, keyType=1(StaticValue), frames=1] 3: chest - Other[type=0x01, keyType=1(StaticValue), frames=1], Other[type=0x02, keyType=1(StaticValue), frames=1], Other[type=0x06, keyType=1(StaticValue), frames=1], Other[type=0x07, keyType=1(StaticValue), frames=1], Other[type=0x08, keyType=1(StaticValue), frames=1], Rotation[type=0x11, keyType=1(StaticValue), frames=1] 6: eye_r - Other[type=0x01, keyType=1(StaticValue), frames=1], Other[type=0x02, keyType=1(StaticValue), frames=1], Other[type=0x06, keyType=1(StaticValue), frames=1], Other[type=0x07, keyType=1(StaticValue), frames=1], Other[type=0x08, keyType=1(StaticValue), frames=1], Rotation[type=0x11, keyType=6(QuatSlerp), frames=68] 7: eye_l - Other[type=0x01, keyType=1(StaticValue), frames=1], Other[type=0x02, keyType=1(StaticValue), frames=1], Other[type=0x06, keyType=1(StaticValue), frames=1], Other[type=0x07, keyType=1(StaticValue), frames=1], Other[type=0x08, keyType=1(StaticValue), frames=1], Rotation[type=0x11, keyType=6(QuatSlerp), frames=62] 8: shoulder_r_jo - Other[type=0x01, keyType=1(StaticValue), frames=1], Other[type=0x02, keyType=1(StaticValue), frames=1], Other[type=0x06, keyType=1(StaticValue), frames=1], Other[type=0x07, keyType=1(StaticValue), frames=1], Other[type=0x08, keyType=1(StaticValue), frames=1], Rotation[type=0x11, keyType=6(QuatSlerp), frames=67] 9: arm_r - Other[type=0x01, keyType=1(StaticValue), frames=1], Other[type=0x02, keyType=1(StaticValue), frames=1], Other[type=0x06, keyType=1(StaticValue), frames=1], Other[type=0x07, keyType=1(StaticValue), frames=1], Other[type=0x08, keyType=1(StaticValue), frames=1], Rotation[type=0x11, keyType=6(QuatSlerp), frames=101] 10: forearm_r - Other[type=0x01, keyType=1(StaticValue), frames=1], Other[type=0x02, keyType=1(StaticValue), frames=1], Other[type=0x06, keyType=1(StaticValue), frames=1], Other[type=0x07, keyType=1(StaticValue), frames=1], Other[type=0x08, keyType=1(StaticValue), frames=1], Rotation[type=0x11, keyType=6(QuatSlerp), frames=34] 11: wrist_r - Other[type=0x01, keyType=1(StaticValue), frames=1], Other[type=0x02, keyType=1(StaticValue), frames=1], Other[type=0x06, keyType=1(StaticValue), frames=1], Other[type=0x07, keyType=1(StaticValue), frames=1], Other[type=0x08, keyType=1(StaticValue), frames=1], Rotation[type=0x11, keyType=6(QuatSlerp), frames=101] 12: pinky_r_jo - Other[type=0x01, keyType=1(StaticValue), frames=1], Other[type=0x02, keyType=1(StaticValue), frames=1], Other[type=0x06, keyType=1(StaticValue), frames=1], Other[type=0x07, keyType=1(StaticValue), frames=1], Other[type=0x08, keyType=1(StaticValue), frames=1], Rotation[type=0x11, keyType=6(QuatSlerp), frames=89] 14: pinky_b_r - Other[type=0x01, keyType=0(Static0), frames=0], Other[type=0x00, keyType=0(Static0), frames=0], Other[type=0x02, keyType=1(StaticValue), frames=1], Other[type=0x06, keyType=1(StaticValue), frames=1], Other[type=0x07, keyType=1(StaticValue), frames=1], Other[type=0x08, keyType=1(StaticValue), frames=1] 15: pinky_c_r - Other[type=0x01, keyType=0(Static0), frames=0], Other[type=0x00, keyType=0(Static0), frames=0], Other[type=0x02, keyType=0(Static0), frames=0], Other[type=0x00, keyType=0(Static0), frames=0], Other[type=0x06, keyType=1(StaticValue), frames=1], Other[type=0x07, keyType=1(StaticValue), frames=1] 16: ring_r - Other[type=0x01, keyType=1(StaticValue), frames=1], Other[type=0x02, keyType=1(StaticValue), frames=1], Other[type=0x06, keyType=1(StaticValue), frames=1], Other[type=0x07, keyType=1(StaticValue), frames=1], Other[type=0x08, keyType=1(StaticValue), frames=1], Rotation[type=0x11, keyType=6(QuatSlerp), frames=84] 20: middle_a_r - Other[type=0x01, keyType=1(StaticValue), frames=1], Other[type=0x02, keyType=1(StaticValue), frames=1], Other[type=0x06, keyType=1(StaticValue), frames=1], Other[type=0x07, keyType=1(StaticValue), frames=1], Other[type=0x08, keyType=1(StaticValue), frames=1], Rotation[type=0x11, keyType=6(QuatSlerp), frames=96] 21: middle_b_r - Other[type=0x01, keyType=1(StaticValue), frames=1], Other[type=0x02, keyType=1(StaticValue), frames=1], Other[type=0x06, keyType=1(StaticValue), frames=1], Other[type=0x07, keyType=1(StaticValue), frames=1], Other[type=0x08, keyType=1(StaticValue), frames=1], Rotation[type=0x11, keyType=6(QuatSlerp), frames=89] 22: middle_c_r - Other[type=0x01, keyType=1(StaticValue), frames=1], Other[type=0x02, keyType=0(Static0), frames=0], Other[type=0x00, keyType=0(Static0), frames=0], Other[type=0x06, keyType=1(StaticValue), frames=1], Other[type=0x07, keyType=1(StaticValue), frames=1], Other[type=0x08, keyType=1(StaticValue), frames=1] 23: index_a_r - Other[type=0x01, keyType=1(StaticValue), frames=1], Other[type=0x02, keyType=1(StaticValue), frames=1], Other[type=0x06, keyType=1(StaticValue), frames=1], Other[type=0x07, keyType=1(StaticValue), frames=1], Other[type=0x08, keyType=1(StaticValue), frames=1], Rotation[type=0x11, keyType=1(StaticValue), frames=1] 24: index_b_r - Other[type=0x01, keyType=0(Static0), frames=0], Other[type=0x00, keyType=0(Static0), frames=0], Other[type=0x02, keyType=1(StaticValue), frames=1], Other[type=0x06, keyType=1(StaticValue), frames=1], Other[type=0x07, keyType=1(StaticValue), frames=1], Other[type=0x08, keyType=1(StaticValue), frames=1] 25: index_c_r - Other[type=0x01, keyType=1(StaticValue), frames=1], Other[type=0x02, keyType=0(Static0), frames=0], Other[type=0x00, keyType=0(Static0), frames=0], Other[type=0x06, keyType=1(StaticValue), frames=1], Other[type=0x07, keyType=1(StaticValue), frames=1], Other[type=0x08, keyType=1(StaticValue), frames=1] 26: thumb_r_jo - Other[type=0x01, keyType=1(StaticValue), frames=1], Other[type=0x02, keyType=1(StaticValue), frames=1], Other[type=0x06, keyType=1(StaticValue), frames=1], Other[type=0x07, keyType=1(StaticValue), frames=1], Other[type=0x08, keyType=1(StaticValue), frames=1], Rotation[type=0x11, keyType=6(QuatSlerp), frames=90] 28: thumb_b_r - Other[type=0x01, keyType=1(StaticValue), frames=1], Other[type=0x02, keyType=1(StaticValue), frames=1], Other[type=0x06, keyType=1(StaticValue), frames=1], Other[type=0x07, keyType=1(StaticValue), frames=1], Other[type=0x08, keyType=1(StaticValue), frames=1], Rotation[type=0x11, keyType=6(QuatSlerp), frames=92] 29: shoulder_l_jo - Other[type=0x01, keyType=1(StaticValue), frames=1], Other[type=0x02, keyType=1(StaticValue), frames=1], Other[type=0x06, keyType=1(StaticValue), frames=1], Other[type=0x07, keyType=1(StaticValue), frames=1], Other[type=0x08, keyType=1(StaticValue), frames=1], Rotation[type=0x11, keyType=6(QuatSlerp), frames=78] 30: arm_l - Other[type=0x01, keyType=1(StaticValue), frames=1], Other[type=0x02, keyType=0(Static0), frames=0], Other[type=0x00, keyType=0(Static0), frames=0], Other[type=0x06, keyType=1(StaticValue), frames=1], Other[type=0x07, keyType=1(StaticValue), frames=1], Other[type=0x08, keyType=1(StaticValue), frames=1] 31: forearm_l - Other[type=0x01, keyType=1(StaticValue), frames=1], Other[type=0x02, keyType=1(StaticValue), frames=1], Other[type=0x06, keyType=1(StaticValue), frames=1], Other[type=0x07, keyType=1(StaticValue), frames=1], Other[type=0x08, keyType=1(StaticValue), frames=1], Rotation[type=0x11, keyType=6(QuatSlerp), frames=52] 32: wrist_l - Other[type=0x01, keyType=1(StaticValue), frames=1], Other[type=0x02, keyType=1(StaticValue), frames=1], Other[type=0x06, keyType=1(StaticValue), frames=1], Other[type=0x07, keyType=1(StaticValue), frames=1], Other[type=0x08, keyType=1(StaticValue), frames=1], Rotation[type=0x11, keyType=6(QuatSlerp), frames=52] 33: pinky_l_jo - Other[type=0x01, keyType=1(StaticValue), frames=1], Other[type=0x02, keyType=1(StaticValue), frames=1], Other[type=0x06, keyType=1(StaticValue), frames=1], Other[type=0x07, keyType=1(StaticValue), frames=1], Other[type=0x08, keyType=1(StaticValue), frames=1], Rotation[type=0x11, keyType=6(QuatSlerp), frames=52] 35: pinky_b_l - Other[type=0x01, keyType=1(StaticValue), frames=1], Other[type=0x02, keyType=0(Static0), frames=0], Other[type=0x00, keyType=0(Static0), frames=0], Other[type=0x06, keyType=1(StaticValue), frames=1], Other[type=0x07, keyType=1(StaticValue), frames=1], Other[type=0x08, keyType=1(StaticValue), frames=1] 36: pinky_c_l - Other[type=0x01, keyType=1(StaticValue), frames=1], Other[type=0x02, keyType=1(StaticValue), frames=1], Other[type=0x06, keyType=1(StaticValue), frames=1], Other[type=0x07, keyType=1(StaticValue), frames=1], Other[type=0x08, keyType=1(StaticValue), frames=1], Rotation[type=0x11, keyType=1(StaticValue), frames=1] 37: ring_l - Other[type=0x01, keyType=1(StaticValue), frames=1], Other[type=0x02, keyType=1(StaticValue), frames=1], Other[type=0x06, keyType=1(StaticValue), frames=1], Other[type=0x07, keyType=1(StaticValue), frames=1], Other[type=0x08, keyType=1(StaticValue), frames=1], Rotation[type=0x11, keyType=6(QuatSlerp), frames=52] 41: middle_a_l - Other[type=0x01, keyType=1(StaticValue), frames=1], Other[type=0x02, keyType=1(StaticValue), frames=1], Other[type=0x06, keyType=1(StaticValue), frames=1], Other[type=0x07, keyType=1(StaticValue), frames=1], Other[type=0x08, keyType=1(StaticValue), frames=1], Rotation[type=0x11, keyType=6(QuatSlerp), frames=92] 42: middle_b_l - Other[type=0x01, keyType=1(StaticValue), frames=1], Other[type=0x02, keyType=0(Static0), frames=0], Other[type=0x00, keyType=0(Static0), frames=0], Other[type=0x06, keyType=1(StaticValue), frames=1], Other[type=0x07, keyType=1(StaticValue), frames=1], Other[type=0x08, keyType=1(StaticValue), frames=1] 43: middle_c_l - Other[type=0x01, keyType=1(StaticValue), frames=1], Other[type=0x02, keyType=1(StaticValue), frames=1], Other[type=0x06, keyType=1(StaticValue), frames=1], Other[type=0x07, keyType=1(StaticValue), frames=1], Other[type=0x08, keyType=1(StaticValue), frames=1], Rotation[type=0x11, keyType=1(StaticValue), frames=1] 44: index_a_l - Other[type=0x01, keyType=1(StaticValue), frames=1], Other[type=0x02, keyType=1(StaticValue), frames=1], Other[type=0x06, keyType=1(StaticValue), frames=1], Other[type=0x07, keyType=1(StaticValue), frames=1], Other[type=0x08, keyType=1(StaticValue), frames=1], Rotation[type=0x11, keyType=6(QuatSlerp), frames=84] 45: index_b_l - Other[type=0x01, keyType=1(StaticValue), frames=1], Other[type=0x02, keyType=1(StaticValue), frames=1], Other[type=0x06, keyType=1(StaticValue), frames=1], Other[type=0x07, keyType=1(StaticValue), frames=1], Other[type=0x08, keyType=1(StaticValue), frames=1], Rotation[type=0x11, keyType=6(QuatSlerp), frames=84] 46: index_c_l - Other[type=0x01, keyType=1(StaticValue), frames=1], Other[type=0x02, keyType=1(StaticValue), frames=1], Other[type=0x06, keyType=1(StaticValue), frames=1], Other[type=0x07, keyType=1(StaticValue), frames=1], Other[type=0x08, keyType=1(StaticValue), frames=1], Rotation[type=0x11, keyType=1(StaticValue), frames=1] 47: thumb_l_jo - Other[type=0x01, keyType=1(StaticValue), frames=1], Other[type=0x02, keyType=1(StaticValue), frames=1], Other[type=0x06, keyType=1(StaticValue), frames=1], Other[type=0x07, keyType=1(StaticValue), frames=1], Other[type=0x08, keyType=1(StaticValue), frames=1], Rotation[type=0x11, keyType=1(StaticValue), frames=1] 49: thumb_b_l - Other[type=0x01, keyType=1(StaticValue), frames=1], Other[type=0x02, keyType=1(StaticValue), frames=1], Other[type=0x06, keyType=1(StaticValue), frames=1], Other[type=0x07, keyType=1(StaticValue), frames=1], Other[type=0x08, keyType=1(StaticValue), frames=1], Rotation[type=0x11, keyType=6(QuatSlerp), frames=76] 51: thigh_r - Other[type=0x01, keyType=1(StaticValue), frames=1], Other[type=0x02, keyType=1(StaticValue), frames=1], Other[type=0x06, keyType=1(StaticValue), frames=1], Other[type=0x07, keyType=1(StaticValue), frames=1], Other[type=0x08, keyType=1(StaticValue), frames=1], Rotation[type=0x11, keyType=6(QuatSlerp), frames=101] 52: leg_r - Other[type=0x01, keyType=1(StaticValue), frames=1], Other[type=0x02, keyType=1(StaticValue), frames=1], Other[type=0x06, keyType=1(StaticValue), frames=1], Other[type=0x07, keyType=1(StaticValue), frames=1], Other[type=0x08, keyType=1(StaticValue), frames=1], Rotation[type=0x11, keyType=1(StaticValue), frames=1] 53: foot_r - Other[type=0x01, keyType=1(StaticValue), frames=1], Other[type=0x02, keyType=1(StaticValue), frames=1], Other[type=0x06, keyType=1(StaticValue), frames=1], Other[type=0x07, keyType=1(StaticValue), frames=1], Other[type=0x08, keyType=1(StaticValue), frames=1], Rotation[type=0x11, keyType=6(QuatSlerp), frames=68] 54: toe_r - Other[type=0x01, keyType=1(StaticValue), frames=1], Other[type=0x02, keyType=1(StaticValue), frames=1], Other[type=0x06, keyType=1(StaticValue), frames=1], Other[type=0x07, keyType=1(StaticValue), frames=1], Other[type=0x08, keyType=1(StaticValue), frames=1], Rotation[type=0x11, keyType=1(StaticValue), frames=1] 55: thigh_l - Other[type=0x01, keyType=1(StaticValue), frames=1], Other[type=0x02, keyType=1(StaticValue), frames=1], Other[type=0x06, keyType=1(StaticValue), frames=1], Other[type=0x07, keyType=1(StaticValue), frames=1], Other[type=0x08, keyType=1(StaticValue), frames=1], Rotation[type=0x11, keyType=6(QuatSlerp), frames=77] 56: leg_l - Other[type=0x01, keyType=1(StaticValue), frames=1], Other[type=0x02, keyType=1(StaticValue), frames=1], Other[type=0x06, keyType=1(StaticValue), frames=1], Other[type=0x07, keyType=1(StaticValue), frames=1], Other[type=0x08, keyType=1(StaticValue), frames=1], Rotation[type=0x11, keyType=6(QuatSlerp), frames=38] 57: foot_l - Other[type=0x01, keyType=1(StaticValue), frames=1], Other[type=0x02, keyType=1(StaticValue), frames=1], Other[type=0x06, keyType=1(StaticValue), frames=1], Other[type=0x07, keyType=1(StaticValue), frames=1], Other[type=0x08, keyType=1(StaticValue), frames=1], Rotation[type=0x11, keyType=6(QuatSlerp), frames=72] 58: toe_l - Other[type=0x01, keyType=1(StaticValue), frames=1], Other[type=0x02, keyType=0(Static0), frames=0], Other[type=0x00, keyType=0(Static0), frames=0], Other[type=0x06, keyType=1(StaticValue), frames=1], Other[type=0x07, keyType=1(StaticValue), frames=1], Other[type=0x08, keyType=1(StaticValue), frames=1] === Bones in skeleton but not in motion (static) === 0: root 1: upperbody_jo 4: neck 5: head 13: pinky_a_r_jo 17: ring_a_r 18: ring_b_r 19: ring_c_r 27: thumb_a_r_jo 34: pinky_a_l_jo 38: ring_a_l 39: ring_b_l 40: ring_c_l 48: thumb_a_l_jo 50: lowerbody_jo1 point
-
SLES_526.07.ELF (PS2 game executable) SCRIPT.PTD (1,728,512 bytes) 1. INITIAL FILE ANALYSIS: hexdump -C SCRIPT.PTD | head -50 First 32 bytes: unknown header Bytes 0x20-0x11F: 256-byte table Rest: encrypted data With Radare2, I examined the ELF a bit: Found function at 0x0010da30 (file handling?) 3. CALL TRACING: 0x0010da30 → 0x10ccf0 → 0x10a3f8 → 0x0010d850 4. DECODING FUNCTION ANALYSIS (0x0010d850): 🔓 ALGORITHMS FOUND: 1. LZSS DECOMPRESSION: def yklz_lzss_decompress(data): param_byte = data[7] # Always 0x0A shift = param_byte - 8 # 2 mask = (1 << shift) - 1 # 3 decompressed_size = int.from_bytes(data[8:12], 'little') # ... standard LZSS implementation 2. DECRYPTION ALGORITHM (0x0010D850): def junroma_decrypt_exact(data): if len(data) <= 0x120: return data result = bytearray(data) t1 = 0 # Initialized to 0 base_ptr = 0 # Base pointer (t3 in code) for i in range(0x120, len(data)): encrypted_byte = data[i] # t7 = (t1 XOR encrypted_byte) + base_ptr t7 = (t1 ^ encrypted_byte) + base_ptr # decrypted_byte = TABLE[(t7 + 0x20) & 0xFF] idx = (t7 + 0x20) & 0xFF decrypted_byte = SUBSTITUTION_TABLE[idx] result[i] = decrypted_byte # t1 = (t1 - 1) & 0xFF t1 = (t1 - 1) & 0xFF return bytes(result) 3. SUBSTITUTION TABLE (0x0055F7A0): SUBSTITUTION_TABLE = bytes([ 0x82, 0x91, 0x42, 0x88, 0x35, 0xBB, 0x0F, 0x85, 0x96, 0x2C, 0x56, 0xFF, 0x8E, 0x3C, 0x7C, 0x0D, 0x61, 0xBF, 0xB8, 0xEF, 0xD1, 0x16, 0x07, 0xEE, 0x4F, 0x09, 0xCB, 0x0C, 0xE2, 0xB1, 0xDD, 0x12, 0xFB, 0x08, 0x89, 0x8B, 0x03, 0xC9, 0x27, 0x19, 0x6A, 0x32, 0x5D, 0xCD, 0x98, 0x17, 0xF4, 0xE7, 0x9F, 0x1A, 0xF9, 0x1B, 0x6C, 0x5C, 0x44, 0x3B, 0x6E, 0x3E, 0x60, 0xD5, 0x4D, 0x21, 0x43, 0x4E, 0x65, 0xFD, 0x0B, 0x92, 0x8C, 0x2B, 0x41, 0xED, 0x76, 0x22, 0xC1, 0x74, 0xA3, 0x47, 0x14, 0x67, 0xE0, 0xDE, 0x0A, 0xE3, 0x1E, 0x5F, 0x1C, 0x84, 0xEA, 0xA0, 0x02, 0x69, 0x52, 0xB9, 0xC5, 0x20, 0x6D, 0xC8, 0x79, 0xD0, 0x05, 0x77, 0xB3, 0xDA, 0x7F, 0xBA, 0xF1, 0xB2, 0x72, 0x9E, 0x9A, 0xB5, 0x6B, 0x1F, 0x58, 0xD2, 0x11, 0xA6, 0xD8, 0x80, 0x23, 0x46, 0x73, 0xB6, 0x2E, 0xE4, 0xAD, 0x81, 0xC6, 0xDB, 0x57, 0x95, 0x01, 0xEC, 0xC4, 0xF2, 0xEB, 0xDF, 0xC0, 0x28, 0x49, 0xE9, 0x37, 0x15, 0x5E, 0x34, 0x31, 0x00, 0xA8, 0x8D, 0x9C, 0xBC, 0xA2, 0x62, 0x90, 0xCA, 0x66, 0x3D, 0x70, 0x4C, 0x24, 0x48, 0xBE, 0xA9, 0x5A, 0x94, 0xD4, 0xF5, 0x1D, 0x38, 0x25, 0x8F, 0x26, 0xB4, 0x83, 0x45, 0x8A, 0x5B, 0xFC, 0x63, 0xA4, 0xFA, 0xAF, 0xF8, 0x10, 0xAB, 0x53, 0x54, 0x2F, 0xDC, 0xF6, 0xD3, 0x0E, 0x68, 0xE1, 0x59, 0xAA, 0x30, 0xC2, 0x51, 0xD7, 0xE6, 0xB0, 0xBD, 0x6F, 0x06, 0x93, 0x7D, 0x3A, 0xF7, 0x04, 0x78, 0x2D, 0x55, 0xA5, 0x2A, 0xA7, 0x40, 0x71, 0x9B, 0x7A, 0xC3, 0xD6, 0xFE, 0xCF, 0xE5, 0x4A, 0x7B, 0xC7, 0x99, 0xF0, 0xCC, 0x3F, 0xAC, 0xB7, 0x87, 0x7E, 0x33, 0x13, 0x97, 0xE8, 0x75, 0xCE, 0xA1, 0x50, 0x4B, 0x39, 0xD9, 0x86, 0x64, 0x9D, 0x29, 0x36, 0x18, 0xAE, 0xF3 ]) EXTRATION CODE (PYTHON) import os import struct # ==================== SUBSTITUTION TABLE ==================== SUBSTITUTION_TABLE = bytes([ 0x82, 0x91, 0x42, 0x88, 0x35, 0xBB, 0x0F, 0x85, 0x96, 0x2C, 0x56, 0xFF, 0x8E, 0x3C, 0x7C, 0x0D, # ... (same as above, shortened for brevity) 0xE8, 0x75, 0xCE, 0xA1, 0x50, 0x4B, 0x39, 0xD9, 0x86, 0x64, 0x9D, 0x29, 0x36, 0x18, 0xAE, 0xF3 ]) # ==================== LZSS DECOMPRESSION ==================== def yklz_lzss_decompress(data): if len(data) < 16: raise ValueError("File too small (smaller than the 16-byte header).") # Extract header parameters param_byte = data[7] shift = param_byte - 8 if shift < 0: shift = 4 mask = (1 << shift) - 1 # Decompressed size (uint32, little-endian) decompressed_size = int.from_bytes(data[8:12], 'little') # LZSS decompression src_pos = 16 output = bytearray() while len(output) < decompressed_size and src_pos < len(data): flags = data[src_pos] src_pos += 1 for bit in range(8): if len(output) >= decompressed_size or src_pos >= len(data): break is_reference = (flags & 0x80) != 0 flags = (flags << 1) & 0xFF if not is_reference: # Literal byte output.append(data[src_pos]) src_pos += 1 else: # Reference (match) if src_pos + 1 >= len(data): break b1 = data[src_pos] b2 = data[src_pos + 1] src_pos += 2 length = (b1 >> shift) + 3 offset = ((b1 & mask) << 8) | b2 offset += 1 start_index = len(output) - offset for i in range(length): idx = start_index + i if idx < 0: output.append(0) else: output.append(output[idx]) return bytes(output) # ==================== JRS DECRYPTION ==================== def junroma_decrypt_exact(data): """ EXACT implementation of the decryption algorithm (0x0010D850). Confirmed by debugger analysis. Initial t1 = 0 t3 (base_ptr) = 0 for our data Start offset: 0x120 """ if len(data) <= 0x120: return data result = bytearray(data) # Initial t1 = 0 (confirmed by debugger) t1 = 0 # base_ptr = 0 (t3 = base pointer to data) base_ptr = 0 for i in range(0x120, len(data)): encrypted_byte = data[i] # t7 = (t1 XOR encrypted_byte) + base_ptr t7 = (t1 ^ encrypted_byte) + base_ptr # decrypted_byte = TABLE[(t7 + 0x20) & 0xFF] idx = (t7 + 0x20) & 0xFF decrypted_byte = SUBSTITUTION_TABLE[idx] result[i] = decrypted_byte # t1 = (t1 - 1) & 0xFF t1 = (t1 - 1) & 0xFF return bytes(result) # ==================== JRS FILE EXTRACTION ==================== def extract_jrs_files(data): """Extracts individual .JRS files from decrypted data.""" jrs_magic = b'\x8F\x83\xDB\xCF' # JRS Magic: "純ロマ" files = [] pos = 0 while pos < len(data): idx = data.find(jrs_magic, pos) if idx == -1: break # Determine size (find next magic or use header size) next_magic = data.find(jrs_magic, idx + 4) if next_magic != -1: file_size = next_magic - idx else: file_size = len(data) - idx file_data = data[idx:idx + file_size] files.append({ 'offset': idx, 'size': file_size, 'data': file_data, 'is_jrs': True }) pos = idx + file_size return files # ==================== COMPLETE EXTRACTOR ==================== def extract_all_yklz_sections(): """Extracts and processes all YKLZ sections from SCRIPT.PTD.""" print("=== JUNJOU ROMANTICA PS2 EXTRACTOR ===") # Read file try: with open('SCRIPT.PTD', 'rb') as f: raw_data = f.read() print(f"File SCRIPT.PTD read: {len(raw_data):,} bytes") except FileNotFoundError: print("❌ ERROR: SCRIPT.PTD not found") return # Search for YKLZ sections yklz_signature = b'YKLZ' positions = [] pos = 0 while True: idx = raw_data.find(yklz_signature, pos) if idx == -1: break positions.append(idx) pos = idx + 1 print(f"YKLZ sections found: {len(positions)}") if not positions: print("❌ No YKLZ sections found") return # Create directories os.makedirs('EXTRACTED', exist_ok=True) os.makedirs('EXTRACTED/JRS_FILES', exist_ok=True) total_jrs = 0 # Process each section for i, pos in enumerate(positions): print(f"\n--- Processing section #{i:03d} (offset 0x{pos:08X}) ---") # Extract YKLZ data if i + 1 < len(positions): next_pos = positions[i + 1] yklz_data = raw_data[pos:next_pos] else: yklz_data = raw_data[pos:] try: # 1. Decompress LZSS decompressed = yklz_lzss_decompress(yklz_data) print(f" Decompressed: {len(decompressed):,} bytes") # Save decompressed version decomp_filename = f'EXTRACTED/section_{i:03d}_decompressed.bin' with open(decomp_filename, 'wb') as f: f.write(decompressed) # 2. Apply decryption (except section 0) if i == 0: # Section 0 is ASCII text without encryption decrypted = decompressed print(f" Section 0 (metadata) - not decrypted") else: decrypted = junroma_decrypt_exact(decompressed) print(f" Decryption applied (from offset 0x120)") # Save decrypted version decrypted_filename = f'EXTRACTED/section_{i:03d}_decrypted.bin' with open(decrypted_filename, 'wb') as f: f.write(decrypted) # 3. Extract JRS files if decrypted[:4] == b'\x8F\x83\xDB\xCF': print(f" ✅ Contains JRS file(s)") jrs_files = extract_jrs_files(decrypted) for j, jrs in enumerate(jrs_files): filename = f'EXTRACTED/JRS_FILES/section_{i:03d}_file_{j:03d}.jrs' with open(filename, 'wb') as f: f.write(jrs['data']) print(f" JRS file #{j}: {jrs['size']:,} bytes") total_jrs += 1 # Analyze JRS header if len(jrs['data']) >= 0x40: version = int.from_bytes(jrs['data'][4:8], 'little') declared_size = int.from_bytes(jrs['data'][12:16], 'little') print(f" Version: {version}, Declared size: {declared_size:,}") # 4. For section 0, show ASCII content if i == 0: try: text = decrypted.decode('ascii', errors='ignore').strip() if text: print(f" ASCII content: {text[:100]}...") # Save as text text_filename = f'EXTRACTED/section_000_metadata.txt' with open(text_filename, 'w', encoding='utf-8') as f: f.write(text) except: pass except Exception as e: print(f" ❌ Error: {e}") import traceback traceback.print_exc() print(f"\n{'='*60}") print("EXTRACTION COMPLETED!") print(f"Total JRS files extracted: {total_jrs}") print(f"Everything saved to: EXTRACTED/") # ==================== EXECUTION ==================== if __name__ == "__main__": extract_all_yklz_sections() NOW, THE RESULTING FILES ALL HAVE A HEADER WITH THE MAGIC NUMBER "JUNROMA" AND APPEAR TO BE ENCRYPTED. TRYING THE SAME ALGORITHMS OR APPLYING SHIFT-JIS JAPANESE DIDN'T WORK.1 point
-
Please don't publish tutorials until you finish them. Also, Raw Texture Cooker is outdated. It's better to use ImageHeat https://github.com/bartlomiejduda/ImageHeat It supports more pixel formats etc.1 point
-
Introduction This question is probably the most asked one and it makes total sense why, the answer unfortunatelly is pretty generic in it's nature, it depends but if we dive deeper turns out it's not as hard as you think might be here is why I personally think this way... Reverse engineering the game, specifically for asset extraction, requires 4 different steps to create: 1. Extract Game Archive, (Reverse enigneer game's extractioon method, spot a compression method, decrypt xor keys (Rarely)) 2. Reverse Enigneer Binary 3D model files 3. Reverse egnineer Binary Texture files 4. Reverse egnineer the Binary Audio files While those are not extreamly hard to topics to learn, it can took some time to figure them out yourselfe. There are numereous ways to reverse engineer those tasks, you can do it manually via binary inspection, or by using, exploits or even by using leaked Beta Builds or reloaded versions, that often are packed with .PDB files (debug symbols) that can be loaded into Ghidra for near source code, code debugging experience. While the best one is still a binary inspection, there are already dedicated tools for this, for inspecting and extracting manually sample by sample, but currently in time being there aren't any automated programs for this so you must choose to rely on Python scripts. For extracting game archives I recommend QuickBMS for model extraction Model Researcher for Textures Raw Texture Cooker and Audacity for Audio... By extracting all of the game content don't forget about the Headers and Magic Numbers, No matter how Payload loos like, the headers are always the same and often contain super usefull info with them. Graphic Debuggers vs Reverse Engineering This is hot topic is the most intersting one, since yes, Dumping 3D Models and Textures + Recording the Audio's using Graphic Debuggers like RenderDoc, nvidia Nsight Graphics and NinjaRipper Exploit obviously way, way easier than any reverse engineering the proprietary files, it can be done in few minutes vs it can took a few days to mounths in Reverse Engineering so the difference is huge sometimes, hovewer after you reverse engineered the binary files you have access to extreamly fast asset "ripping" speeds without relying on the drawcalls and of course you have access to all of the cut contents and very very easier and faster Map/World "ripping". There are obviously upsides and downsides in both of the methods, I personally recommend using exactly what you need for, if there are already scripts for extracting and maybe even converting some binary proprietary assets then go for it!1 point
-
My first try on this .lwo format.
1 point
-
Skeleton deformations for the character creator is probably a more accurate term for Veilguards “morph targets” (DAO/DA2 use straight up targets while I/VG use the skeleton to deform morphs with different bone positions) But I’m not a game dev. 😉1 point
-
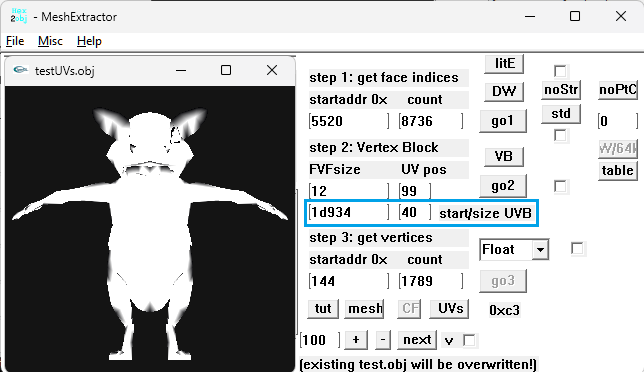
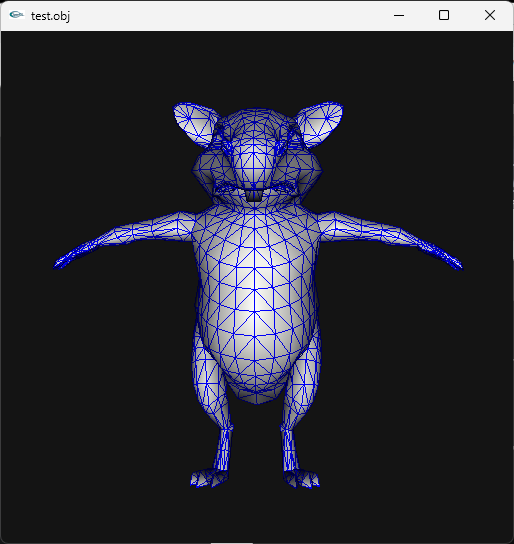
My best bet: edit: fail, at 0x1d934 there's only a copy of the mesh
1 point
-
The script has been updated and is now output in Lua format whenever possible. format_hotfix_data.py1 point
-
Version 1.0.0
19 downloads
Broken Sword - Shadow of the Templars (1996) * bs1_1996_clu_export.py * bs1_1996_clu_import_and_patch.py Required: Python. When installing, make sure to check “Add python.exe to PATH.” Usage: * Copy the swordres.rif and text.clu files into the same folder as the .py files. * Run bs1_1996_clu_export.py: this will extract the texts into Text_exported.txt. * Translate it, then rename the finished file to Text_translated.txt. * Run bs1_1996_clu_import_and_patch.py: this will insert the translated texts back into text.clu and modify swordres.rif. * The new files will be created with the _new suffix. Tested with GoG (2.0.0.8) and Steam Reforged Free DLC FEARka1 point -
Yeah, the DWord face indices totally don't fit but I have a déjà vue of this picture, maybe on former Xentax? edit: correct vertex start is 0x144
1 point
-
You need to decompress them first. Only then you can succeed... Here's jersey-color after decompression. PS4 format. But there's problem with switch format. ImageHeat doesn't support swizzle format. But RawTex can handle this.
1 point
-
I've moved this topic to graphic file formats, rather than 3d Models where you posted it. Also, please don't start another post for the exact same thing. I've deleted your other post as a duplicate. Please read the rules before posting again.1 point
-
Decided to extract some key frames. from that .mot file I shared earlier. Wonder if there is any insight. The NaNs are interesting tho.
1 point
-
Version 2.0.0
270 downloads
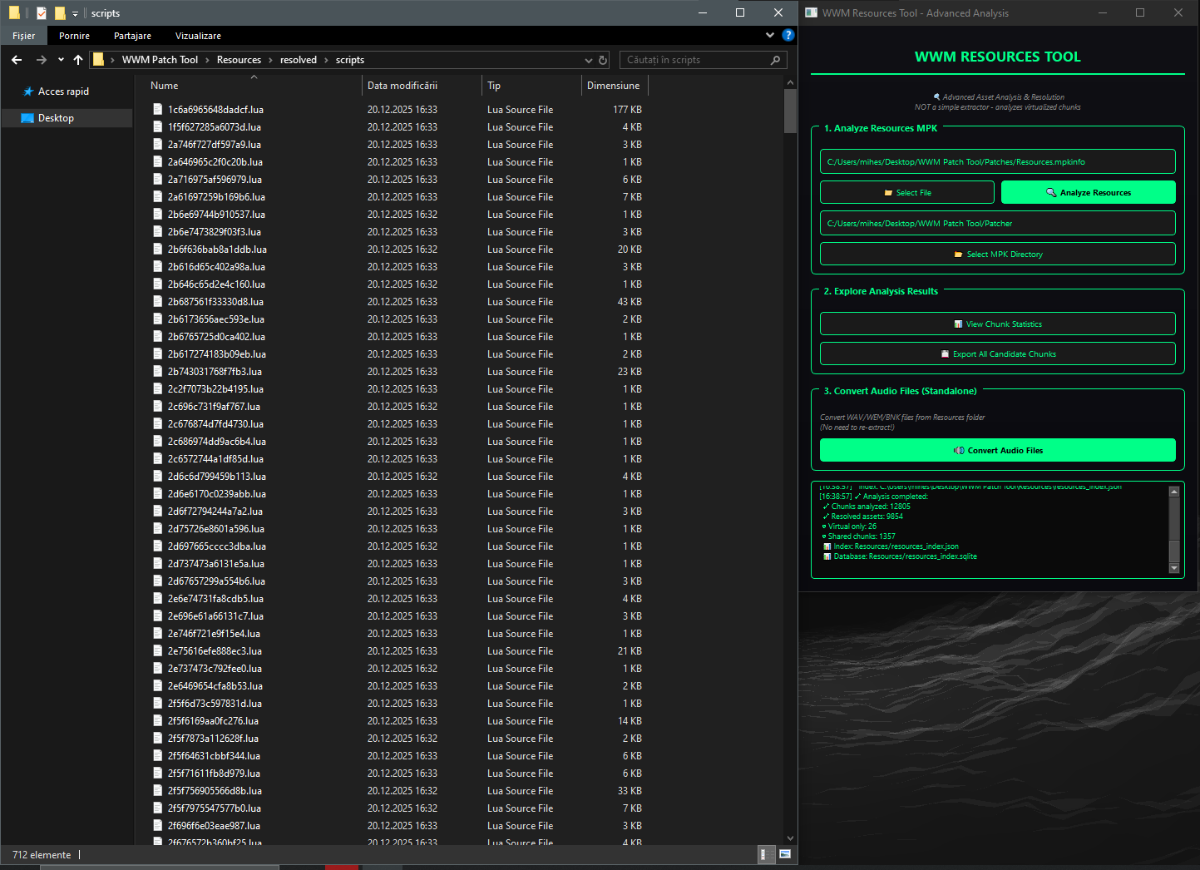
Currently, the test work has been carried out on Where Winds Meet, unless a certain game appears with the same index structure as theirs Applicable games Where Winds Meet Command processing Please put all the files you need into the same folder as the script patch mpk.py patch.mpkdb patch mpk.py *.mpkinfo Notice!!! patch.mpkdb only has the index of patchx.mpk or patchxx.mpk files For example patch.mpk patch1.mpk....patch50.mpk For other mpks, the index information should be in mpkinfo To make the script better handle, please do not put together .mpk files with the same number suffix. For example resources1.mpk LT1.mpk Because there are too many mpkinfo, many mpkinfo and mpk file names are not opposite. In some cases, there is no distinction logic written. If the numbers are the same, it may be misjudged as being to be processed. mpk If you really need to deal with it It is recommended to process step by step, such as importing resources1.mpk and resources.mpkinfo first. After the processing is completed, delete resources1.mpk and resources.mpkinfo in this folder, and then importing LT1.mpk and LT1.mpkinfo If you are dealing with mpkinfo named after the in-game name For example MpkCached_common_qinghe.mpkinfo It is recommended to put all patches of patchxxxx.mpk into this folder1 point -
It's Unity, but seems to have a protection layer so it can't be opened in Asset Studio. Game Assembly: https://www.mediafire.com/file/3i7kvobi4nacnbh/GameAssembly.zip/file THO.zip1 point
-
fmt_FGOArcade_mot.py Still incomplete1 point
-
I made a blender addon to import models, textures and animations for dolphin wave and other games that used the same engine. it can import lzs and lza files as is. You don't need to decrypt or decompress the files https://github.com/Al-Hydra/blenderBUM1 point
-
car_ambulance, extracted using hex2obj (after decompressing pxc with simplified bms from ky123):
1 point
-
For this format it's not as hard as you may think of. It's just a matter of persistent search which some people lack of and leave it to guys like me... Be that as it may, here's a H2O example, copy the 6 lines into notepad, for example, and save as ch0001_01_whatever. Rename the .txt file to .H2O then and load the model and the H2O file into hex2obj. Press the 'mesh' button. 0x951408 11085 Vb1 32 99 0x8F8A68 5239 021010 0x0 255 ch0001_01 obj.bin seems to contain different meshes: And the start address of the concerning FI block is unknown: Being bored by this annoying FIs' start address search for each sub mesh I used meshlab again:
1 point
-
use my plugin for Noesis arc_zlib_plzp_lang_vfs.py (which I mentioned earlier) it recursively unpacks all files, at the output you will get *.png, *.wav, *.pm3, *.vram, *.text, *.pvr and e.t.c You can also find a link to the plugin for 3D models *.vram above in the same topic. (*.pvr can open in PVRTexTool)1 point


.png.370ab7bc8da22e3022ea6bb7d94cf154.png)