


Leaderboard
-
Noob
Supporter75Points321Posts -
stasys
Members14Points31Posts -
shak-otay
Engineers11Points1,455Posts -
Hazza12555
Members11Points74Posts


Popular Content
Showing content with the highest reputation since 06/04/2026 in all areas
-
4 pointsWe are currently testing whether we can retrieve character IDs from the database and read all related data4 points
-
4 points4 points3 pointsNew Version of TASM 1+2 Tools Audio is now sorted/named Also sorted into languages.3 pointsApparently there is a bug with Default Berri's hair Fur Shells are currently merging her Hair and Body material, due to an oversight in how the shells are drawn, getting a fix done now EDIT Here's the updated script RBMimport_12.py3 points2 points2 pointsadded extraction support, should work on files with versions beside 1.2 but untested same with compressed files: https://github.com/smiRaphi/UniPyX/commit/10b71fe85dbc064334ff472caadb6525fb1b5b852 points2 pointsPython 3.X import argparse import struct import sys import threading import zlib from dataclasses import dataclass from pathlib import Path, PurePosixPath MAGIC = b"D0" @dataclass(frozen=True) class PackEntry: name: str offset: int stored_size: int original_size: int stored_raw: bool def u16(data: bytes, offset: int) -> int: return struct.unpack_from("<H", data, offset)[0] def u32(data: bytes, offset: int) -> int: return struct.unpack_from("<I", data, offset)[0] def parse_pack(data: bytes) -> tuple[int, list[PackEntry]]: if len(data) < 8: raise ValueError("The file is too small to contain a D0 pack header.") if data[:2] != MAGIC: raise ValueError(f"Unsupported magic {data[:2]!r}; expected {MAGIC!r}.") index_end = u32(data, 2) entry_count = u16(data, 6) if not (8 <= index_end <= len(data)): raise ValueError(f"Invalid index end offset: 0x{index_end:X}.") index_pos = 8 raw_entries: list[tuple[str, int, int, bool]] = [] for entry_index in range(entry_count): name_end = data.find(b"\0", index_pos, index_end) if name_end < 0: raise ValueError(f"Missing file-name terminator in index entry {entry_index}.") if name_end + 9 > index_end: raise ValueError(f"Truncated metadata in index entry {entry_index}.") name = data[index_pos:name_end].decode("utf-8", "replace") packed_size_field = u32(data, name_end + 1) original_size = u32(data, name_end + 5) stored_raw = bool(packed_size_field & 0x80000000) stored_size = packed_size_field & 0x7FFFFFFF if not name or stored_size == 0: raise ValueError(f"Invalid index entry {entry_index} at 0x{index_pos:X}.") raw_entries.append((name, stored_size, original_size, stored_raw)) index_pos = name_end + 9 if index_pos != index_end: raise ValueError( f"Index parsed to 0x{index_pos:X}, but header declares 0x{index_end:X}." ) entries: list[PackEntry] = [] data_pos = index_end for name, stored_size, original_size, stored_raw in raw_entries: data_end = data_pos + stored_size if data_end > len(data): raise ValueError(f"Resource {name!r} extends past the end of the container.") entries.append( PackEntry( name=name, offset=data_pos, stored_size=stored_size, original_size=original_size, stored_raw=stored_raw, ) ) data_pos = data_end if data_pos != len(data): raise ValueError( f"Resource data ends at 0x{data_pos:X}, but file ends at 0x{len(data):X}." ) return index_end, entries def safe_relative_path(name: str) -> Path: normalized = name.replace("\\", "/") parts = [] for part in PurePosixPath(normalized).parts: if part in ("", ".", "/"): continue if part == "..": continue clean = part.replace(":", "_") parts.append(clean) if not parts: raise ValueError(f"Resource name {name!r} does not contain a safe path.") return Path(*parts) def decompress_payload(payload: bytes, entry: PackEntry) -> bytes: if entry.stored_raw or entry.stored_size == entry.original_size: return payload errors: list[str] = [] for window_bits in (zlib.MAX_WBITS, -zlib.MAX_WBITS): try: output = zlib.decompress(payload, window_bits) if entry.original_size and len(output) != entry.original_size: raise ValueError( f"decompressed size {len(output)} does not match {entry.original_size}" ) return output except Exception as exc: errors.append(str(exc)) raise ValueError(f"Could not decompress {entry.name!r}: {'; '.join(errors)}") def extract_pack(input_path: Path, output_dir: Path, preserve_folders: bool = True) -> list[Path]: data = input_path.read_bytes() _, entries = parse_pack(data) output_dir.mkdir(parents=True, exist_ok=True) written: list[Path] = [] for index, entry in enumerate(entries, 1): payload = data[entry.offset : entry.offset + entry.stored_size] output = decompress_payload(payload, entry) relative = safe_relative_path(entry.name) if not preserve_folders: relative = Path(f"{index:04d}_{relative.name}") output_path = output_dir / relative output_path.parent.mkdir(parents=True, exist_ok=True) output_path.write_bytes(output) written.append(output_path) return written def summary_text(input_path: Path, index_end: int, entries: list[PackEntry]) -> str: raw_count = sum(entry.stored_raw for entry in entries) compressed_count = len(entries) - raw_count lines = [ f"Container: {input_path.name}", f"Magic: {MAGIC.decode('ascii')}", f"Index end: 0x{index_end:X}", f"Entries: {len(entries)}", f"Raw entries: {raw_count}", f"Compressed entries: {compressed_count}", "", ] for entry in entries[:80]: mode = "raw" if entry.stored_raw else "compressed" lines.append( f"0x{entry.offset:08X} {entry.stored_size:9d} {mode:10s} {entry.name}" ) if len(entries) > 80: lines.append(f"... {len(entries) - 80} more entries") return "\n".join(lines) def run_gui() -> None: import tkinter as tk from tkinter import filedialog, messagebox, scrolledtext, ttk root = tk.Tk() root.title("D0 Packres Extractor") root.geometry("800x540") root.resizable(True, True) default_file = Path("packres-android_core.png") input_var = tk.StringVar(value=str(default_file.resolve()) if default_file.exists() else "") output_var = tk.StringVar(value=str((Path.cwd() / "_packres_android_core_extract").resolve())) folders_var = tk.BooleanVar(value=True) status_var = tk.StringVar(value="Ready") frame = ttk.Frame(root, padding=12) frame.pack(fill="both", expand=True) frame.columnconfigure(1, weight=1) frame.rowconfigure(5, weight=1) def browse_input() -> None: path = filedialog.askopenfilename( title="Choose packres container", filetypes=[("Packres files", "*.png *.dat *.bin"), ("All files", "*.*")], ) if path: input_var.set(path) source = Path(path) output_var.set(str(source.with_name(source.stem + "_extract"))) def browse_output() -> None: path = filedialog.askdirectory(title="Choose output folder") if path: output_var.set(path) def set_log(text: str) -> None: log.configure(state="normal") log.delete("1.0", "end") log.insert("1.0", text) log.configure(state="disabled") def scan_clicked() -> None: try: input_path = Path(input_var.get().strip()) if not input_path.is_file(): raise ValueError("Input file does not exist.") index_end, entries = parse_pack(input_path.read_bytes()) set_log(summary_text(input_path, index_end, entries)) status_var.set(f"Scan complete: {len(entries)} entries.") except Exception as exc: status_var.set("Scan failed") messagebox.showerror("Scan failed", str(exc)) def extract_clicked() -> None: def worker() -> None: try: input_path = Path(input_var.get().strip()) output_dir = Path(output_var.get().strip()) if not input_path.is_file(): raise ValueError("Input file does not exist.") written = extract_pack(input_path, output_dir, folders_var.get()) index_end, entries = parse_pack(input_path.read_bytes()) text = summary_text(input_path, index_end, entries) text += f"\n\nWrote {len(written)} file(s) to:\n{output_dir}" root.after(0, lambda: set_log(text)) root.after(0, lambda: status_var.set(f"Extracted {len(written)} file(s).")) root.after( 0, lambda: messagebox.showinfo( "Extract complete", f"Extracted {len(written)} file(s)." ), ) except Exception as exc: root.after(0, lambda: status_var.set("Extract failed")) root.after(0, lambda: messagebox.showerror("Extract failed", str(exc))) status_var.set("Extracting...") threading.Thread(target=worker, daemon=True).start() ttk.Label(frame, text="Input Container").grid(row=0, column=0, sticky="w", padx=6, pady=6) ttk.Entry(frame, textvariable=input_var).grid(row=0, column=1, sticky="ew", padx=6, pady=6) ttk.Button(frame, text="Browse", command=browse_input).grid(row=0, column=2, padx=6, pady=6) ttk.Label(frame, text="Output Folder").grid(row=1, column=0, sticky="w", padx=6, pady=6) ttk.Entry(frame, textvariable=output_var).grid(row=1, column=1, sticky="ew", padx=6, pady=6) ttk.Button(frame, text="Browse", command=browse_output).grid(row=1, column=2, padx=6, pady=6) ttk.Checkbutton(frame, text="Preserve folders", variable=folders_var).grid( row=2, column=0, columnspan=2, sticky="w", padx=6, pady=8 ) buttons = ttk.Frame(frame) buttons.grid(row=3, column=0, columnspan=3, sticky="e", padx=6, pady=8) ttk.Button(buttons, text="Scan", command=scan_clicked).grid(row=0, column=0, padx=6) ttk.Button(buttons, text="Extract", command=extract_clicked).grid(row=0, column=1, padx=6) ttk.Label(frame, textvariable=status_var).grid( row=4, column=0, columnspan=3, sticky="w", padx=6, pady=4 ) log = scrolledtext.ScrolledText(frame, wrap="none", state="disabled") log.grid(row=5, column=0, columnspan=3, sticky="nsew", padx=6, pady=6) root.mainloop() def parse_args(argv: list[str]) -> argparse.Namespace: parser = argparse.ArgumentParser(description="Extract D0 packres containers.") parser.add_argument("input", nargs="?", help="Input packres file.") parser.add_argument("-o", "--output", help="Output folder. Default: <input>_extract") parser.add_argument("--flat", action="store_true", help="Do not preserve resource folders.") parser.add_argument("--scan-only", action="store_true", help="Only display the index.") parser.add_argument("--gui", action="store_true", help="Open the graphical interface.") return parser.parse_args(argv) def main(argv: list[str] | None = None) -> int: args = parse_args(sys.argv[1:] if argv is None else argv) if args.gui or not args.input: run_gui() return 0 input_path = Path(args.input) output_dir = Path(args.output) if args.output else input_path.with_name(input_path.stem + "_extract") data = input_path.read_bytes() index_end, entries = parse_pack(data) print(summary_text(input_path, index_end, entries)) if args.scan_only: return 0 written = extract_pack(input_path, output_dir, preserve_folders=not args.flat) print(f"\nWrote {len(written)} file(s) to {output_dir}") return 0 if __name__ == "__main__": raise SystemExit(main())
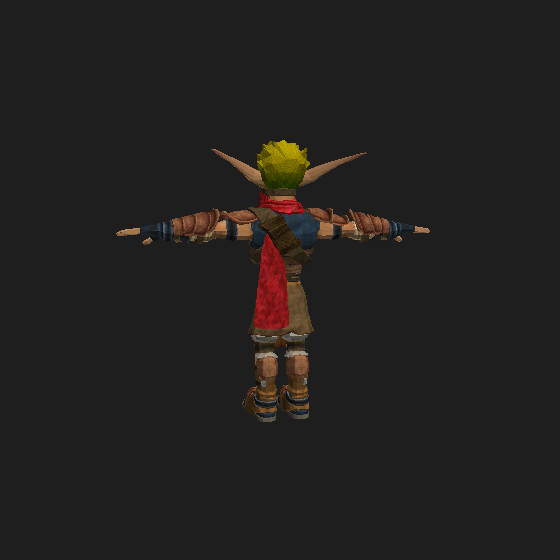
 2 pointsAdded rigging to all models in the form of a .glb model. Fixed some bugs2 points2 pointsthese .lsc files are a custom container, magic NKDB (Nikke Database). All big-endian. Layout: 0x00 "NKDB" 0x04 version (uint32) = 1 0x08 16-byte key/IV (unique per file) 0x18 flag uint32 = 0x1000 (4096) - same in every file 0x1C record count (uint32) 0x20 offset table: count × uint32 (absolute offsets) + 4 pad bytes ... data section: records back-to-back Record size = offset[i+1] - offset, last one runs to EOF. The offset table checks out perfectly (monotonic, no gaps, matches file size), so reading the container is trivial. The record payloads are encrypted. Data section entropy is a flat 8.0 bits/byte and the byte distribution is dead uniform (all 256 values ~0.39% each), which screams AES, not compression (no magic bytes, no skew). Record sizes aren't multiples of 16, so it's a stream mode (CTR/CFB/OFB/GCM), not ECB/CBC. The 16 bytes in the header are almost certainly a per-file IV/nonce or key-id, the actual AES key isn't in the file, it lives in the game client (il2cpp binary). Tried XOR and AES with the header bytes as the key, nothing decrypts, so don't bother going down that road. You'll need to pull the key from GameAssembly/libil2cpp to read the actual locale text (probably JSON/table rows once decrypted).2 pointsInstead of just dumping files without explanation, you need to explain what you're trying to do, what you've already tried, etc. And read the rules, or these low effort posts will be deleted.2 points2 pointsRequirements Python 3.10 or newer installed on your system. (Note: Make sure to check the "Add Python to PATH" box during installation. No additional modules are required.) How to use Add your files: Place your original Unreal Engine font files (.uasset + .uexp pairs, or .ufont files) into the source folder. Export: Double-click export.bat. The tool will extract the fonts and save them to the ttf_otf folder. Edit or Replace: Go to the ttf_otf folder and modify the extracted .ttf or .otf files, or replace them with your custom fonts. (Important: The replaced files must keep the exact same names as the exported ones!) Import: Double-click import.bat. The tool will repack your modified fonts back into the original UE formats. Done: You can find your newly generated, ready-to-use game files in the NEW folder.2 pointsIn dc3c2177 there are multiple meshes, for the last one: At 1421408, 320 x 3 shorts (position?) At 1423344, 320 x 3 shorts in range [-4096;4096] (normals?) At 1425278, 320 x 2 shorts (UV, divide by 4096) At 1426576, 384 shorts (indices) UV looks fine, but mesh is a mess
 2 points2 pointsAdded support for it and also for the .res (magic: "ins\0") & .tm2col (just a collection of TIM2 images) subfiles https://github.com/smiRaphi/UniPyX/commit/ddb91627fb759da2ef71f940c9a39f1e0b651fac2 points2 points.IMG files have zlib blocks. To extract them correctly with names, you need an .IND file. .IMG = Data .IND = Index You must have .img and .ind files with the same name in the same folder to extract the files. import argparse import re import struct import sys import threading import zlib from dataclasses import dataclass from pathlib import Path from typing import Callable, Iterable ZLIB_HEADERS = {b"\x78\x01", b"\x78\x5e", b"\x78\x9c", b"\x78\xda"} INVALID_NAME_CHARS = re.compile(r'[<>:"/\\|?*\x00-\x1f]') class ImgIndError(Exception): pass @dataclass class IndexEntry: index: int name: str offset: int end_offset: int = 0 def read_u16le(data: bytes, offset: int) -> int: return struct.unpack_from("<H", data, offset)[0] def read_u32le(data: bytes, offset: int) -> int: return struct.unpack_from("<I", data, offset)[0] def clean_name(raw: bytes) -> str: return raw.split(b"\x00", 1)[0].decode("ascii", "replace").strip() def safe_filename(name: str) -> str: name = INVALID_NAME_CHARS.sub("_", name).strip(" .") return name or "unnamed.bin" def guess_extension(data: bytes) -> str: if data.startswith(b"\xff\xfb") or data.startswith(b"ID3"): return ".mp3" if data.startswith(b"\x0a") and len(data) > 4: return ".pcx" if len(data) >= 18 and data[2] in {1, 2, 3, 9, 10, 11}: width = int.from_bytes(data[12:14], "little") height = int.from_bytes(data[14:16], "little") bpp = data[16] if 0 < width <= 8192 and 0 < height <= 8192 and bpp in {8, 15, 16, 24, 32}: return ".tga" if data.startswith(b"RIFF") and data[8:12] == b"WAVE": return ".wav" if data.startswith(b"DDS "): return ".dds" if data.startswith(b"\x89PNG\r\n\x1a\n"): return ".png" return ".bin" def resolve_img_path(ind_path: Path) -> Path: candidates = [ ind_path.with_suffix(".IMG"), ind_path.with_suffix(".img"), ind_path.with_suffix(".Img"), ] for candidate in candidates: if candidate.exists(): return candidate raise ImgIndError(f"Matching .IMG file not found for {ind_path.name}") def parse_ind(ind_path: Path, img_size: int) -> tuple[str, list[IndexEntry]]: data = ind_path.read_bytes() if len(data) < 2: raise ImgIndError(f"{ind_path.name} is too small for an index") count = read_u16le(data, 0) named_size = 2 + count * 24 offset_only_size = 2 + count * 4 entries: list[IndexEntry] = [] if len(data) == named_size: layout = "named" for index in range(count): pos = 2 + index * 24 name = clean_name(data[pos:pos + 20]) offset = read_u32le(data, pos + 20) entries.append(IndexEntry(index, name, offset)) elif len(data) == offset_only_size: layout = "offsets_only" stem = ind_path.stem for index in range(count): pos = 2 + index * 4 offset = read_u32le(data, pos) entries.append(IndexEntry(index, f"{stem}_{index:04d}", offset)) else: raise ImgIndError( f"{ind_path.name}: unsupported index size {len(data)} for count {count}; " f"expected {named_size} or {offset_only_size}" ) if not entries: return layout, entries ordered = sorted(entries, key=lambda item: item.offset) for i, entry in enumerate(ordered): next_offset = ordered[i + 1].offset if i + 1 < len(ordered) else img_size if entry.offset < 0 or entry.offset > img_size: raise ImgIndError(f"{ind_path.name}: entry {entry.index} offset exceeds IMG size") if next_offset < entry.offset: raise ImgIndError(f"{ind_path.name}: entry offsets are not monotonic") entry.end_offset = next_offset return layout, entries def unique_output_path(out_dir: Path, filename: str, used: set[str]) -> Path: filename = safe_filename(filename) stem = Path(filename).stem suffix = Path(filename).suffix if not suffix: suffix = ".bin" candidate = f"{stem}{suffix}" counter = 1 while candidate.lower() in used: candidate = f"{stem}_{counter:04d}{suffix}" counter += 1 used.add(candidate.lower()) return out_dir / candidate def unpack_block(block: bytes) -> tuple[bytes, int | None, bool, str]: if len(block) >= 6 and block[4:6] in ZLIB_HEADERS: expected = read_u32le(block, 0) try: output = zlib.decompress(block[4:]) except zlib.error as exc: return block, expected, False, f"zlib error: {exc}" status = "ok" if expected != len(output): status = f"size mismatch: expected {expected}, got {len(output)}" return output, expected, True, status return block, None, False, "raw" def extract_pair( ind_path: Path, output_root: Path | None = None, limit: int | None = None, log: Callable[[str], None] | None = None, ) -> Path: ind_path = ind_path.resolve() img_path = resolve_img_path(ind_path).resolve() img_size = img_path.stat().st_size layout, entries = parse_ind(ind_path, img_size) output_root = output_root or ind_path.parent / "_europeracer_imgind_extract" pair_out = output_root / ind_path.stem pair_out.mkdir(parents=True, exist_ok=True) if limit is not None: entries = entries[:limit] if log: log(f"{ind_path.name}: {len(entries)} entries, layout={layout}") used_names: set[str] = set() with img_path.open("rb") as img_file: for entry in entries: packed_size = entry.end_offset - entry.offset img_file.seek(entry.offset) block = img_file.read(packed_size) unpacked, _expected_size, _compressed, status = unpack_block(block) filename = entry.name if not Path(filename).suffix: filename += guess_extension(unpacked) out_path = unique_output_path(pair_out, filename, used_names) out_path.write_bytes(unpacked) if log and (entry.index % 100 == 0 or entry.index == entries[-1].index): log(f" {entry.index + 1}/{len(entries)} {entry.name} -> {out_path.name}") if log and status not in {"ok", "raw"}: log(f" warning: {entry.name}: {status}") if log: log(f"Done: {pair_out}") return pair_out def find_ind_files(input_path: Path) -> list[Path]: if input_path.is_dir(): found: dict[str, Path] = {} for pattern in ("*.IND", "*.ind"): for path in input_path.glob(pattern): found[str(path.resolve()).lower()] = path return sorted(found.values(), key=lambda path: path.name.lower()) if input_path.suffix.lower() == ".ind": return [input_path] raise ImgIndError("Select an .IND file or a folder containing .IND/.IMG pairs") def extract_input( input_path: Path, output_dir: Path | None = None, limit: int | None = None, log: Callable[[str], None] | None = None, ) -> list[Path]: ind_files = find_ind_files(input_path) if not ind_files: raise ImgIndError(f"No .IND files found in {input_path}") output_dir = output_dir or (input_path if input_path.is_dir() else input_path.parent) / "_europeracer_imgind_extract" results = [] for ind_path in ind_files: results.append(extract_pair(ind_path, output_dir, limit=limit, log=log)) return results def run_gui() -> None: import tkinter as tk from tkinter import filedialog, messagebox, ttk root = tk.Tk() root.title("Europe Racer IMG/IND Extractor") root.geometry("760x520") input_var = tk.StringVar() output_var = tk.StringVar() status_var = tk.StringVar(value="Select an .IND file or a folder with .IND/.IMG pairs.") frame = ttk.Frame(root, padding=12) frame.pack(fill="both", expand=True) frame.columnconfigure(1, weight=1) frame.rowconfigure(4, weight=1) ttk.Label(frame, text="Input").grid(row=0, column=0, sticky="w", padx=(0, 8), pady=4) ttk.Entry(frame, textvariable=input_var).grid(row=0, column=1, sticky="ew", pady=4) def choose_file() -> None: path = filedialog.askopenfilename( title="Select IND file", filetypes=[("IND files", "*.ind *.IND"), ("All files", "*.*")], ) if path: input_var.set(path) def choose_folder() -> None: path = filedialog.askdirectory(title="Select folder with IMG/IND pairs") if path: input_var.set(path) ttk.Button(frame, text="IND File", command=choose_file).grid(row=0, column=2, padx=4) ttk.Button(frame, text="Folder", command=choose_folder).grid(row=0, column=3, padx=4) ttk.Label(frame, text="Output").grid(row=1, column=0, sticky="w", padx=(0, 8), pady=4) ttk.Entry(frame, textvariable=output_var).grid(row=1, column=1, sticky="ew", pady=4) def choose_output() -> None: path = filedialog.askdirectory(title="Select output folder") if path: output_var.set(path) ttk.Button(frame, text="Browse", command=choose_output).grid(row=1, column=2, padx=4) progress = ttk.Progressbar(frame, mode="indeterminate") progress.grid(row=2, column=0, columnspan=4, sticky="ew", pady=(10, 4)) ttk.Label(frame, textvariable=status_var).grid(row=3, column=0, columnspan=4, sticky="w", pady=4) log_box = tk.Text(frame, height=18, wrap="word") log_box.grid(row=4, column=0, columnspan=4, sticky="nsew", pady=(8, 0)) scroll = ttk.Scrollbar(frame, orient="vertical", command=log_box.yview) scroll.grid(row=4, column=4, sticky="ns", pady=(8, 0)) log_box.configure(yscrollcommand=scroll.set) def log(message: str) -> None: def append() -> None: log_box.insert("end", message + "\n") log_box.see("end") root.after(0, append) def start_extract() -> None: in_text = input_var.get().strip() if not in_text: messagebox.showerror("Missing input", "Select an .IND file or a folder first.") return input_path = Path(in_text) output_dir = Path(output_var.get().strip()) if output_var.get().strip() else None def worker() -> None: try: root.after(0, progress.start) root.after(0, lambda: status_var.set("Extracting...")) results = extract_input(input_path, output_dir, log=log) root.after(0, lambda: status_var.set(f"Done: {len(results)} pair(s) extracted.")) except Exception as exc: root.after(0, lambda: status_var.set("Error")) root.after(0, lambda: messagebox.showerror("Extraction error", str(exc))) log(f"ERROR: {exc}") finally: root.after(0, progress.stop) threading.Thread(target=worker, daemon=True).start() ttk.Button(frame, text="Extract", command=start_extract).grid(row=5, column=3, sticky="e", pady=10) root.mainloop() def build_arg_parser() -> argparse.ArgumentParser: parser = argparse.ArgumentParser(description="Extract Europe Racer .IMG/.IND resource pairs") parser.add_argument("input", nargs="?", help=".IND file or folder containing .IND/.IMG pairs") parser.add_argument("-o", "--output", help="Output folder") parser.add_argument("--limit", type=int, help="Extract only the first N entries for testing") parser.add_argument("--gui", action="store_true", help="Launch GUI") parser.add_argument("--no-gui", action="store_true", help="Run from command line") return parser def main(argv: Iterable[str] | None = None) -> int: parser = build_arg_parser() args = parser.parse_args(argv) if args.gui or (not args.no_gui and not args.input): run_gui() return 0 if not args.input: parser.error("input is required in --no-gui mode") try: paths = extract_input( Path(args.input), Path(args.output) if args.output else None, limit=args.limit, log=print, ) except Exception as exc: print(f"ERROR: {exc}", file=sys.stderr) return 1 print("Extracted:") for path in paths: print(f" {path}") return 0 if __name__ == "__main__": raise SystemExit(main())2 pointsJust to clarify a few things: I copied what I had already said in my first post, and added that the format seemed complicated based on what others on the forum were saying about it back in May. About the source/comments being in Portuguese, i'm actually from Brazil, and the script was originally in Portuguese. I only asked GPT to translate the script to English for convenience lol, so my bad for not making that clear right away. It generated tons of different versions of the script while trying to get it right, but this was as far as it got. Regarding "KMDExtractor", I didn't use it because I didn't even know it existed.2 points2 pointsWas heavily tied up in other stuff - including building up my utility library for other projects (that would include this), I'm hoping to have an OSS release at some point this week, the tool has undergone major refactoring under the hood and I've figured out where the game handles those invalid version meshes, along with texture bindings, etc. With the upgrades to my utility library the tool will support more formats such as SMD, FBX, etc.
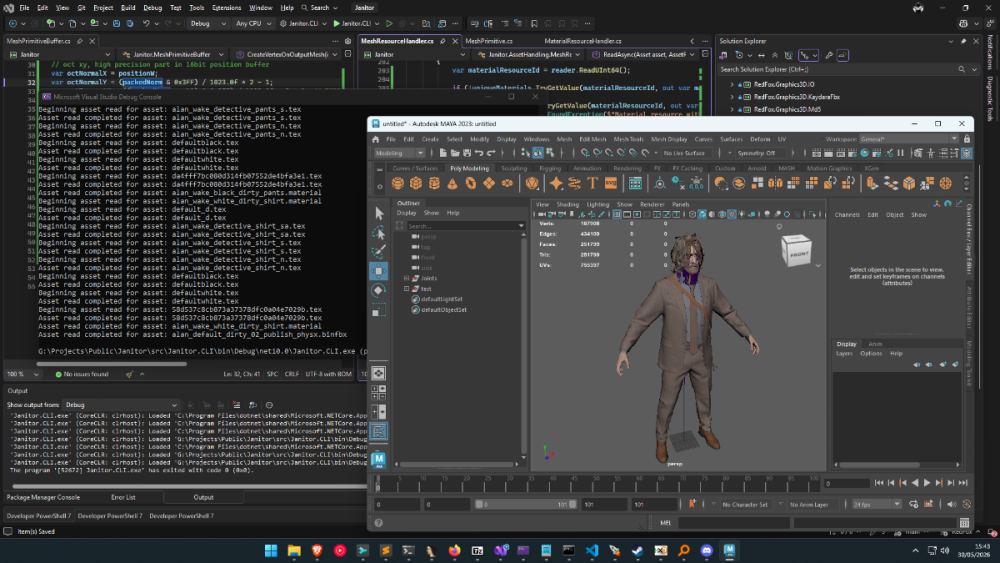 2 pointsHere you go - plugin for Blender 5.0 Imports meshes, skeletons, animations and textures Some animation files may fail to import (could not figure it out) io_scene_until_dawn_demo.zip2 points1 pointYeah, textures seem to be converting and looking 100% fine now. Thanks a lot for that, bruv.1 point1 pointok new version posted. You need to re-dump (only chunks) to get HD chunks now.1 pointWell, it's too poor to be released. But I pmed you what I had so far, Dec. 24, recompiled.1 point1 pointWhere have you found SX 6.0? I can't find any reference to it anywhere on the internet. I believe the latest I've found is v4 EDIT: Nevermind I just saw another post of yours that has the link. Thank you!1 pointAfter having searched through many too many senseless (?) blocks I finally got this (deepforest):
 1 point1 point100% I'm planning on doing it for all of the games, they all use the same engine with slightly different modifications.1 pointFor the 3D models, maybe you can take a look at Murugo's Blender script, that might help. For the textures, maybe the findings I posted in an another thread might help. https://reshax.com/topic/702-ps2-tokimeki-memorial-3-textures/1 pointHere the samples: https://drive.google.com/file/d/1Z5yF4f7nrojuPYyZmeV1VX2ZbJ-AXNVP/view?usp=drivesdk and here an yz2 encoder/decoder: https://github.com/RayneDuarte/YZ2-Encoder-and-Decoder-ported-to-modern-Cpp-Builder-121 pointHere the executable: https://drive.google.com/file/d/1uNtUpMyFZLqc2AnjjunMzX58fEg3mdRQ/view?usp=drivesdk1 point//------------------------------------------------ //--- 010 Editor v14.0 Binary Template // // File: // Authors: // Version: // Purpose: // Category: // File Mask: // ID Bytes: // History: //------------------------------------------------ char Sign[4]; uint16 Version; ubyte CRPRStrLen; char CRPResourceName[CRPRStrLen]; byte Null[5]; ubyte StrLen; char TrackName[StrLen]; uint32 ResourceCount; uint32 DataBaseOffset; struct { uint32 Unknown_0; ubyte StrLen; char ResourceName[StrLen]; ubyte MD5StrLen; char MD5[MD5StrLen]; uint32 Unknown_1; uint32 ResourceOffset; // + DataBaseOffset uint32 Unknown_2; uint32 ResourceSize; }TOC[ResourceCount]<optimize=false>;1 pointadded support: https://github.com/smiRaphi/UniPyX (https://github.com/smiRaphi/UniPyX/commit/79a2d846dacb4b5c11b158b7122b4a81c2b028ee)1 pointIt wasn't that hard follow 010 template... Works on all provided samples. Thanks ikskoks for confirmation. from inc_noesis import * import noesis import rapi import os def registerNoesisTypes(): handle = noesis.register("Shogo: Mobile Armor Division - Texture", ".DTX") noesis.setHandlerTypeCheck(handle, noepyCheckType) noesis.setHandlerLoadRGBA(handle, noepyLoadRGBA) noesis.logPopup() return 1 def noepyCheckType(data): bs = NoeBitStream(data) if len(data) < 20: return 0 return 1 def noepyLoadRGBA(data, texList): bs = NoeBitStream(data) baseName = rapi.getExtensionlessName(rapi.getLocalFileName(rapi.getInputName())) bs.read(8) TextureWidth = bs.readUShort() TextureHeight = bs.readUShort() bs.read(32) PaletteBuffer = bs.read(1024) RawDataBufferSize = TextureWidth * TextureHeight RawDataBuffer = bs.read(RawDataBufferSize) data = rapi.imageDecodeRawPal(RawDataBuffer, PaletteBuffer, TextureWidth, TextureHeight, 8, "a8 r8 g8 b8") texFmt = noesis.NOESISTEX_RGBA32 texList.append(NoeTexture(rapi.getInputName(), TextureWidth, TextureHeight, data, texFmt)) return 11 pointHi Thanks for the reply. https://mega.nz/file/8E91gQ5R#ZSFpInsbTl4mVMbnm5dJB9fyu7aoWfvX9eEpatwfd4I He is the file Thanks1 point1 pointHi Thanks for the reply. https://www.dropbox.com/scl/fi/1w80o3nyqxi6c65ntzumb/car_24922C7461E7A08C.json.jmodel?rlkey=8grue2kq4y8mvgzgqze2zqrjy&st=seqbisjh&dl=0 He is the file https://mega.nz/file/AEFyjbzb#J-M2lVQMtK9MR5AGTFCSgz4MoTWRDddfDn8LhLTkous Here is the raw pack file too Thanks 🙂1 pointadded support, only extracts audio currently as I've no clue how the 3d models (AMPC) knows it's offsets https://github.com/smiRaphi/UniPyX (https://github.com/smiRaphi/UniPyX/commit/46a9f811f79d84a93e8ec9f3480f717ab25e54b6) Also to play the audios, you'll need a player that supports this specific format, only one I know is: https://github.com/librempeg/librempeg1 pointalso added support for it in my extractor with koei tecmo specific extension guessing: https://github.com/smiRaphi/UniPyX/commit/385f2da5ce0bd9b194c287b56f591dadbf75716b1 pointWorking on a tool for this currently, fixing normal and specular mapping then will release!
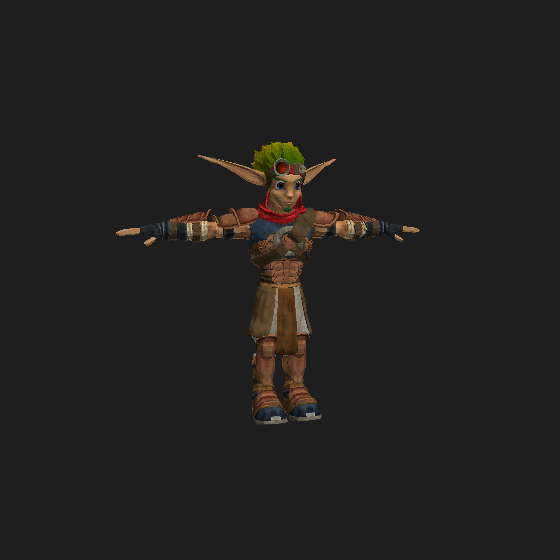
 1 pointWell, you can convert to PNG with ImageHeat and then you can convert to JPG/TGA with other tools. By the way, toher tools should also work: DTXView (from REZ Tool Pack) DTXConvert (from REZ Tool Pack) DTXUtility DEdit DTX-Meta-Transfer
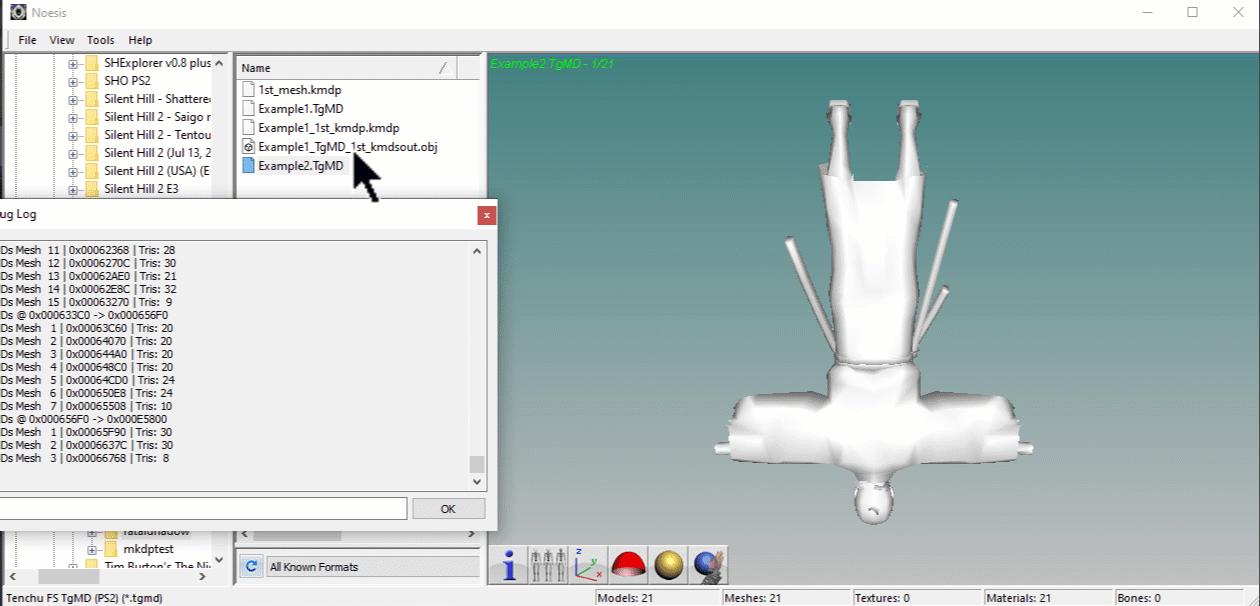
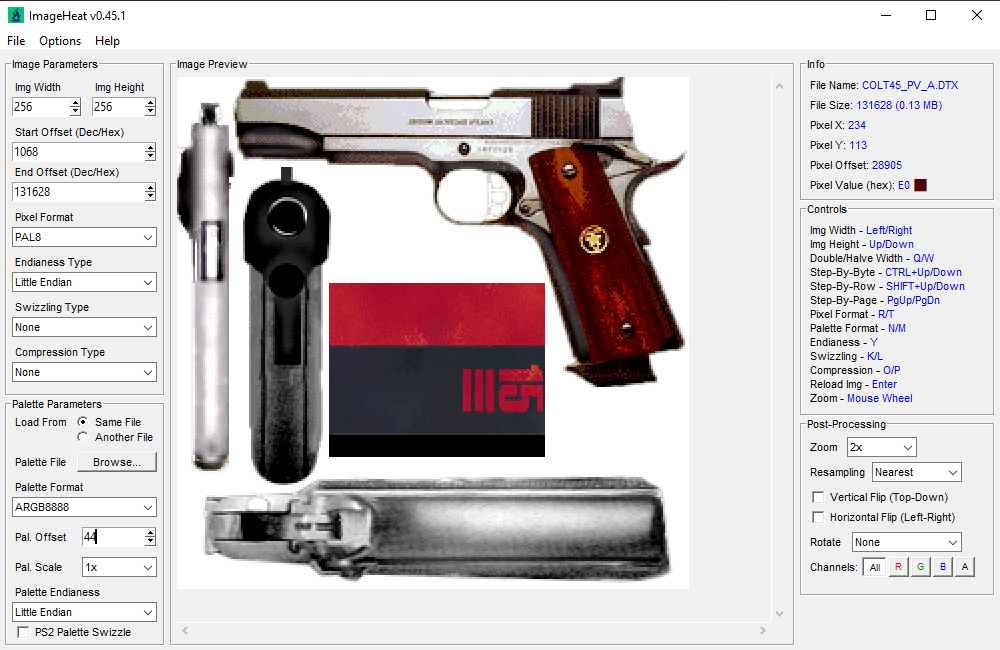 1 point1 pointHere it is (only works for Watch Dogs 1). Blender249[WatchDogs][PC][xbg][2014-10-25].zip1 point1 pointI discovered that Avatar XBG Blender Importer can support Far Cry 2: https://github.com/Quiet-Joker/Avatar-XBG-Blender-Importer1 pointJust a quick note - the decompressed length and file offset values seem to be actually 5-byte/40-bit values, due to some archives being over 4 GB, with the same format used in quite a few other PS3/PC games, such as Captain America: Super Soldier, Infamous, Naughty Bear, Warhawk, Ghost Of Tsushima, among others.1 pointThat is a big script, lol. Mine reads only kmds, then I made other for kmdp and finally I made other to read kmds and kmp from .TgMD container but without textures. TgMD has a table with pointers to all kmds/kmdp and textures but mine does not read textures yet, lol. And I fixed the strips. Check this:
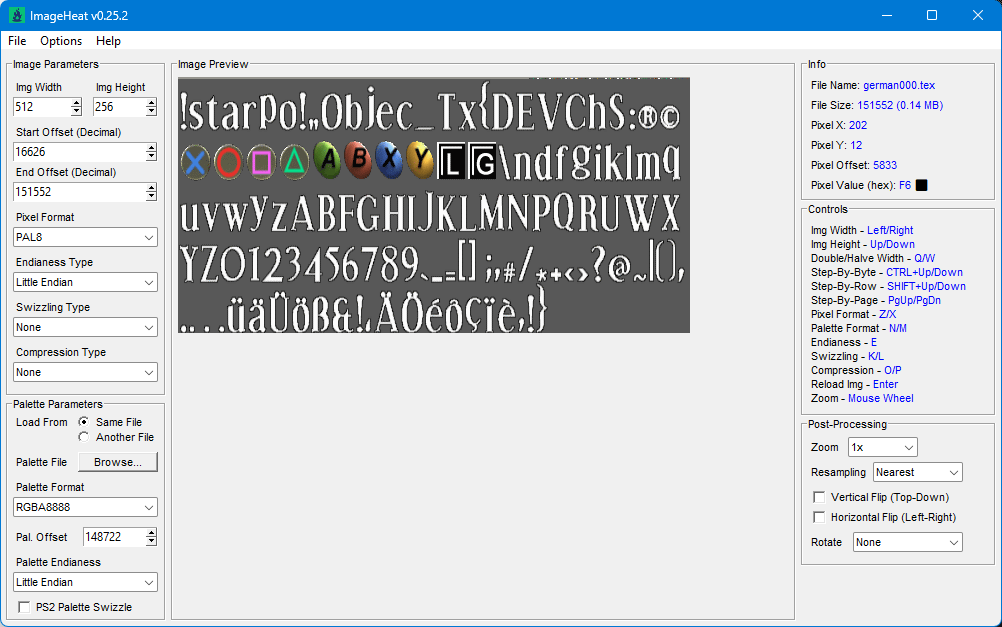
 1 point1 pointIt all depends on what you're looking for - these files have more than just TIM images and I3D meshes in them.1 pointHere is the newest version most animations should work, I haven't tested everything yet added a search bar to make it easier to find assets you have loaded I tried to speed up the animation loading, but I don't think there is a real way to do it at this moment unless I worked on the memory stuff, right now its decrypting each frame, then keyframing it, so they can take about 3 to 4 minutes if you want to load another animation, its better to just refresh the scene, current bug is that the animation unloader has some memory cache'd for a few bones that I haven't been able to quash yet. sometimes the clear animation buttons works though I'm currently working on another Conker project, if that goes anywhere then I'll announce it here RBMimport_12.py1 point1 pointYou have been informed that there's hashes only. So you can't get filenames simply because there's no simple way back from a hash to the string it was generated from. First step, afaik, will be to find the hashing algorithm (debugging required). Once the algo is known the more tricky part begins: you need to find all filenames. I don't know how, they might be in the private sources of the developers, whatever. Then the hashing algo is used to create a hash list of all known filenames. Then you can replace the hashes in the bin files by the belonging filenames to know which chunks they have. Long story short, you will have no choice but to work with the hashes unless some kind of miracle happens you find out who these guys are:1 point1 pointThank you, with this I was able to put the image ImageHeat (see first image) and export it as a .png, and after modifying the .atlas to read the .png, I was able to lead the animation in my Spine Viewer However, he looks weird, with most of the problems around the edges (like his collar or his eyes), which may have something to do with the outline that I think is in "rim-DEFAULT." However, I can't seem to figure out a way to export the texture from rim properly. kermit.zip
 1 pointYou can also find it here if you do CTRL + F and search GOTG https://ia800801.us.archive.org/view_archive.php?archive=/30/items/xentax.7z/attachments.zip1 pointDrag and drop .index files into the script, it will automatically parse streamed.resources and extract sounds. streamed.py streamed.zip
.thumb.png.c09c1d8af0948c551ca36af743253048.png) 1 point
1 point Extremely early version of tool, can export a good portion of models in game, some will fail due to version (investigating if this is due to them being old files, or if the game genuinely has a different code path for them, as I can only see 1 in the exe). Some will also fail due to WIP issues with mapping LOD indices (errors or corrupt mesh output) Drag and drop Alan Wake 2's folder onto the exe/pass it via CLI and it will export all binfbx files in the archives. Currently only exports models with material names/skeleton, references to textures and other data is a heavy work in progress, but I felt it was best to get an early version out that can at least export mesh info. Requires Cast plugin to import into Blender/Maya for now, more formats will be supported later: https://github.com/dtzxporter/cast Janitor.CLI.7z1 pointThis project looks kinda abandoned, to be honest. Since you wrote you don't know jack about hex or anything like that I wasn't sure to upload an unfinished Make_obj exe in fear of the confusions it could cause. Anyways here's the latest obj file from Gantz I could find which is obviously the one from here: testGantzFakeTriStrips.zip1 point1 pointI didn’t delve into the topic, but if you just need to replace the magic check in the code, then I made the replacement in line 73 in the MAS2Reader.cs file: if (fileTypeString == "GMOTOR_MAS_2.90") to if (fileTypeString.EndsWith("_MAS_2.90")) so it will be universal. I also build this in VS: MAS2Extract.7z1 point
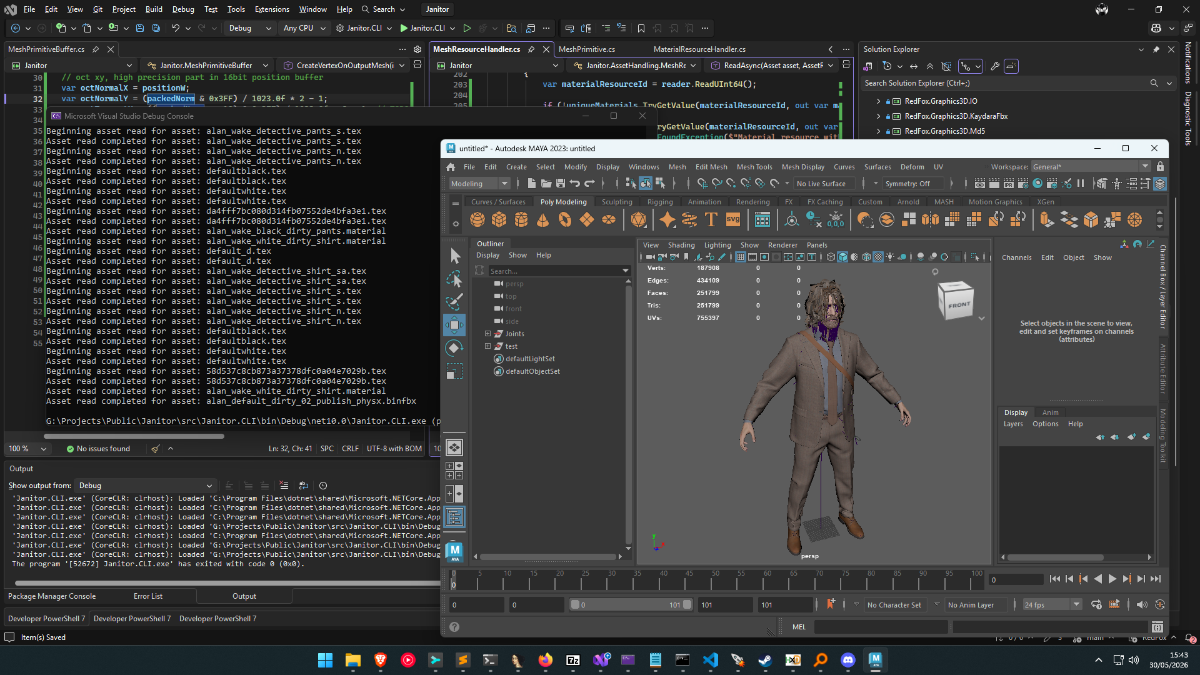
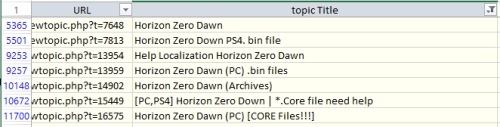 Uploading all my tools will take a lot of time, so this is temporary solution. Most of my tools were released on zenhax, and now available with wayback machine. But how to find them? Here is a list of all topics from Zenhax archived by wayback machine, including attachments and inline scripts. Find topic name with search or filter (see "horizon zero" screenshot as example), then copy URL for the list, and open it. This way you can download almost all of my tools. And also all tools/scripts published by others through the years.1 point


.png.ccf09f34bfa6b931b357fdc6d96ded37.png)