Search the Community
Showing results for tags 'ps2'.
Found 24 results
-
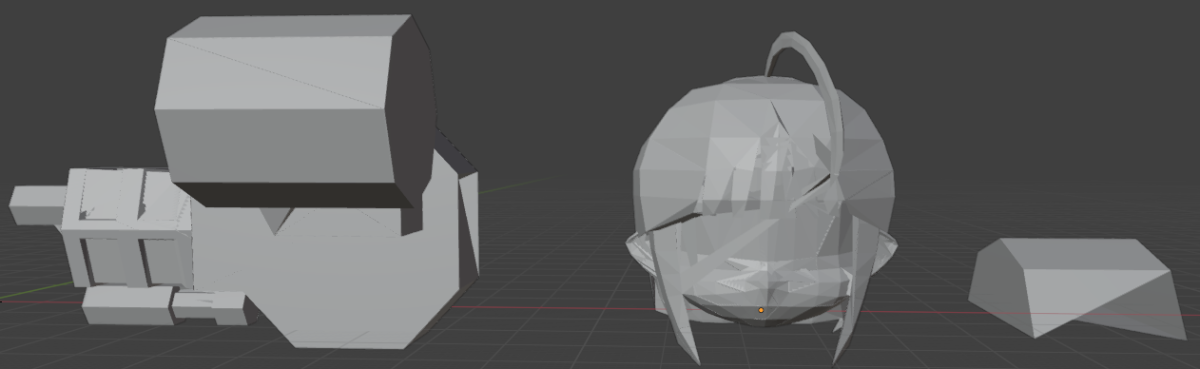
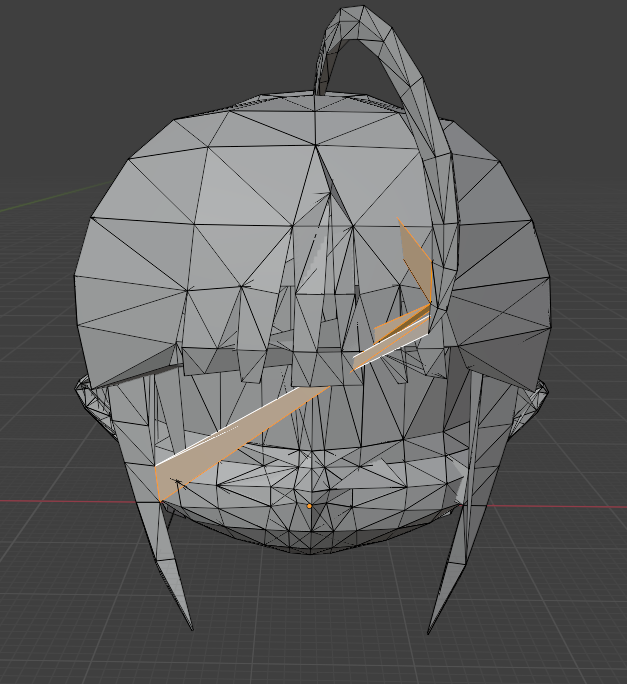
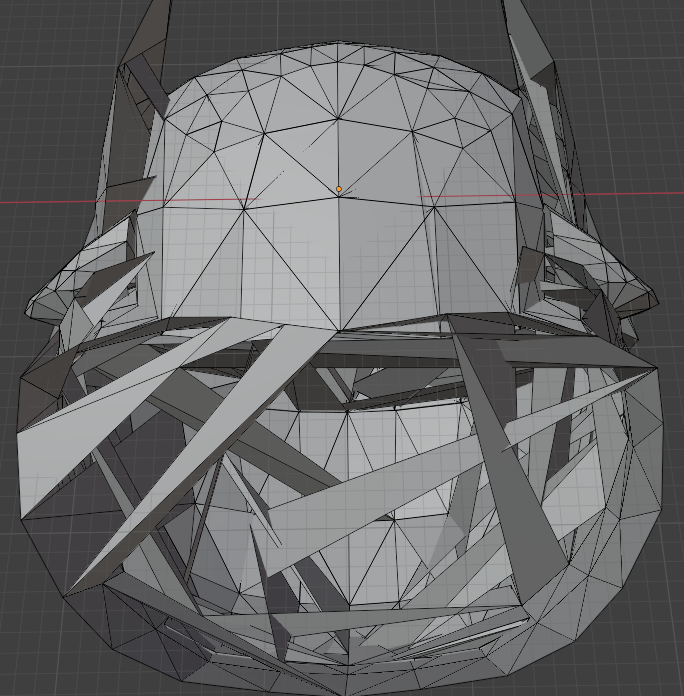
 This is my first time posting on this website so please forgive me for not formatting this properly if such I made a mistake. Recently I have been reverse engineering a lot of different games for various old consoles or obscure hardware/software. Some due to clients "Paid commissions", other due to personal curiosity. List is rather large. Recently, I came across the game Garou Golden Knight. I was asked to make tools and a system as to where people could easily "mod" the game. So far, I am about 80% there. Packing/repacking tools work. Decompressing the files is required before any file editing, etc. This game like many others uses Renderware for models, animations, etc. You could use the dragonFF model importer for the models though expect issues. Most models use a plethora of static parts "which is common with PS2 games using renderware among others" so you are not going to get a full single solid model but many pieces with a simple underlaying body and armature. Some animations are done literally through text based files and "in game load up" to attach some static models to specific bone/location/orientation. games uses a lot of txt based files making it extremely easy to mod. I have a client begging me to finish tools for this game which I am not fully able to and out of frustration about to tell them to pike off. The animations for this game use a vendor I am not aware of for Renderware flavours. The format is the common rwanm but not the standard vendors/flavours like Climax, Eighting, etc.... For those that don't know about rwanm I will elaborate a little about these in particular. They are RenderWare Animation chunks (chunk id 0x1B). The version is 0x100. With these animations, they behave like expected (multiples of 16 pointing backwards). Others clearly do not. Many offsets point forward to keyframes that haven’t been read yet (e.g. 1248 when we’re only at keyframe 76, and 1248/16 = 78). There are also huge values way beyond keyframes_num * 16. If you were to try known renderware animation importers, they will all give errors or assign a wrong vendor to these. Example being ValueError: 65226 is not in list. Most of the time values, when interpreted as plain floats, are nonsense (gigantic positive/negative values, denormals, etc.), with only some near 0 or a few small fractions looking “reasonable”. These .rwanm are not the same “TM compressed rotation” variant of any vendor I have messed with in the past or for any known blender/noesis/3ds max importer. It’s almost certainly using game-specific compression/packing on top of the base RW structure. If you try the well known blender animation importer for renderware it will try and associate these animations with trashmasters and only give errors due to misinterpretations. This game has been giving me more trouble than any other renderware game I worked on. I spent 3 days straight now and still have made 0 progress while simply doing a whack-a-mole attempt at making a valid working importer for the animations. If I can get help with these animations I could finish the modding suite for this game. With this post I am uploading a rar file that has two animations. One small, one average, the texture file and the base skeleton/body for one of the characters these animations belong to. At this point, with the amount of frustration I have had with this game... If I had some help with the animation format to successfully be able to get them into blender or even noesis.. I would then add that to the tools and make them public. This game was/is more difficult than the King of Fighters Maximum Impact series with their animations..... If I could get help with this I would be more than willing to release tools for many other games that have no public tools nor have a active modding scene. I know people like to steal from these games, that isn't the point of this. My work is for modders only. While I hate writing this.... If you are replying only to try and get assets from this game, that won't happen. Any help with this would be most appreciated. I can't spend weeks on this and have too many other jobs to complete. I will try to reply when possible to those offering advice/information or perhaps even a solution. Thank you in advance even if you just want to poke at the animations. Something is better than nothing. Garou test files for public.rar
 -
I'd like to be able to modify the 3D models in this game, but to do that I need to be able to extract and import them. So far, what I've noticed is that their header is always (54 67 4D 44) [TgMD], the animations always seem to have the header (4B 4D 44 73 71) [KMDsq], while the textures are basically TM2 with the header (4B 32 54 78 80 00 00 00 80 00 01 00 80) [K2Tx€] located at the end of the model. It seems quite simple and organized, but so far no program I've tested has even been able to read it. What I also know about the game is that the models were made in Softimage, and the engine seems to be a custom Renderware engine; I imagine the model is designed to take advantage of the PS2's fast memory. I don't know if there's an easy way to edit them in Blender or another program, but if anyone can help in any way they can, I would appreciate it. Here is one model of the game. Tenchu PS2.zip
-
 I've been interested in trying to rip the files for the Open Season videogame to unearth any unused files present for a couple of years, found some filenames for unused stuff like a wolf character among other things in the .UMD package file which the game requires in the Xbox 360, Xbox, and PC versions to even bootup (while also using .lin and liv files for packages (.liv being exclusive to the Xbox 360 version), PS2, GameCube and Wii have the contents of the .lin and .liv files included in the main .UMD package file that's required to boot the game up. Though there's been no way to view this stuff for 18 and a half years since the release of the movie and the tie-in game here. Here's files as samples from every version of the main Console/PC releases for research purposes from anyone willing to look into this, which would be really awesome. Versions included: Xbox 360 (North American Version) Xbox (North American Version) PC (North American Version) PS2 (1st European version (English, French, Spanish, Dutch) since it's the earliest final retail build of this release compared to the Scandinavian European PS2 version) GameCube (North American Version) Wii (North American Version) https://drive.google.com/drive/folders/1lTmfQnIQhtK099_aeYbiDBTHjNbwY7oh?usp=sharing
 -
Basically this character is a boss that you are never shown in-game due to story reasons however im 99% sure she has a model because you can see the silhouette during gameplay. I just want to see her model, doesn’t even have to be extracted. But I’ve found no luck trying to do it myself. My ideas were model extraction or using a free camera in-game. I use a mac so have had no luck with apps to help with this (don’t/can’t run on mac). Ive had no idea where to ask for help with this so I hope this is the right place.
-
How do I decompress CMP files from this game? I need to extract model data. Any help would be great, thanks! cmp.zip
-
 Hello all, I'm new to ResHax. And I'm opening up a new topic here because I would like to see if it's possible (if anybody wants to help me out) to rip the 3D models from this very strange and beautiful PlayStation 2 party game only released in Japan called Super Galdelic Hour. Me and a discord friend of mine managed to extract the game's data from the DATA.BIN/DATA.FAT files, and inside were a bunch of unique file formats that the game uses such as .EGG, .SEQ, .VUG, .VU1, .VU0, .MOT/BIN, and .BD/HD/SD. Each file format has a different purpose as explained down below. EGG: This is for graphics and textures. (Special thanks to BoringHexi for helping me extract all of the game's graphics and textures!) SEQ: Camera animations maybe. VUG: This stores the 3D geometry for each character and piece of scenery in the game. VU1/VU0: This stores 3D geometry for objects and miscellaneous models. MOT/BIN: Animations! BD/HD/SD: This is for audio, sound effects and voice clips while SD files are used for sequenced music. Our main focus for this topic is ripping the 3D models of the characters, objects and scenery from the .VUG/VU1/VU0 files, and maybe animations from the .MOT/BIN files. The ZIP file attached down below contains all of the necessary files that I pulled from the extracted game files for the topic. If anybody wants to help me out with this as a collaborative effort, feel free to be my guest as that would be much appreciated! galdelic_vu_files.zip
 -
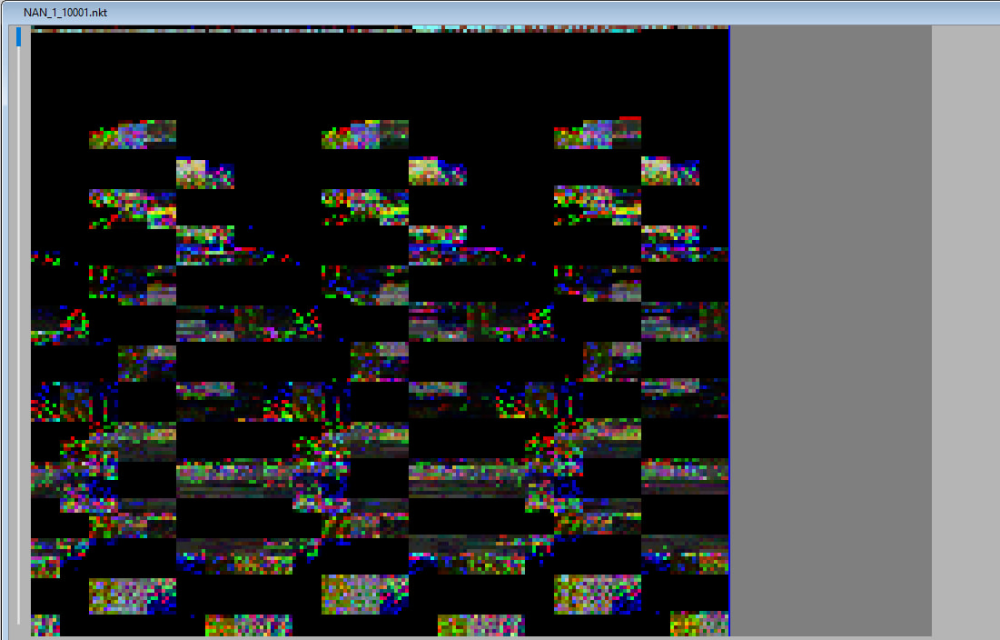
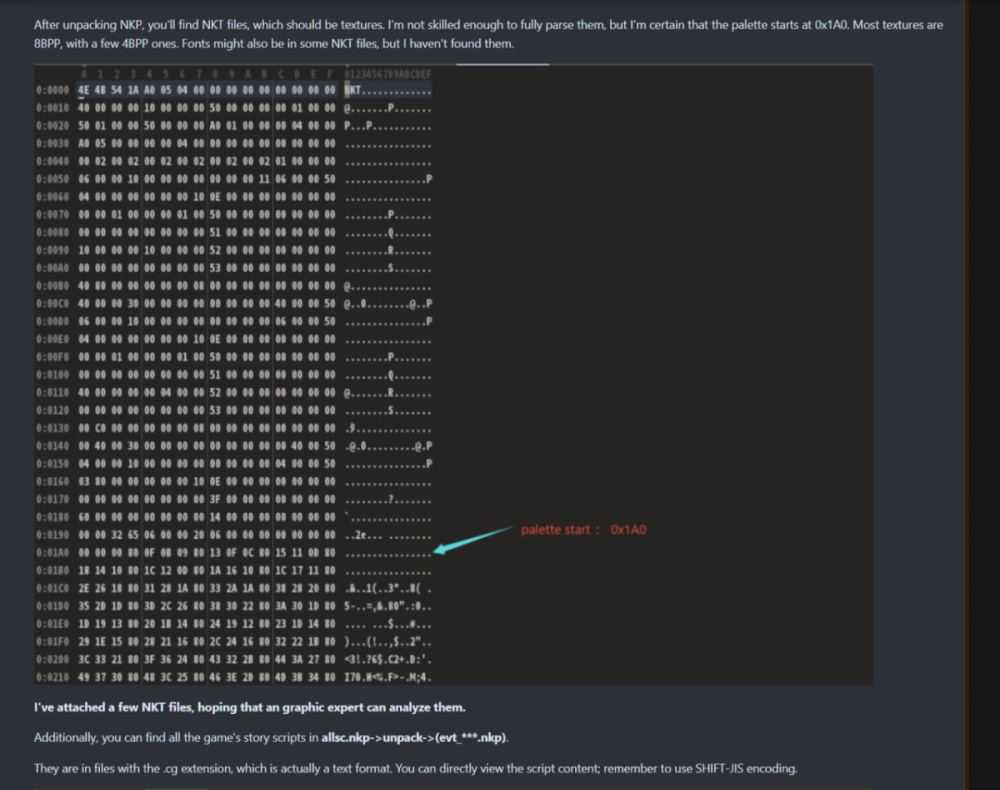
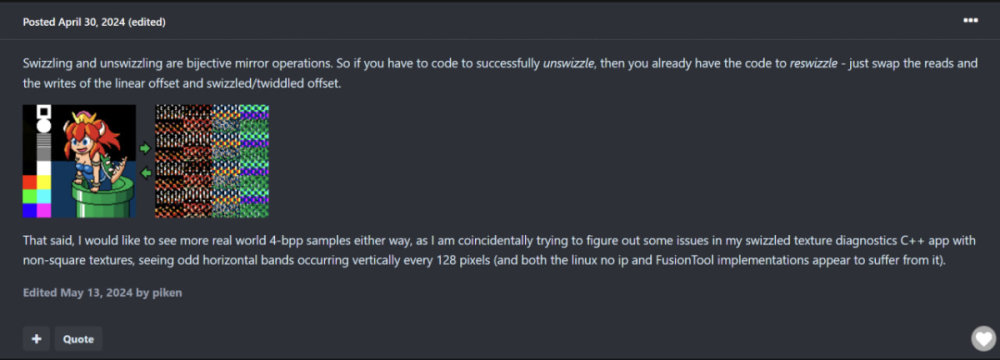
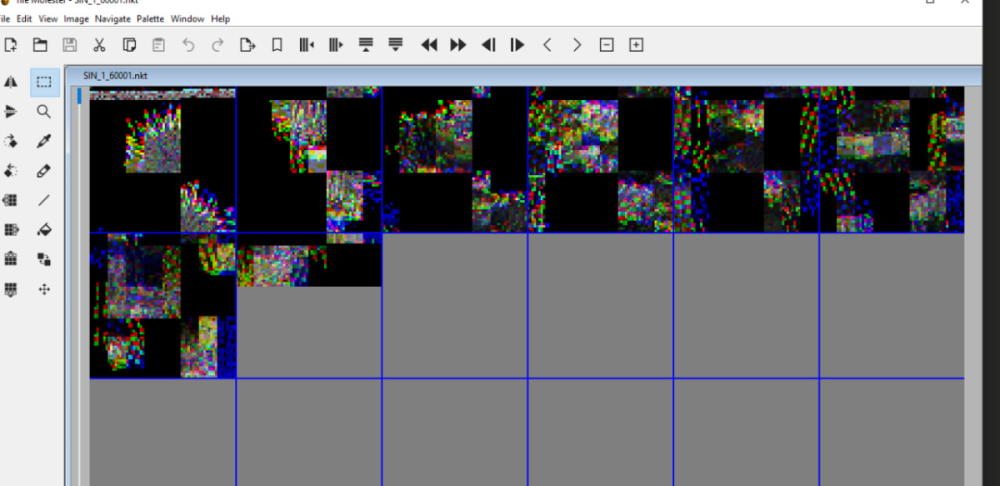
i need help with a custom texture format to unswizzle for the ps2 game NANA. If you could help me achieve this in any way it would be a great help as i could get to work on fantranslating the game. I am putting a 65$ USD LTC/BTC bounty on anyone who can successfully unswizzle this format, and it will be paid to the first person who can provide the function or proof that they can unswizzle the current texture format. Please contact me on my social platforms for this : @mxlg on discord and @mxlgborn on telegram. This image ^ is what i got in tile molester, from using 8x8 block size 32bpp RGBA, on 2 dimensions with the custom block size. i still see the swizzling, and also i have this image with 24x24: also here is the sample files you can test in tilemolester or any file explorer: https://www.mediafire.com/folder/gx88877fgxwye/NKT The issues are the unswizzle method. The pallete starts at 0x1A0 and the texture at 0x5A0. The width and the height it seems is 256x512, the color depth is 8bpp.

-
 Hello, can anyone check these file formats to see if you can extract anything from them? I’ve already tried without any luck, but I figured some of you might know. This link contains the dump I created, so you can skim through the files and take a look. If possible, could you also suggest or maybe even create any plugins or tools that might help open them? https://drive.google.com/drive/folders/1kqHk6ULPWuRH6yAyc3tQuH_Vlivf8ysB?usp=drive_link
 -
There are at least two types of i3d file formats, used within the .i3d files used in ape escape 3 and Rule of Rose uses .i3d files in .mdl files. I3D_BIN: Mesh ✔️ Bones ✔️ Skin ❌ I3D_I3M: Animation ❌ Tools: https://github.com/Durik256/Noesis-Plugins/blob/master/fmt_i3dg.py - Supports meshes. fmt_RuleOfRose_PS2__i3d.zip - Supports bones (made by Bigchillghost from xentax, reuploaded into reshax for quicker accessibility)
-
Hello! This game has made me waste a ton of time on the web; I was wondering if anyone here might know more! The game is called Automodellista, a cartoon-style PS2 game with a racing theme. I'm interested in the track models because they look awesome! The main goal is to get the files into Blender. The tracks and cars are in binary format, they do not have any particular extension as you can see in the images. Inside the files it is possible to see traces of textures in TIM format. This is what the files extracted from the AFS container look like. I did this test extraction of the .ICO file (with imageHeat)
-
Would like some help with these Gran Turismo 4 image formats - I like this series - I extracted the files a while ago and they are all in the compressed file I have left here. Please, if anyone knows how to convert these images to PNG, DDS or JPG I would appreciate it!! I read that they are in a format called "tex1", I tried to convert it with some tools but I haven't found the solution!😊 gt4.zip
-
 Hi everyone, I'm trying to figure out if there's any way to open, extract, and modify the content contained in these files for this game. Unlike the PC-only version, which is a moddable game, the console version appears to contain assets that would later be reused in the version developed by ISI, Image Space Incorporated, the same company that created rFactor, reusing the same engine. But getting back to the previous topic, I've noticed that both .CCD and .VSO files are some kind of file with encoded data, like the CCD, which should contain textures, models, and shaders for the cars and tracks. The .VSO files are generally for scripts, but I won't talk much about those because they're not my current interest. If anyone would be willing to help put together a QuickBMS script or useful tool to open this, I'd be happy to create a patch or future mod! :) Note: These textures, are from the Gamecube version!
-
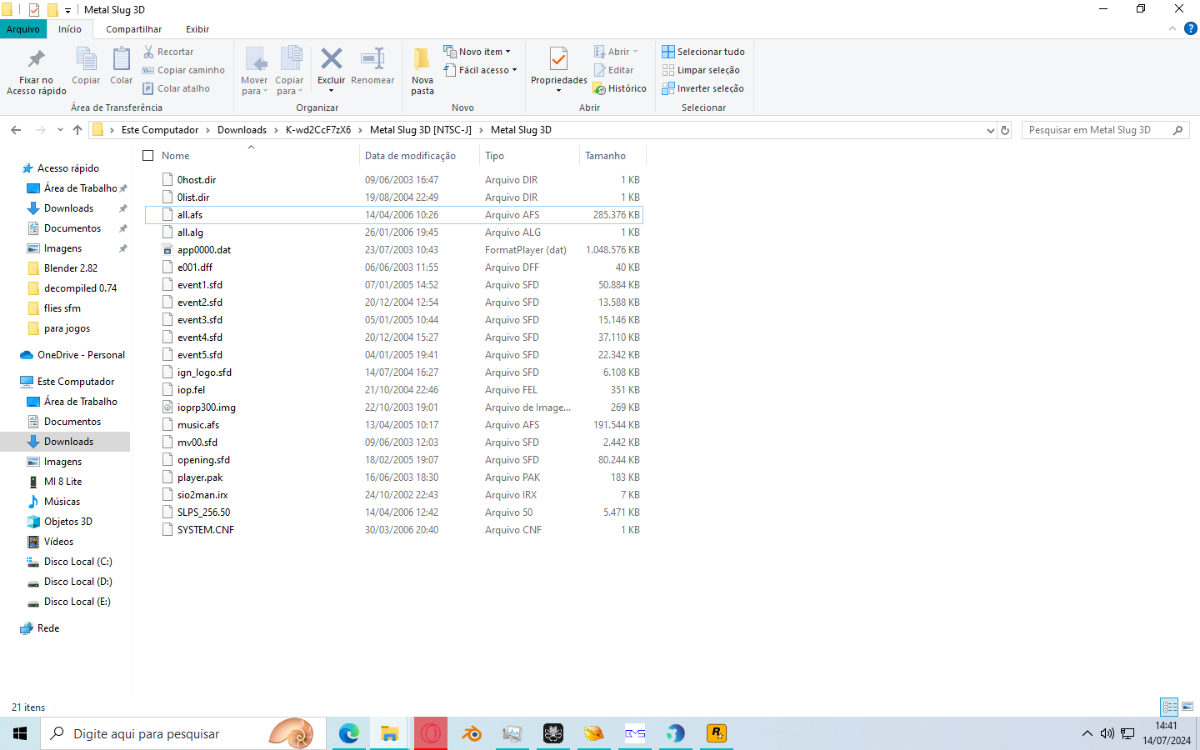
 love it or hate it Metal Slug 3D PS2 (2006). I just need to extract pak file so I knew there are 3d models of enemies and vehicles in the 2006 game but I couldn't extract it I used BMS quickbms https://aluigi.altervista.org/bms/metal_slug_3d.bms it only works only DATA file and the folder in the iso metal slug 3d ps2 doesn't have it! help please !
-
 Hey everyone, I'm currently reverse engineering NCAA Football (PS2, developed by EA Tiburon) and have run into a proprietary 3D model format used throughout the game: .DMF. From initial inspection, this format appears to be used for player models, helmets, coaches, and possibly stadium objects. The files aren't standard formats like OBJ or MDL, and I haven't found any documentation on them. I'm trying to fully reverse the format to export/import geometry, UVs, materials, and possibly skeleton data. models.zip
 -
 I've been chipping away at this for... Weeks now? I've been making improvements to the program called StudioCCS which is a model viewer/exporter for the .hack games. My primary focus is the original series' model animations. I have had some successes - characters largely now look a little bit off rather than twisted and deformed. I have, however, hit the limits of my understanding. An archived XenHax post indicates these use standard PS2 vif tags, and despite reading over the linked posts (through the wonders of the Wayback Machine), I still don't know what I can do. I've had some successes with fixing some of the rotation values so things don't look like garbage, and implemented a few things like exporting a current scene and exporting all animation data. A lot of what I've done is a little hacky, for now, and my code is a mess of commented out attempts and whatnot. My repo is here, and does include a built version in the bin/Debug folder (it's how what I forked from what doing, so I stuck with it): https://github.com/taarna23/StudioCCS I'm attaching 3 character models that the program will load. I hope someone will be able to help. ccs_chara_models.zip
 -
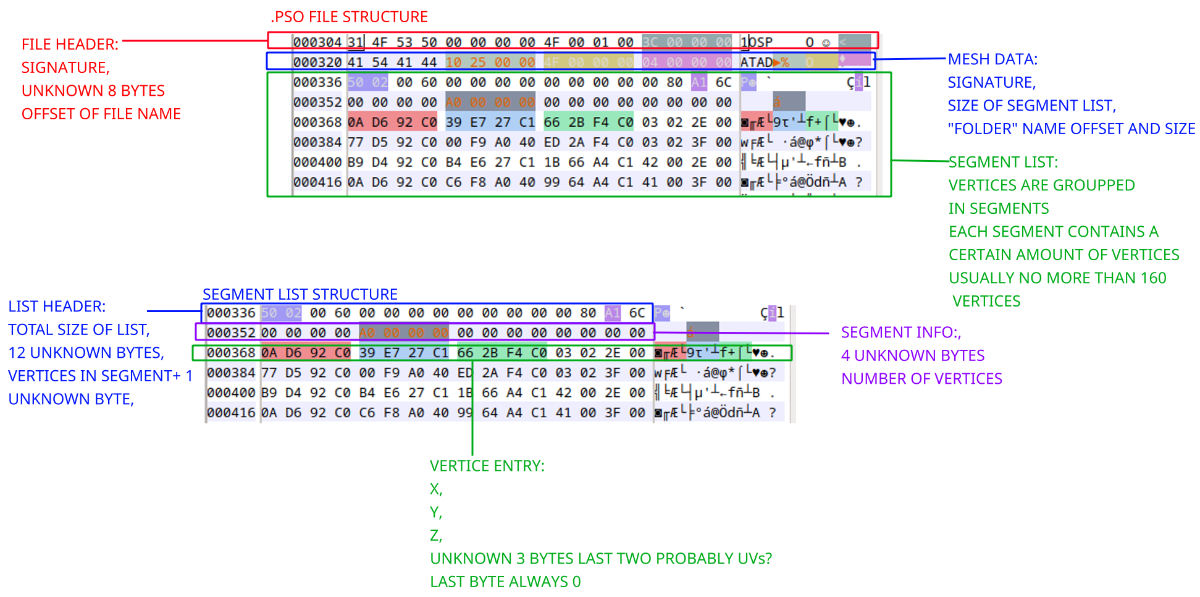
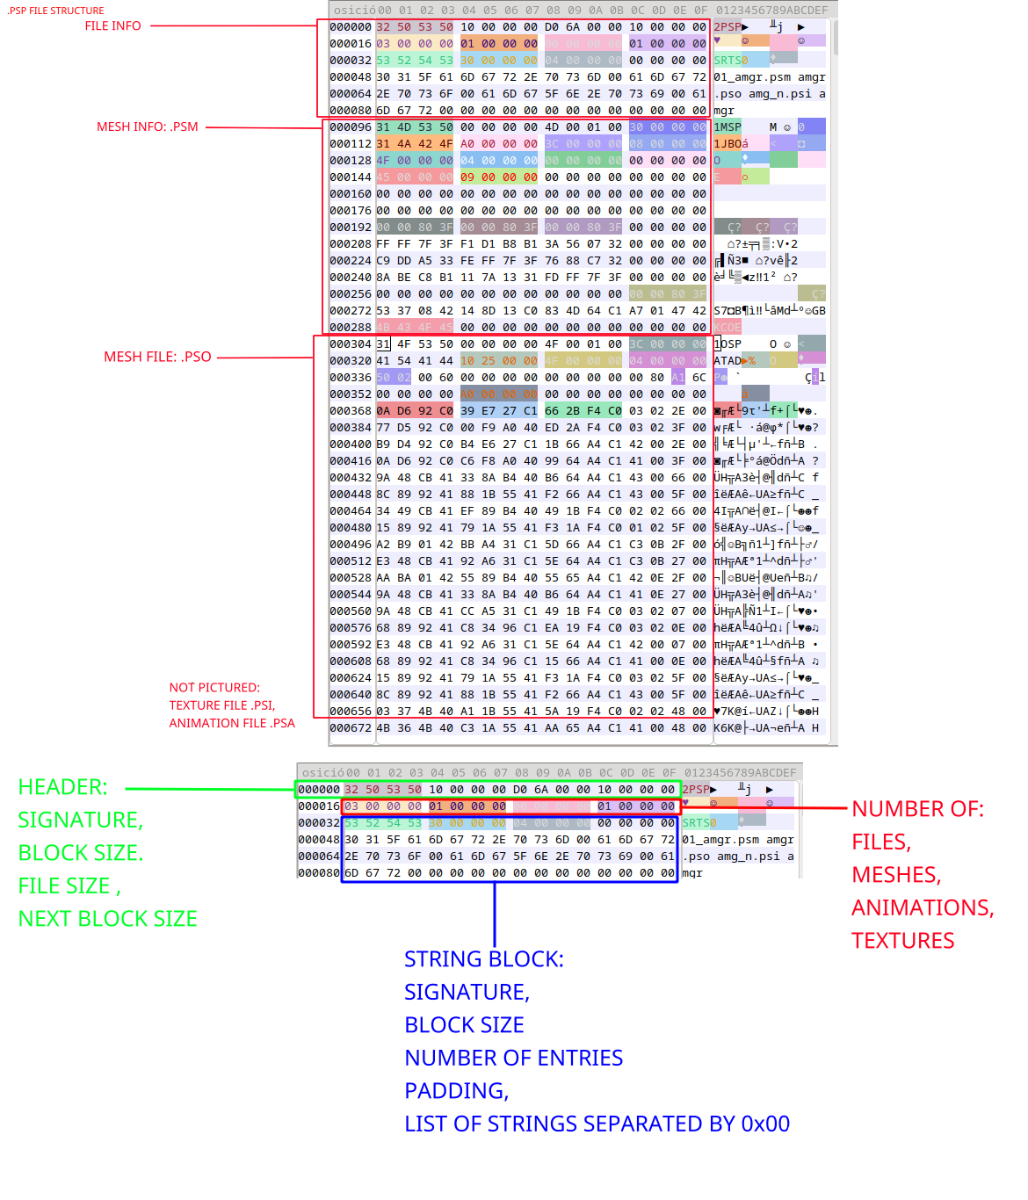
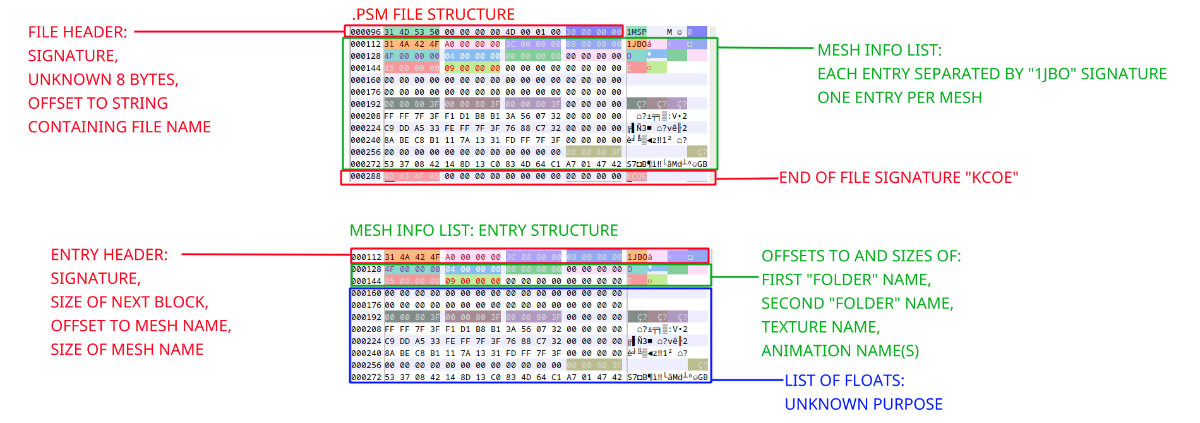
 So, I have been trying to make a script to generate .Obj files automatically from the game's psp files. To explain all the details: A .psp contains the meshes, animations and textures of a single 3D object. And they look something like this: The meshes are stored in .PSO files, while the animations are in .PSA, and the textures in .PSI (don't care about those two yet). Since there can be multiple meshes, textures, and animations in a single file, information like what texture corresponds to what mesh and such is stored in a .PSM file: I haven't really tried to check what the list of floats could possibly mean for the meshes so far. I have no idea. Alright, and here is what the PSO files look like, finally: Using the triangle strip algorithm from @Sparagas 's triangle generator in my script, I have managed to somewhat successfully re-construct the individual meshes from the .pso files: If you look closely, though, you can see there are these ugly triangle spikes coming out of the model. But if you look even closer, you can see the mesh is actually full of them: (There are also a lot of overlapping faces but that's another thing) From my understanding of tri-strips, this is probably intended? The result is good enough that my guess is the developers used a sub-optimal tri-strip conversion algorithm, and all these spikes aren't actually meant to be displayed, which is why most of them are inside the mesh and not outside. This doesn't explain what's up with the ones outside though. And, another problem: some of the models are missing a few faces! You can see on the top picture that the gun and the parallelogram-thingy have holes on their surfaces. But HoiHoi-san's head doesn't seem to have any. Weird! So, all that's left is figuring out: If there is a way to make all the visible spikes go away Why the missing faces If there is a way to fix the overlapping faces And all of this should be able to be done by a script, of course. I'll leave the raw .psp, .pso, and .obj files if anybody wants to take a look. And also my python script (it requires Open3D, which was a pain to install and is pretty resource heavy, if you can adapt it to something else I highly recommend you do that instead LOL). I'll also leave the textures here if anyone wants to figure that out. pointVisualizer.py HoiHoiFiles.7z
-
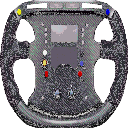
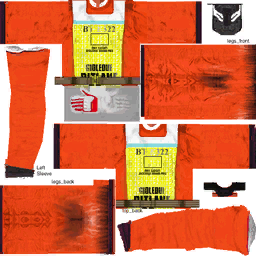
Hi all! New hear so apologies if this is the wrong place to post this. I'm looking at modding one of my beloved games, Gundam Vs Zeta Gundam. I have half a decade of modding experience (not a lot) but PS2 games? Well they're proving a headache and a half for me so far. TL;DR What I need; STATS DISPLAY NAMES An explanation on how to edit textures (link to other resources if possible to save you lovely lot your time) EXTRA AVAILABLE ADDITIONS REMOVING SPACE RESTRICTIONS The File Folder System within the ISO is as follows: I've been able to look into the ISO from the disc and have made backups. The DIR and System files (as far as I'm aware - and I'll be saying that a lot) are relatively unimportant. I'd assume they just tell the PS2 where to look. Z_ADX is just full of BGMs and VA work, cool, but not what I'm looking for. MODULE I believe is how controllers and the such are handled? AFS_DATA is where I believe the model information is stored. There are a few TM2 Files which I've been able to look at but most of them are rather useless, such as Compressed Character Portraits and the such. They hold quite a few .bin files too, however they are labelled as "hit_set" "atk" and so on, which makes me think those are sound effects. I assume the rest of the .bin files are textures for the Mobile Suits themselves. There are many .pmf .ptx .slw .snd and .pzz files in between too, all of which I've had a hard time looking through, or even figuring out what they are meant to be (I saw someone made a plugin for blender that reads these .pzz files which is unfortunately unavailable). Well then, that leaves me with the SLUS file. an ELF file which I can get a good idea of what I'm looking at most of the time. The main SLUS ELF file holds quite a few string names. Most notably, all of the strings of the Mobile Suits Names. The Issue here is, they all appear to be linked to just the Gallery mode. Their previous game; Federation Vs Zeon, lacked this Gallery mode and what would you know? These strings are not there. I'm having a seriously hard time even finding the true Display Names for these mobile suits. I've been able to find elements which call in animations for Ground, Jumping etc. Attacks, but nothing more substantial. The game contains things like tanks, aircraft, battleships and the like which only the AI can pilot, and even if that is a game restriction, being able to spawn them in versus mode would be a lot of fun. A big thing is that the game also limits these Units (as per the lore) from fighting in certain conditions. For instance, a Ground based unit can't fight in Space, makes sense but this is a game, and it would be fun to change that. I'm aware there's probably custom animations provided to these space going units however they are seen fighting on Low Gravity asteroids and Lunar Surfaces, in which case they share the exact same animations as if on Ground, just a touch slowed down. Changing the cost of each Unit, damage each weapon does, so on so forth is something I'd love to do. I've spent over a week scrolling through each line of that ELF File to make sure I didn't waste anyone's time but I am seriously struggling here. The true end goal would be to be able to produce duplicates of Unit with different paintschemes and the such yet I'm struggling at even finding a link between models and so forth. Any help would be greatly appreciated. SLUS_208.rar
-
Hello, I believe this is a good place to have this topic, anyways, I want to know how I can extract the models from the following 3 games: Monster Rancher 3 (2001), Monster Rancher 4 (2003), and Monster Rancher EVO (2006 in the states, 2005 in Japan). These 3 games are for the PS2 console, and I want to know how to open the .dat files of these 3 games. I'm willing to accept your wisdom, provided that you know what you are teaching me. I thank you in advance, and I also provided 3 screenshots, one for each of the 3 games, and all of them are Monster Rancher related.
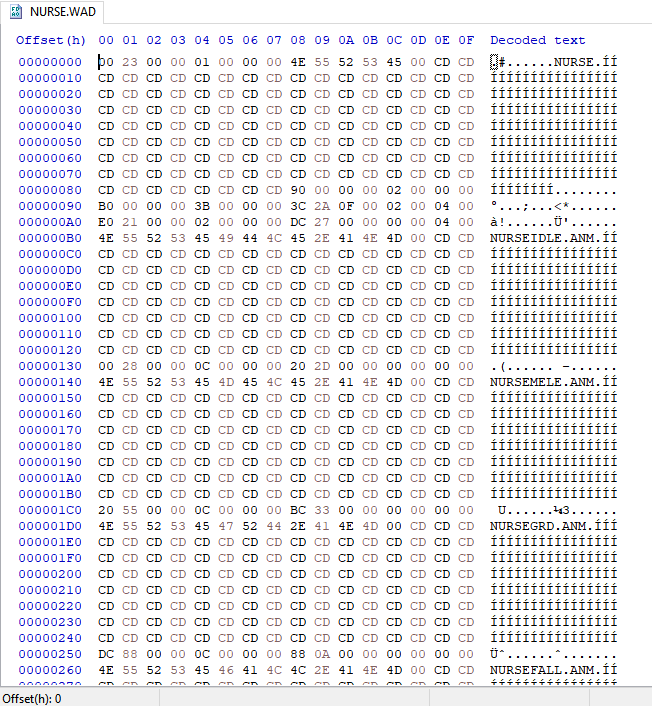
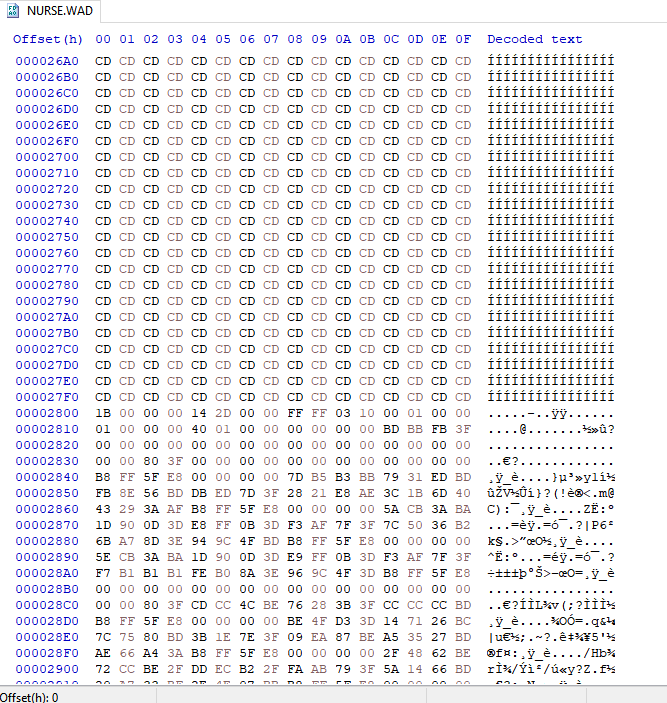
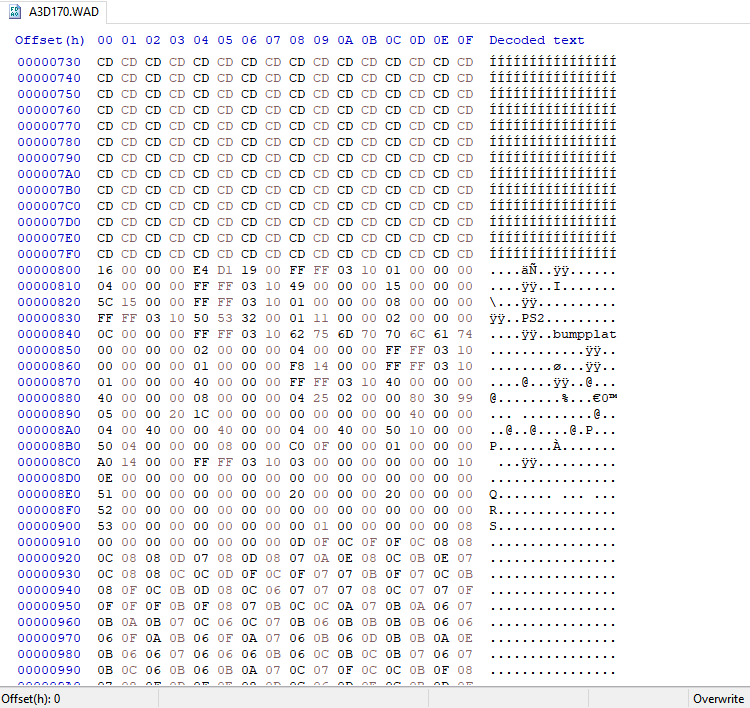
-
Greetings everyone, Some of you might be aware that a prototype build of the cancelled Ps2 game Fear Effect 3 Inferno has been made publicly available by Sega Dreamcast Info. I have recently started to dig through the game's .WAD files, in hopes of finding more leftover content that is not accessible through normal gameplay. This might be helpful to get a better understanding of how far the Devs actually got and, (with a lot of wishful thinking) open up the possibility, for people with the right kind of expertise to build upon this vertical slice of the game. Since the game is running on the, back in the day, very popular Renderware Engine, I am more than confident that some of you fine folks will be able to crack this one. As a first approach, I started with the PCSX2 0.9.8 Texmod Method, which allows you to capture the game's geometry and textures through PCSX. While being quite an awesome tool if you want to do some 3D modelling, this method only enables you to grab assets that are actually loaded in during gameplay. Therefore, you won't find anything that you haven't already seen when playing the game normally. So no new discoveries on that front. My next intuition was to use some of the tools that have been developed for other Renderware titles such as GTA: San Andreas or Sonic Heroes. It seems that in terms of file structure, the game is built quite similar to the Ps2 Version of Rockstar's The Warriors. With Nick7's Warriors Texture Exporter I have been able to extract all the TXD files found within the Prototype build, which is already quite the win. Nevertheless, these .WAD archives contain quite a few more things that are worth extracting: Mainly the game's 3D models (.DFF), animations (.ANM) and Level Geometry (.BSP). The game's audio files might also be stored in here, but since Sega Dreamcast Info stated that the developers created a custom Playstation 2 audio module for the game, I doubt that these will be of much use for now. In that regard, it should be mentioned that no other Renderware or Game Extractor Tool, that I came across yielded any kind of usable results. This is likely due to the fact that, for some reason, Fear Effect 3 Inferno does not seem to rely on a .dir file to structure its contents. Furthermore, the nomenclature .WAD can refer to a multitude of different archive systems with absolutely no internal similarities. So no Source Engine, Id Tech or otherwise common WAD Extractors were able to produce anything from these .WAD files. Since no directory based Tool was able to decrypt these .WAD files, the only viable option I see now is to use a program like QuickBMS and extract the files based on their hexadecimal properties. While there are thousands of BMS scripts out there, none of the ones made for WAD extraction or Renderware games were able to get anything substantial from these WADs. The only BMS script that came close was mx_simulator.bms which managed to pull some of the file names but none of the corresponding data. And this brings me to the current state of this project: Having to figure out how to write a BMS script specifically for Fear Effect 3 Inferno. Naturally, I tried to follow the tutorial provided Struggleton! but this didn't get me very far. As you can hopefully see with these two examples, the WADs seem to begin with a listing of all the files they contain. The actual data of the files appears to be located much further down in the Hex table. Therefore, I have no idea where I should even begin to search for indicators or how to adress them in the script. If anyone here in the forum is able to help me out on this one, it would be very much appreciated. You can find all of the game's .WAD archives and the BMS scripts that yielded at least some kind of readable result down here: BMS Scripts.7z WAD.7z
-
 I want to rip from a game released only in Japan on PS2 called "Jigoku Shoujo Mioyosuga" developed by Compile Heart. More info for curious people on the game or franchise : https://en.wikipedia.org/wiki/Hell_Girl#Video_games or https://gamefaqs.gamespot.com/ps2/961167-jigoku-shoujo-mioyosuga I've extracted the files from the game and it seems most of the game data is stored in .PTD archives (other files are .PSS that are movies files). There are 11 PTD files and I don't know if they are encrypted or compressed. What I've noticed is that it seems there is a file index table named "PTDALL.PID" which seems to contain the location of files and data but I'm not very familiar with it so I'm not sure. Maybe with some bms script it will be possible to extract everything so thanks for the people that will be able to do this. Download link of the files : https://drive.google.com/file/d/1IIgGjkqZBM__VNdzehLaWAFwmuNUGckl/view?usp=sharing. The PTD files are in the DATA folder.
 -
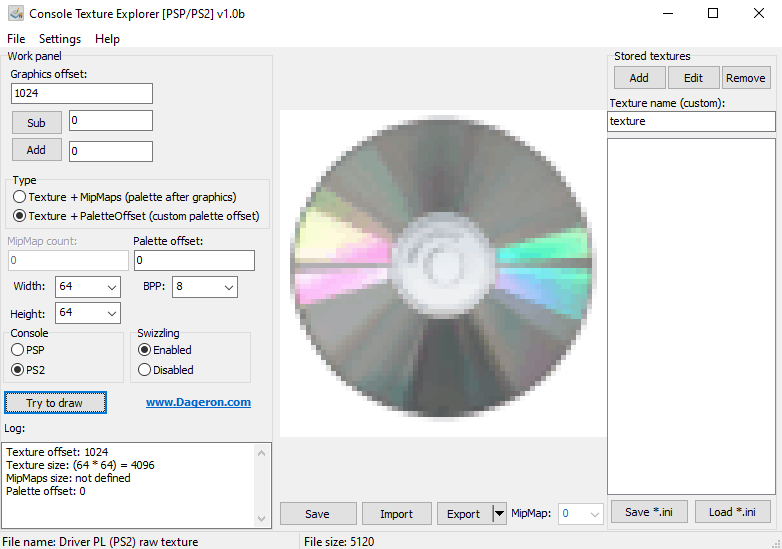
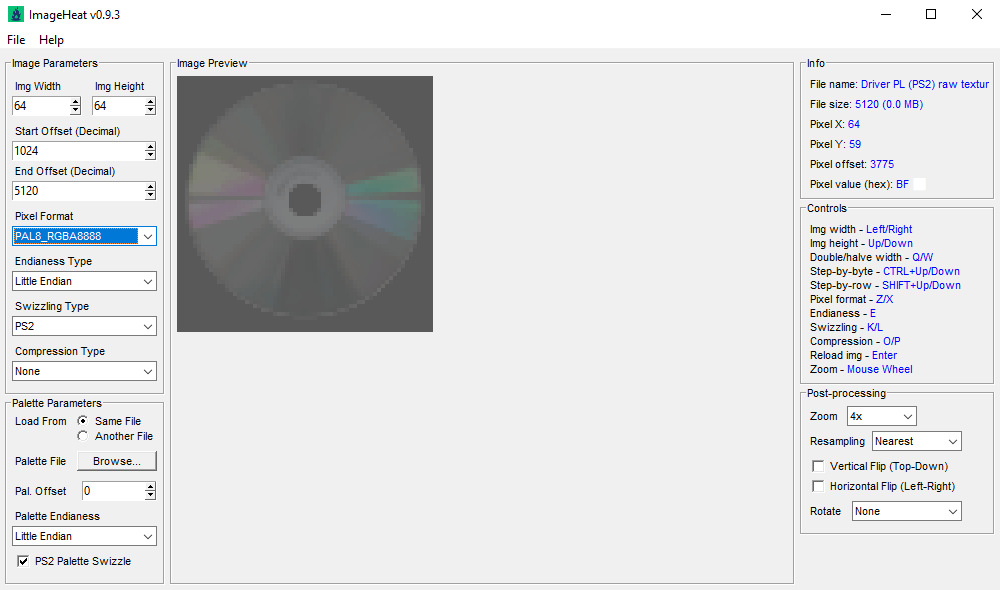
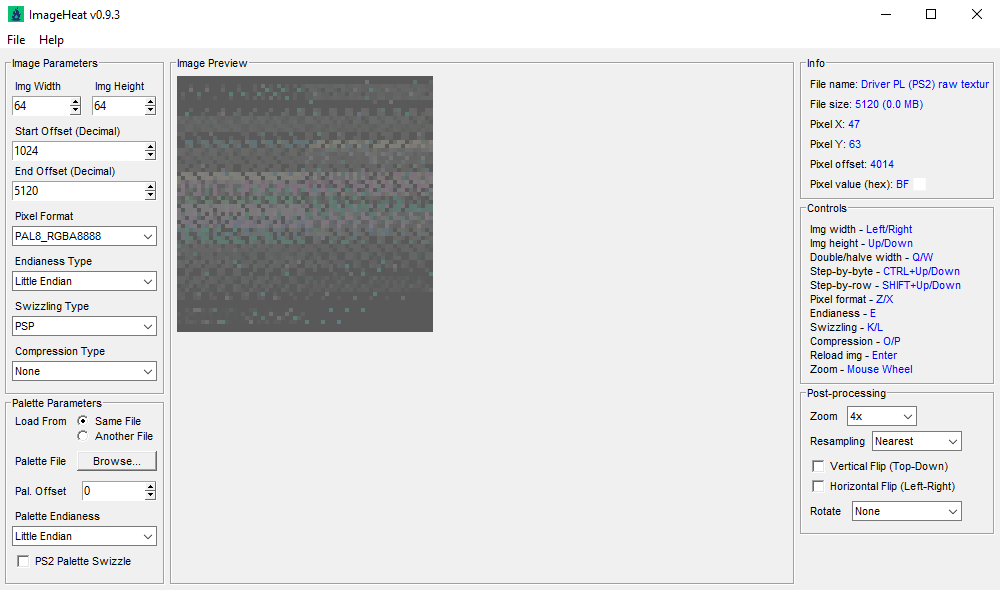
 Hello everyone, I am new here and would like to introduce myself a little bit before going to the main part of the topic. In October last year I started a project with disassembling a PS2 game called Driver Parallel Lines and a little bit later the prequel of it, a PSP game called Driver 76. As a person with basically no prior experience in doing things like these, the start was difficult for me, but because I am really interested in turning my idea into reality, I invested really much time in this project, and learned interesting and possibly important things. I also tried out many cool programs for modifying/working with different kinds of files. Since I found my way to the raw textures my current main goal is to modify the Textures from Driver Parallel Lines (PS2) so they get displayed correctly in Driver 76 (PSP). Why do I think inserting these textures from a PS2 into PSP should work?? Because these two games are basically the same and use many same textures, Driver 76 runs fine with these textures (I tried it out), but they don't look how they should, that's why I assume the keyword of this topic might be Swizzling? The main part of this topic I started with the easiest part, which in my opinion is the HUD. This is how the stock Hud looks in Driver 76: At first I would like to describe the whole picture of this Topic to understand what is what. Driver Parallel Lines (PS2) has two eras in it's gameplay, the year 1978 and the year 2006, both eras have it's unique textures, including two types of the HUD. At first I tried the easiest what I could imagine, just effortlessly pasting the 1978 HUD files [a .gfx file (the textures) and a .bin file (the function/moving elements of the HUD)] into Driver 76, and this is how it looked: Not what I expected, but hey, the PS2 .bin file of the 1978 HUD works fine on the PSP, I can see how the speedometer works, the mileage changes, and also the health bar works fine, which now acts like in Driver Parallel Lines. A little bit later I noticed something very interesting. Since Driver 76 has only one era (the year 1976) not two eras like in Parallel Lines (1978 and 2006), it logically should only have the HUD files for 1976, but for some reason it has the files for 1976 and for 2006! I thought this is very good, because this gives a big opportunity to directly compare the PSP version with the PS2 version of the exact same files, which might help to understand the differences. Since I discovered this, I definitely had to try out both files of the 2006 HUD, the PSP version and the PS2 version. The .bin file doesn't work for some reason, I assume it might be directly bound with the 2006 stuff which is not present here, but the function is not important now, since I am aiming to find a solution for the graphical part. Here are the screenshots of both versions: 2006 HUD PSP file from Driver 76 2006 HUD PS2 File from Driver Parallel Lines I think this is enough to understand what the trouble currently is, that's why I will continue with the results which I was able to find, when comparing + analysing these files and trying to modify the PS2 file. As an example, I decided to work with the texture of the ingame loading icon (a CD), which looks like this in both games: Here are the texture files:Texture files.zip Basic info about this CD texture: -Both textures are exactly the same and are used for the same purpose in both games on both platforms. -Size and offsets are for both files identical -Total file size: 5120 Bytes -Palette offset: -(DEC): 0-1024 -(HEX): 0-400 -Graphics/Texture offset: -(DEC): 1024-5120 -(HEX): 400-1400 -Raw Texture size (without palette): - 4096 Bytes The differences which I noticed: *When viewing in HxD* -Palette only: First & Last two lines are identical, everything between becomes reordered like this: 1->3 2->4 3->1 4->2 identical<->identical identical<->identical identical<->identical identical<->identical 1->3 2->4 3->1 4->2 And so on... Screenshot of the comparison with the differences that I found: I think that this is not a big problem, because the situation of the palette seems to be very understandable, so I would just reorder these lines by using this example of the comparison of these 2 files. If this is necessary of course. *When viewing in HxD* -Graphic/Texture only: The Graphic's/Texture's code is completely different, it seems that only the beginning and the end of the code may look somehow similar (but not identical), but it looks like there's no way to find a logical difference between these two, so that's it with HxD, let's continue with the visual part. Screenshots of the Graphic's/Texture's code: Beginning of the code: End of the code: A cool program which I found on this forum called Console Texture Explorer, by Dageron, gave me the opportunity to view textures the way how they would be displayed on PS2 and also on PSP, by ticking the needed console, this saves much time, no need to rebuild the game to see the result if changes are made. Here is an example to simulate the same result which I described earlier with ingame screenshots: PS2 Texture with PS2 Console option tick: PS2 Texture with PSP Console option tick: And the PSP texture with PSP Console option tick: I think this acts as a perfect example that these textures are exactly the same, but the way both consoles display these textures is different. I assume that the PS2 swizzles textures with it's own technique, and the PSP swizzles with it's own technique, is this correct? Or did I understand this wrong? After weeks of unsuccessful attempts to understand what exactly the displaying difference is, I decided to look again for similiar programs today and I was able to find a very powerful cool program which was posted on this forum called ImageHeat by the moderator ikskoks, as far as I understood who is the developer of this program. I would like to say thank you very much for creating this cool program, I like it, there are many many functions. After playing around with ImageHeat, I think I finally understood that my problem has something to do with swizzling. Here is my latest result with this texture + what I did First a screenshot in ImageHeat of the texture displayed correctly: Then I changed the Swizzling Type to PSP, and turned off PS2 Palette Swizzle: This is also how I saved the texture, by pressing Save Raw Data This is the result: All 3 pictures where simulated in Console Texture Explorer, first picture is an example, and the last two pictures where simulated with PSP option ticked. This is how it should look like: This is how it looked: And this what I was able to achieve with ImageHeat after saving with PSP Swizzling type: After weeks of understanding nothing, I think this already something. Unfortunately I still didn't achieve my goal, but it looks like the end result is halfway done/displayed correctly. This is the end of this long post, thank you to everyone who took his/her time to read everything. I would be really happy and thankful if someone could point me in the right direction, or tell me what the issue is. Maybe even the developer of ImageHeat sees this post who has a really good understanding based on his awesome program. This is my first post on this site, I hope i chose the correct forum (Graphic file formats), If not I apologize for this.
-
 Hi everyone! I recently extracted Midnight Club 2's textures as I am looking to experiment with creating a HD texture pack (which does not exist today). Most of the files are .TEX, with a few .IPU and .PAL files and one .OUT file. However, I have tried several different programs to convert the .TEX files to PNGs in order to upscale them properly, without much luck. ScarletConvert doesn't recognize the tex, Rainbow doesn't support tex files, TextureFinder 1.3.2 opens up a weird image with distorted colors, and TextureFinder 2.1 may be a virus based on VirusTotal and my W11 PC literally stopping me from opening the file. In addition, there are also IPU, OUT, and PAL files in the directory for seemingly larger assets. Can I get some assistance with this problem? Thank you, and have a great day!
 -
I'm currently in the early steps of a translation project for Tokimeki Memorial 3: Yakusoku No Ano Basho De. Right now I am making a tool for extracting the game's script. I have extracted the file system from the .iso. It has five .BIN files which contain all of the game's assets. At first I extracted text from Data5.BIN, as it contained uncompressed text that simply needed to be filtered from the other data. This text is almost exclusively for menus, which means the dialogue must be stored in the other .BIN files. When viewed in a hex editor, it becomes clear that the other data files (Data1.BIN - Data4.BIN) contain a large amount of compressed files with the header ATP. I know some of these contain dialog, because I can see scattered bits of Shift-JIS strings, some of which line up with dialogue I've seen in-game. Using a combination of the PCSX2 debugger and Ghidra I was able to identify where the compressed files are stored in memory when they are loaded off the disk and the function that is responsible for decompressing them. I've recreated this function in my toolset and it runs/exits without crashing but I don't think the decompression is working. It seems to have the following issues: Sometimes there are no changes between the compressed and "decompressed" ATP file (it's possible that this means the file's content was never actually compressed to begin with) Oftentimes the strings appear more jumped in the "decompressed" version than the compressed version. It doesn't stop when it needs to, running into the next ATP file and stopping halfway through "decompressing" that. Here's the assembly function taken from the PCSX2 disassembler: lbu a3,0x0(a0) addiu a0,a0,0x1 daddu t1,a1,zero addiu t0,zero,0x8 bne t0,zero,0x001E93F8 andi v0,a3,0x0001 lbu a3,0x0(a0) addiu a0,a0,0x1 addiu t0,zero,0x8 andi v0,a3,0x0001 bne v0,zero,0x001E9418 addiu t0,t0,-0x1 lbu v0,0x0(a0) addiu a0,a0,0x1 srl a3,a3,0x01 sb v0,0x0(a1) beq zero,zero,0x001E93E0 addiu a1,a1,0x1 bne t0,zero,0x001E942C srl a3,a3,0x01 lbu a3,0x0(a0) addiu a0,a0,0x1 addiu t0,zero,0x8 andi v0,a3,0x0001 beql v0,zero,0x001E9498 lbu v0,0x0(a0) addiu t0,t0,-0x1 bne t0,zero,0x001E9450 srl a3,a3,0x01 lbu a3,0x0(a0) addiu a0,a0,0x1 addiu t0,zero,0x8 andi v0,a3,0x0001 srl a3,a3,0x01 addiu t0,t0,-0x1 bne t0,zero,0x001E9470 sll a2,v0,0x01 lbu a3,0x0(a0) addiu a0,a0,0x1 addiu t0,zero,0x8 andi v0,a3,0x0001 srl a3,a3,0x01 lbu v1,0x0(a0) addiu a0,a0,0x1 addu v0,a2,v0 addiu t0,t0,-0x1 bne v1,zero,0x001E94E0 addiu a2,v0,0x2 beq zero,zero,0x001E94E0 addiu v1,zero,0x100 addiu a0,a0,0x1 lbu v1,0x0(a0) addiu a0,a0,0x1 sll v0,v0,0x08 srl a3,a3,0x01 or v1,v0,v1 beq v1,zero,0x001E9510 addiu t0,t0,-0x1 andi a2,v1,0x000F beq a2,zero,0x001E94D0 addiu a2,a2,0x2 beq zero,zero,0x001E94E0 srl v1,v1,0x04 nop lbu v0,0x0(a0) addiu a0,a0,0x1 srl v1,v1,0x04 addiu a2,v0,0x1 beq a2,zero,0x001E93E0 subu v1,a1,v1 lbu v0,0x0(v1) addiu v1,v1,0x1 addiu a2,a2,-0x1 sb v0,0x0(a1) nop bne a2,zero,0x001E94E8 addiu a1,a1,0x1 beq zero,zero,0x001E93E0 nop nop jr ra subu v0,a1,t1 and here's my attempt to recreate it for my tool set . I apologize in advance for the poor readability public static void DecodeATP(int startAddress, byte[] byteArray, String outputPath) { //Note to self: when implementing this, use integers that refer to indexes on the array as "pointers" //Use labels and gotos for the parts byte[] destination = new byte[byteArray.Length]; uint sourcePointer = (uint) startAddress + 8; //a0 in the assembly, skips 8 to avoid the ATP file header //set up a few variables to take the place of some registers in the original assembly uint v0 = 0x0; uint v1 = 0x0; uint a2 = 0x0; byte previousByte = byteArray[sourcePointer]; sourcePointer++; uint destinationPointer = 0; uint counter = 8; byte buffer; Part1: //Part1 v0 = (byte)(previousByte & 0x1); if (counter == 0) { previousByte = byteArray[sourcePointer]; sourcePointer++; counter = 8; } else { goto Part2; } Part2: //Part2 counter--; if (v0 == 0x0) { buffer = byteArray[sourcePointer]; sourcePointer++; previousByte = (byte)(previousByte >> 0x1); destination[destinationPointer] = buffer; destinationPointer++; goto Part1; } else { goto Part3; } Part3: //Part3 previousByte = (byte)(previousByte >> 0x1); if (counter == 0) { previousByte = byteArray[sourcePointer]; sourcePointer++; counter = 8; } else { goto Part4; } Part4: //Part4 v0 = (byte)(previousByte & 0x1); v0 = byteArray[sourcePointer]; if (v0 == 0x0) { goto Part7; } else { counter--; previousByte = (byte)(previousByte >> 0x1); if (counter != 0){ goto Part5; } previousByte = byteArray[sourcePointer]; sourcePointer++; counter = 8; goto Part5; } Part5: //Part5 v0 = (byte)(previousByte & 0x1); previousByte = (byte)(previousByte >> 0x1); counter--; a2 = (byte)(v0 << 0x1); if (counter != 0) { goto Part6; } else { previousByte = byteArray[sourcePointer]; sourcePointer++; counter = 8; goto Part6; } Part6: //Part6 v0 = (byte)(previousByte & 0x1); previousByte = (byte)(previousByte >> 0x1); v1 = byteArray[sourcePointer]; sourcePointer++; v0 = (byte)(a2 + v0); counter--; a2 = (byte)(v0 + 0x2); if (v1 == 0) { v1 = 0x100; } goto Part9; Part7: //Part7 sourcePointer++; v1 = byteArray[sourcePointer]; sourcePointer++; v0 = (byte)(v0 << 8); previousByte = (byte)(previousByte >> 0x1); v1 = (byte)(v0 | v1); counter--; if (v1 == 0x0) { goto Part11; } else { a2 = (byte)(v1 & 0xf); a2 = a2 + 0x2; if(a2 == 0x0) { goto Part8; } else { v1 = (v1 >> 0x4); goto Part9; } } Part8: //Part8 v0 = byteArray[sourcePointer]; sourcePointer++; v1 = (byte)(v1 >> 4); a2 = (byte)(v0 + 1); goto Part9; Part9: //Part9 v1 = (byte)(destinationPointer - v1); if (a2 == 0) { goto Part1; } else { goto Part10; } Part10: //Part10 v0 = byteArray[v1]; v1++; a2--; destination[destinationPointer] = (byte)v0; destinationPointer++; if (a2 != 0x0) { goto Part10; } else { goto Part1; } Part11: destination = SubArray(0, (int)destinationPointer, byteArray); File.WriteAllBytes(outputPath, destination); return; } Could anyone help me identify where the problem is?
-
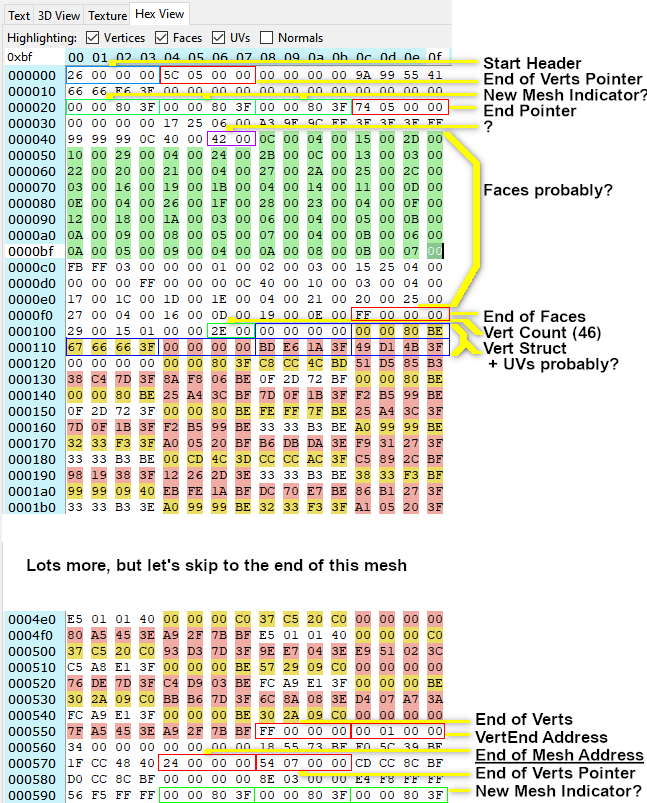
Hi all - I've been obsessed with this little game for a very, very long time, and I'm trying to learn the file structures to try to make it work. I've got the files broken out into the different formats from the disk, and I've pretty confidently identified the .md model files. The mesh files themselves I'm exploring with ModelResearcherPro, and this is what I've come up with so far. most models have multiple meshes embedded, and there's some things I have and some things I haven't figured out yet. I'm using the attached GSG03.MD as the example model, which Iam pretty sure is a robot broken into multiple bits. (There are some models for like a map model, and it's broadly similar.) File Start: Little Endian First long 26 00 00 00 Mesh Start 7x long or floats of header - this is different for each file, but very consistent in length. First long is an address pointer to the end of the vert section, 4 bytes after the vert end marker. Then 6 other ones? Next is what I'm calling a New Mesh Indicator, but probably has some other function: 3x 00 00 80 3F (read as 1.0 as a float?) Next long is the address pointer to the of end of the mesh total (eg. 74 05 00 00 -> 0x0574) then a null long, then a set of bytes that are a consistent header within the file but I haven't sorted them out yet (eg: 17 25 06 00 A3 9E 9C FF 3F 3F 3F FF 99 99 99 0C 40 00) (somewhat consistent between files, at least the same header format, read as: 17 25 06 00 XX XX XX XX XX XX XX XX XX XX XX XX XX XX. ) Then an unsigned int short for....something? doesn't seem to line up with number of faces, or a pointer, or anything like that, but it changes for each mesh in the file. It's bigger than the vertex count, but that's about all I know. Maybe a total number of objects to process, and you subtract out the verts? Then a mix of triangular faces and normals, maybe? Triangular Faces using unsigned int shorts as vertex identifiers (I think), and probably normal vectors? Not really sure how to break through this, the faces don't really align with anything resembling sensible geometry. Also, there's periodically very large shorts, like FB FF, that break the vert indexing. They one's complement into somewhat sensible vertex indices, but no other rhyme or reason as far as I can tell, and I don't know how to do that automatically. At the end of the faces section, there's a long of FF 00 00 00, which I think is an end marker. Then another short 29 00, then another short that's different for each mesh, then another null short. Then a Vertex Count Short (unsigned int). This one I'm fairly confident in, and it's reproduceable. Then starts a mix of Verts and UV and maybe something else. I don't really know if this is right, but it makes the address math work out: each point is 6 floats: ??, U?, V?, X, Y, Z. Then after vertex count of verts, another FF 00 00 00 end marker. Next is 6 longs, and the first is the one that the End of Verts pointer addressed Finally either a short and a null short, or a long, but a low int 24 00 00 00, or 36 00 00 00, and is the address of the end of mesh pointer. Maybe it's actually the beginning of the next mesh? Sometimes there's an empty mesh at the beginning or end. Not sure, but they don't have an end of mesh pointer; sometimes they have a few vertexes, sometimes not. I'll get to textures eventually, but I'd really like to figure out what the mesh format is first. Anyhow, thanks for taking a read! I don't really know what I'm doing yet, but I'd really appreciate any guidance you've got on this. GSG03.7z